ParcelFly Documentation: This tab contains the web documentation.
Getting Started
Welcome to ParcelFly
Thank you for choosing ParcelFly - a modern and scalable parcel delivery management solution built with Laravel. It gives you the tools to manage operations, merchants, payments, and delivery workflows from one system.
This documentation is designed to guide developers, administrators, and product owners through ParcelFly's features, installation process, core modules, and customization possibilities. With an intuitive structure, flexible permission systems, and multi-language support, ParcelFly helps you deliver a seamless parcel management experience.
- Manage parcels, merchants, charges, hubs, and delivery teams from one admin system
- Support parcel tracking, coverage management, and charge configuration
- Includes role-based access, multi-language support, and operational reporting
- Built with clean Laravel architecture for scalable delivery operations
Let's begin your journey with an efficient and modern parcel delivery platform.
Name: ParcelFly - Parcel Delivery Management Script (Laravel)
Version: 1.x
Author: BugBuild Labs | Email: [email protected]
Microsoft Teams: [email protected] | WhatsApp: +8801811843300 | Website: https://bugbuild.com
License: Commercial â Single or Extended Use
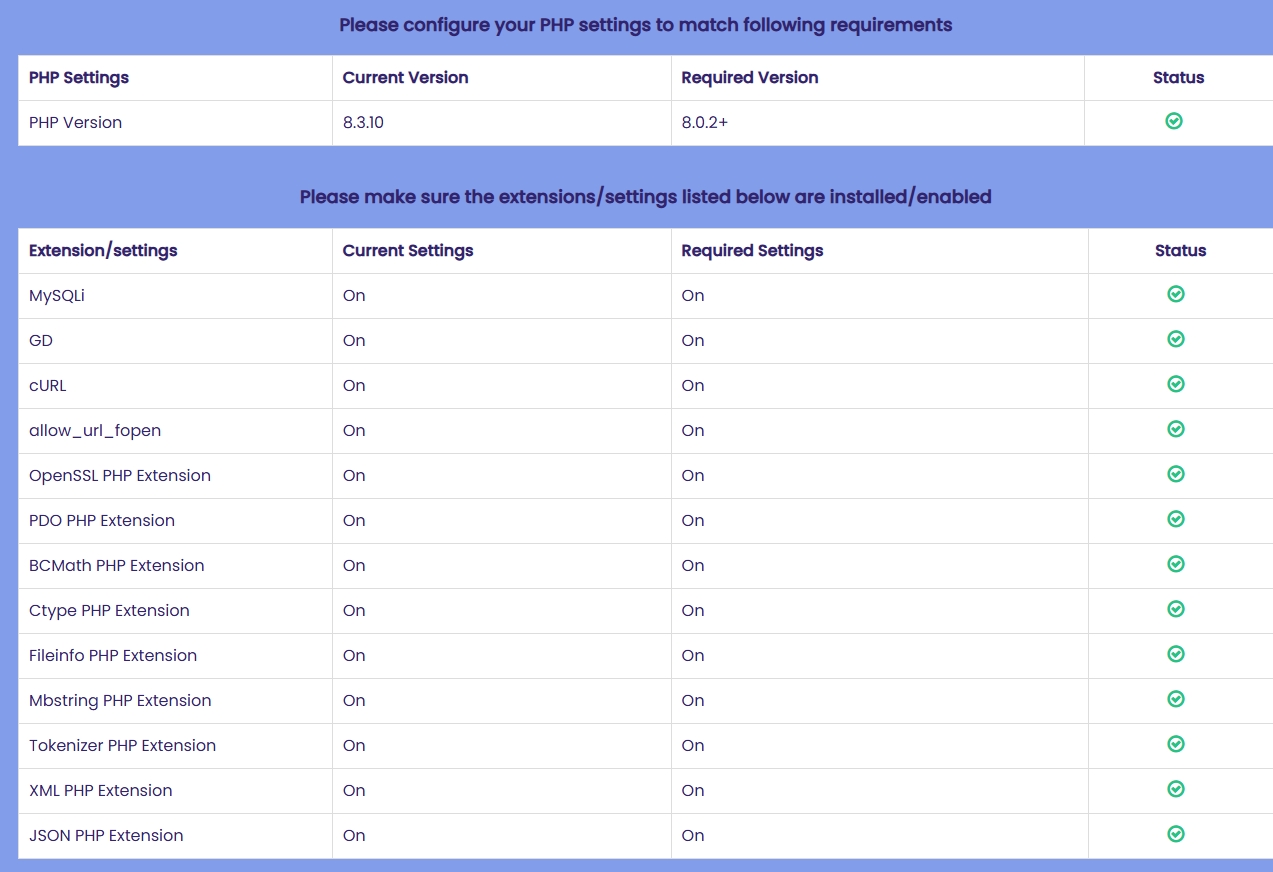
Requirements
Before installing ParcelFly - Parcel Delivery Management Script, confirm that your server meets the following requirements.
PHP Settings:
- PHP Version: 8.1 or higher
Required PHP Extensions:
- MySQLi
- GD
- cURL
- allow_url_fopen
- OpenSSL
- PDO
- BCMath
- Ctype
- Fileinfo
- Mbstring
- Tokenizer
- XML
- JSON
Database Setup (via cPanel)
Follow these steps to create a database in cPanel.
Step 1 â Login to cPanel:
Open your hosting account's cPanel, usually at https://yourdomain.com/cpanel.
Step 2 â Open MySQL® Database Wizard:
From the cPanel dashboard, open MySQL Database Wizard.
Step 3 â Create Database:
Enter a name for your new database and click Next Step.
Step 4 â Create Database User:
Enter a username and a strong password, then click Create User. Save these credentials securely.
Step 5 â Add User to Database:
Select All Privileges to grant full database access, then click Next Step to finish.
â You should now have these ready:
- Database Name
- Database Username
- Password
Upload Files & Set Permissions
Step 1 â Upload Application:
Download Main_Files.zip from CodeCanyon and extract it locally. Inside SourceCode, compress the application files again if needed, upload them to public_html or www, and extract them on the server.
Step 2 â Set Writable Permissions:
Make sure the following folders and files are writable by the web server:
./routes./resources./public./storage./.env
Command (Linux): chmod -R 775 storage routes resources public .env
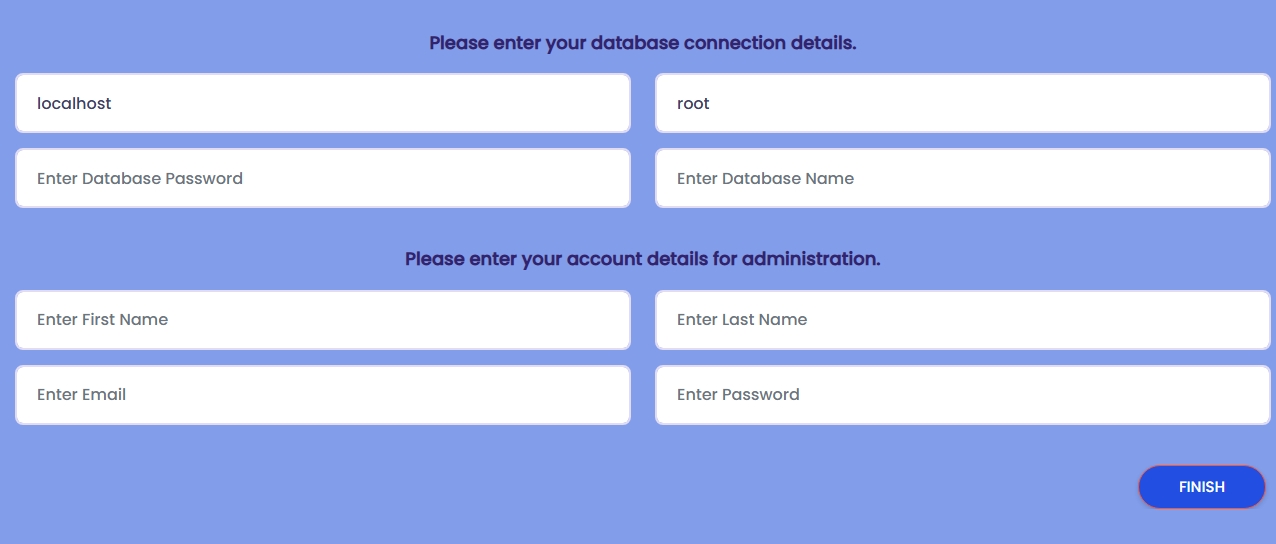
Installation
Follow these steps to install the ParcelFly Laravel application:
1. Launch the Installer:
Open your domain in a browser, for example https://yourdomain.com. The installation wizard will load automatically.
2. Enter Database Configuration:
Enter the database host, usually localhost, then provide the database name, username, and password.
3. Setup Admin Account:
Create the primary administrator account that will be used to access the backend after installation.
first name, last name, email, and a secure password
4. Complete Installation: After completing all required fields and verifying permissions, click FINISH to complete the installation.
Homepage
The ParcelFly homepage is the main public entry point for visitors, merchants, and customers. It highlights the platform, promotes delivery services, and guides users toward the most-used public actions.
- Hero Area: Presents the brand, promotional messaging, and primary call-to-action buttons.
- Service Sections: Highlights delivery features, service benefits, operational strengths, and client-focused content blocks.
- Navigation: Links visitors to login, charges, coverage, blogs, contact pages, and parcel tracking.
This page introduces the ParcelFly brand and directs visitors to the most relevant public workflows.

Homepage Sections
This view shows the extended homepage layout beyond the hero section, including service and company information.
- Operational Highlights: Displays benefits, workflow messaging, and service illustrations.
- Data Presentation: Includes charges, shipment process summaries, client reviews, and FAQ-style sections.
- Marketing Flow: Helps visitors understand ParcelFly before they proceed to login or parcel-related actions.

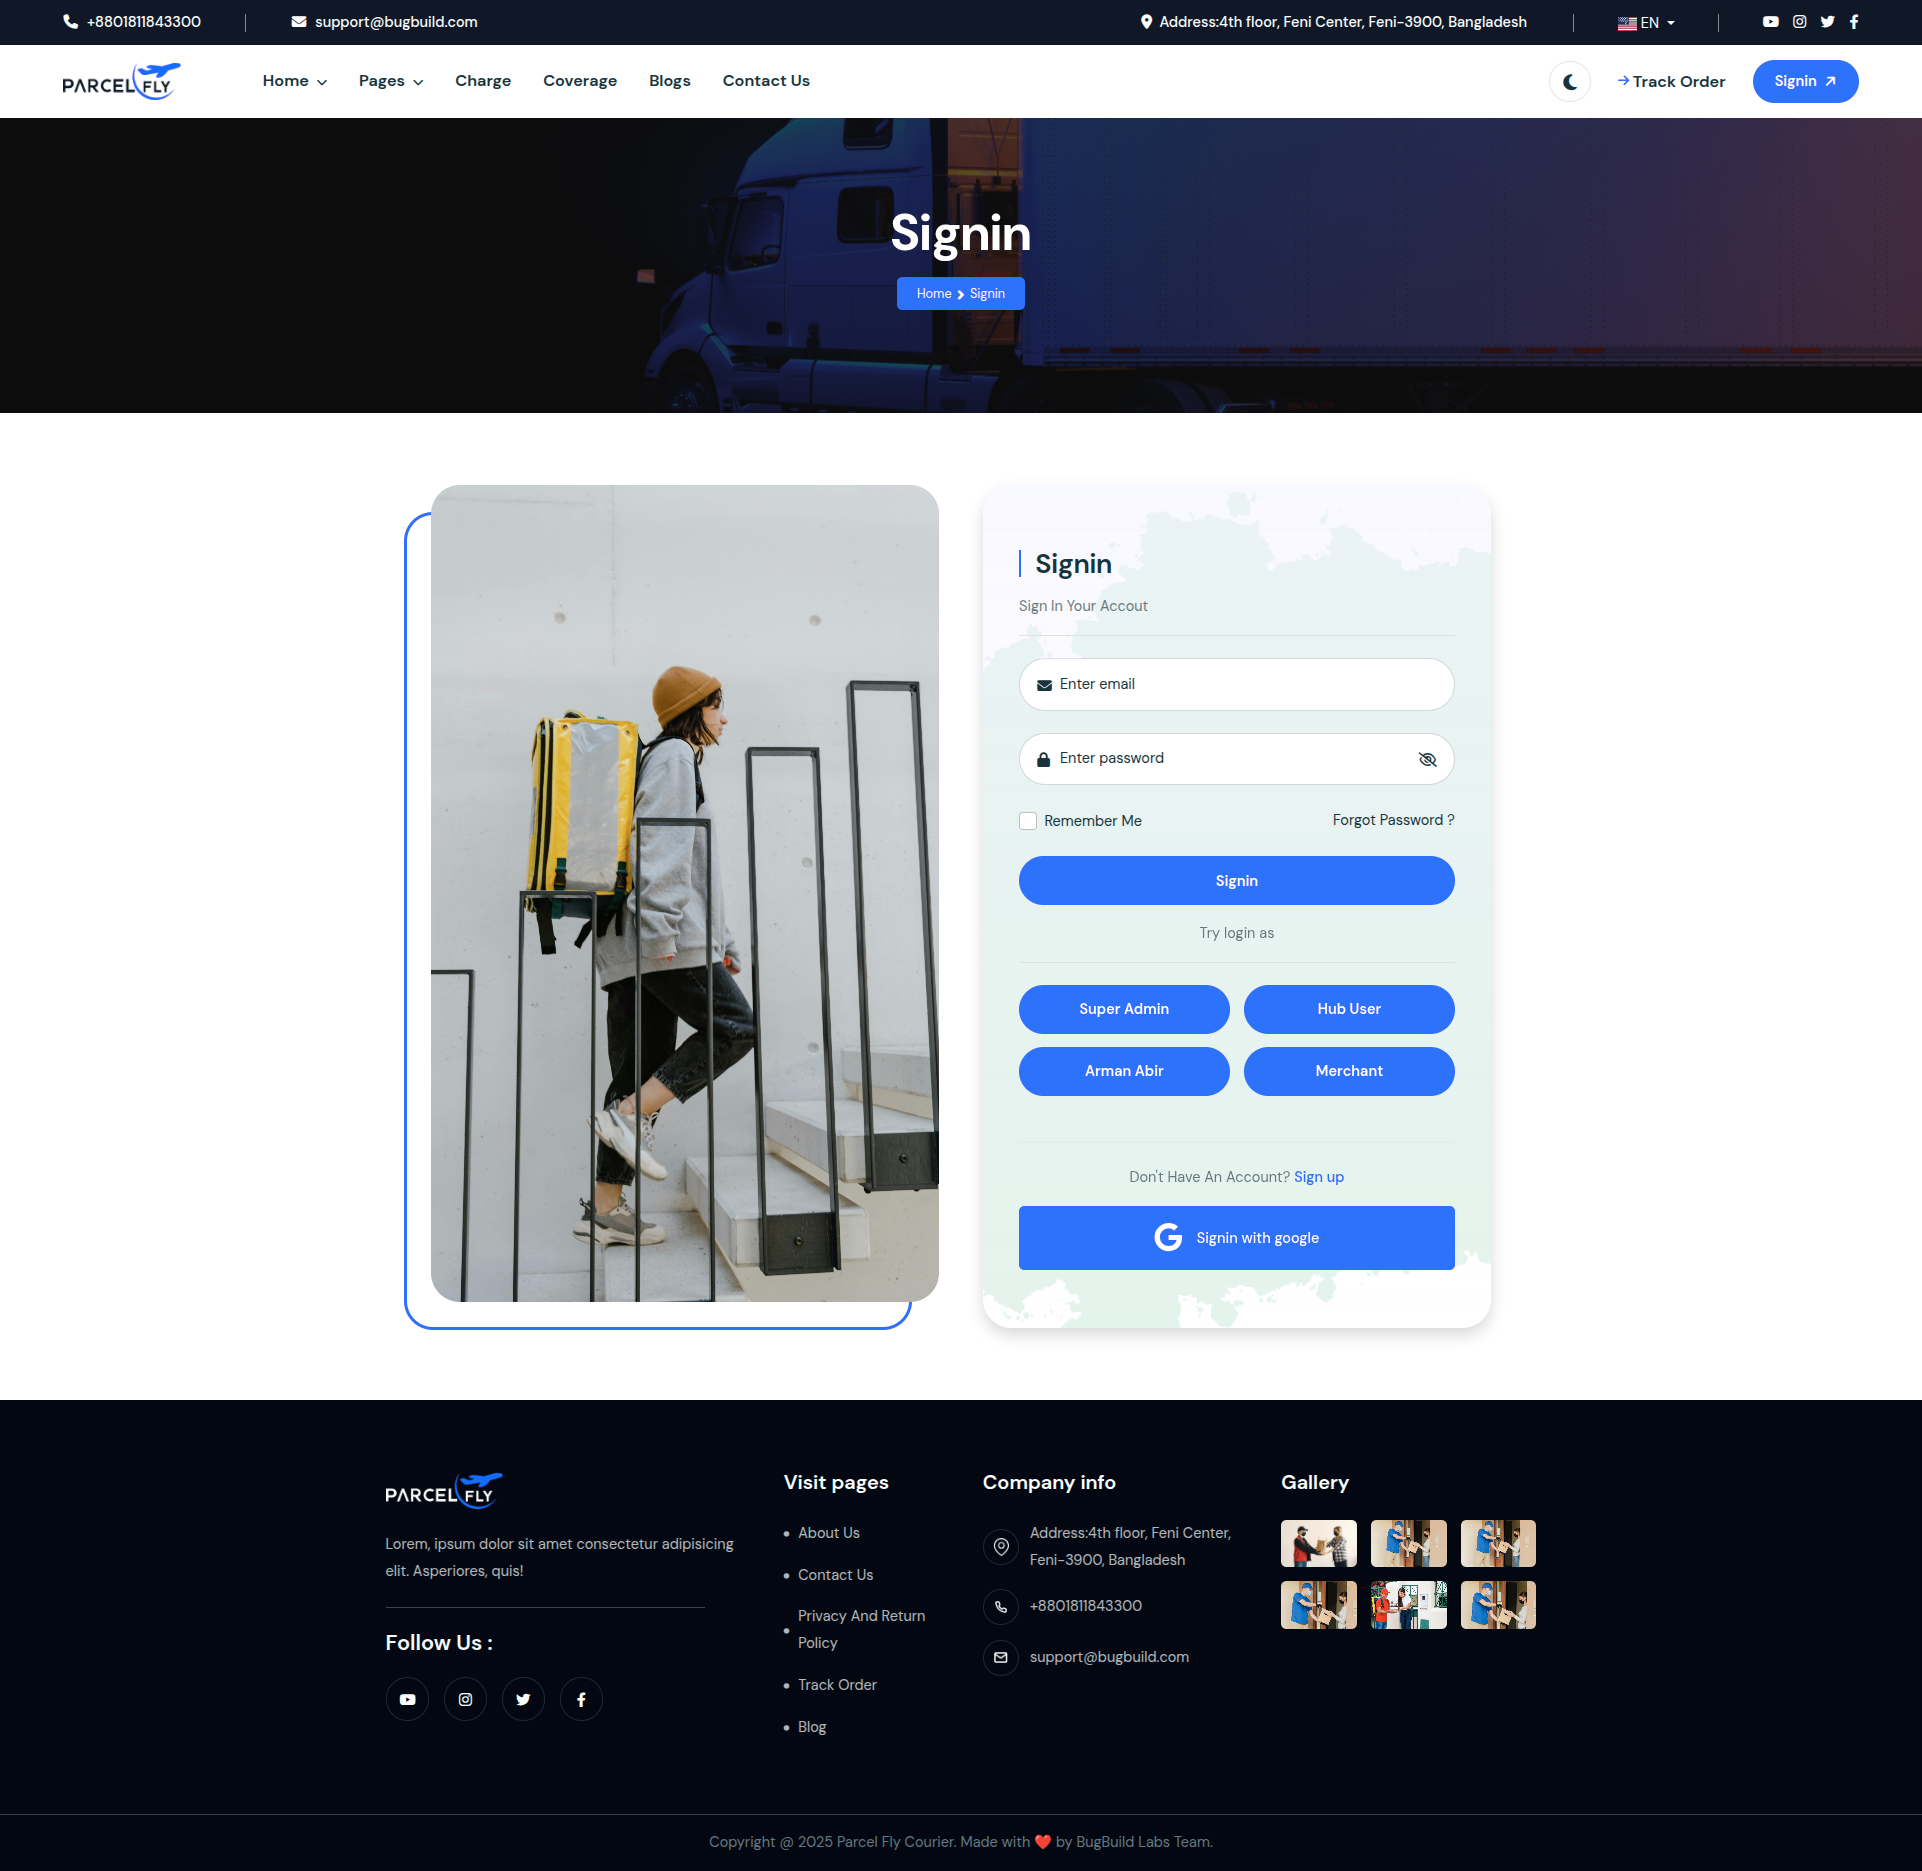
Login
The web login page is used by administrators and internal staff to access the ParcelFly backend.
Step 1: Enter the registered Email Address in the first input field.
Step 2: Enter the account Password. The eye icon can be used to review the password.
Step 3: Click Signin to open the dashboard. The page also provides quick access to the forgot-password flow.
The page supports standard email and password authentication and may also include additional login methods when enabled.
Parcel Tracking
The public tracking page allows customers to check parcel progress without signing in.
- Tracking Input: Customers enter a tracking ID to search for a parcel.
- Parcel Results: The page returns shipment details and delivery progress for the entered parcel.
- Self-service Access: This gives customers a simple self-service tracking experience.
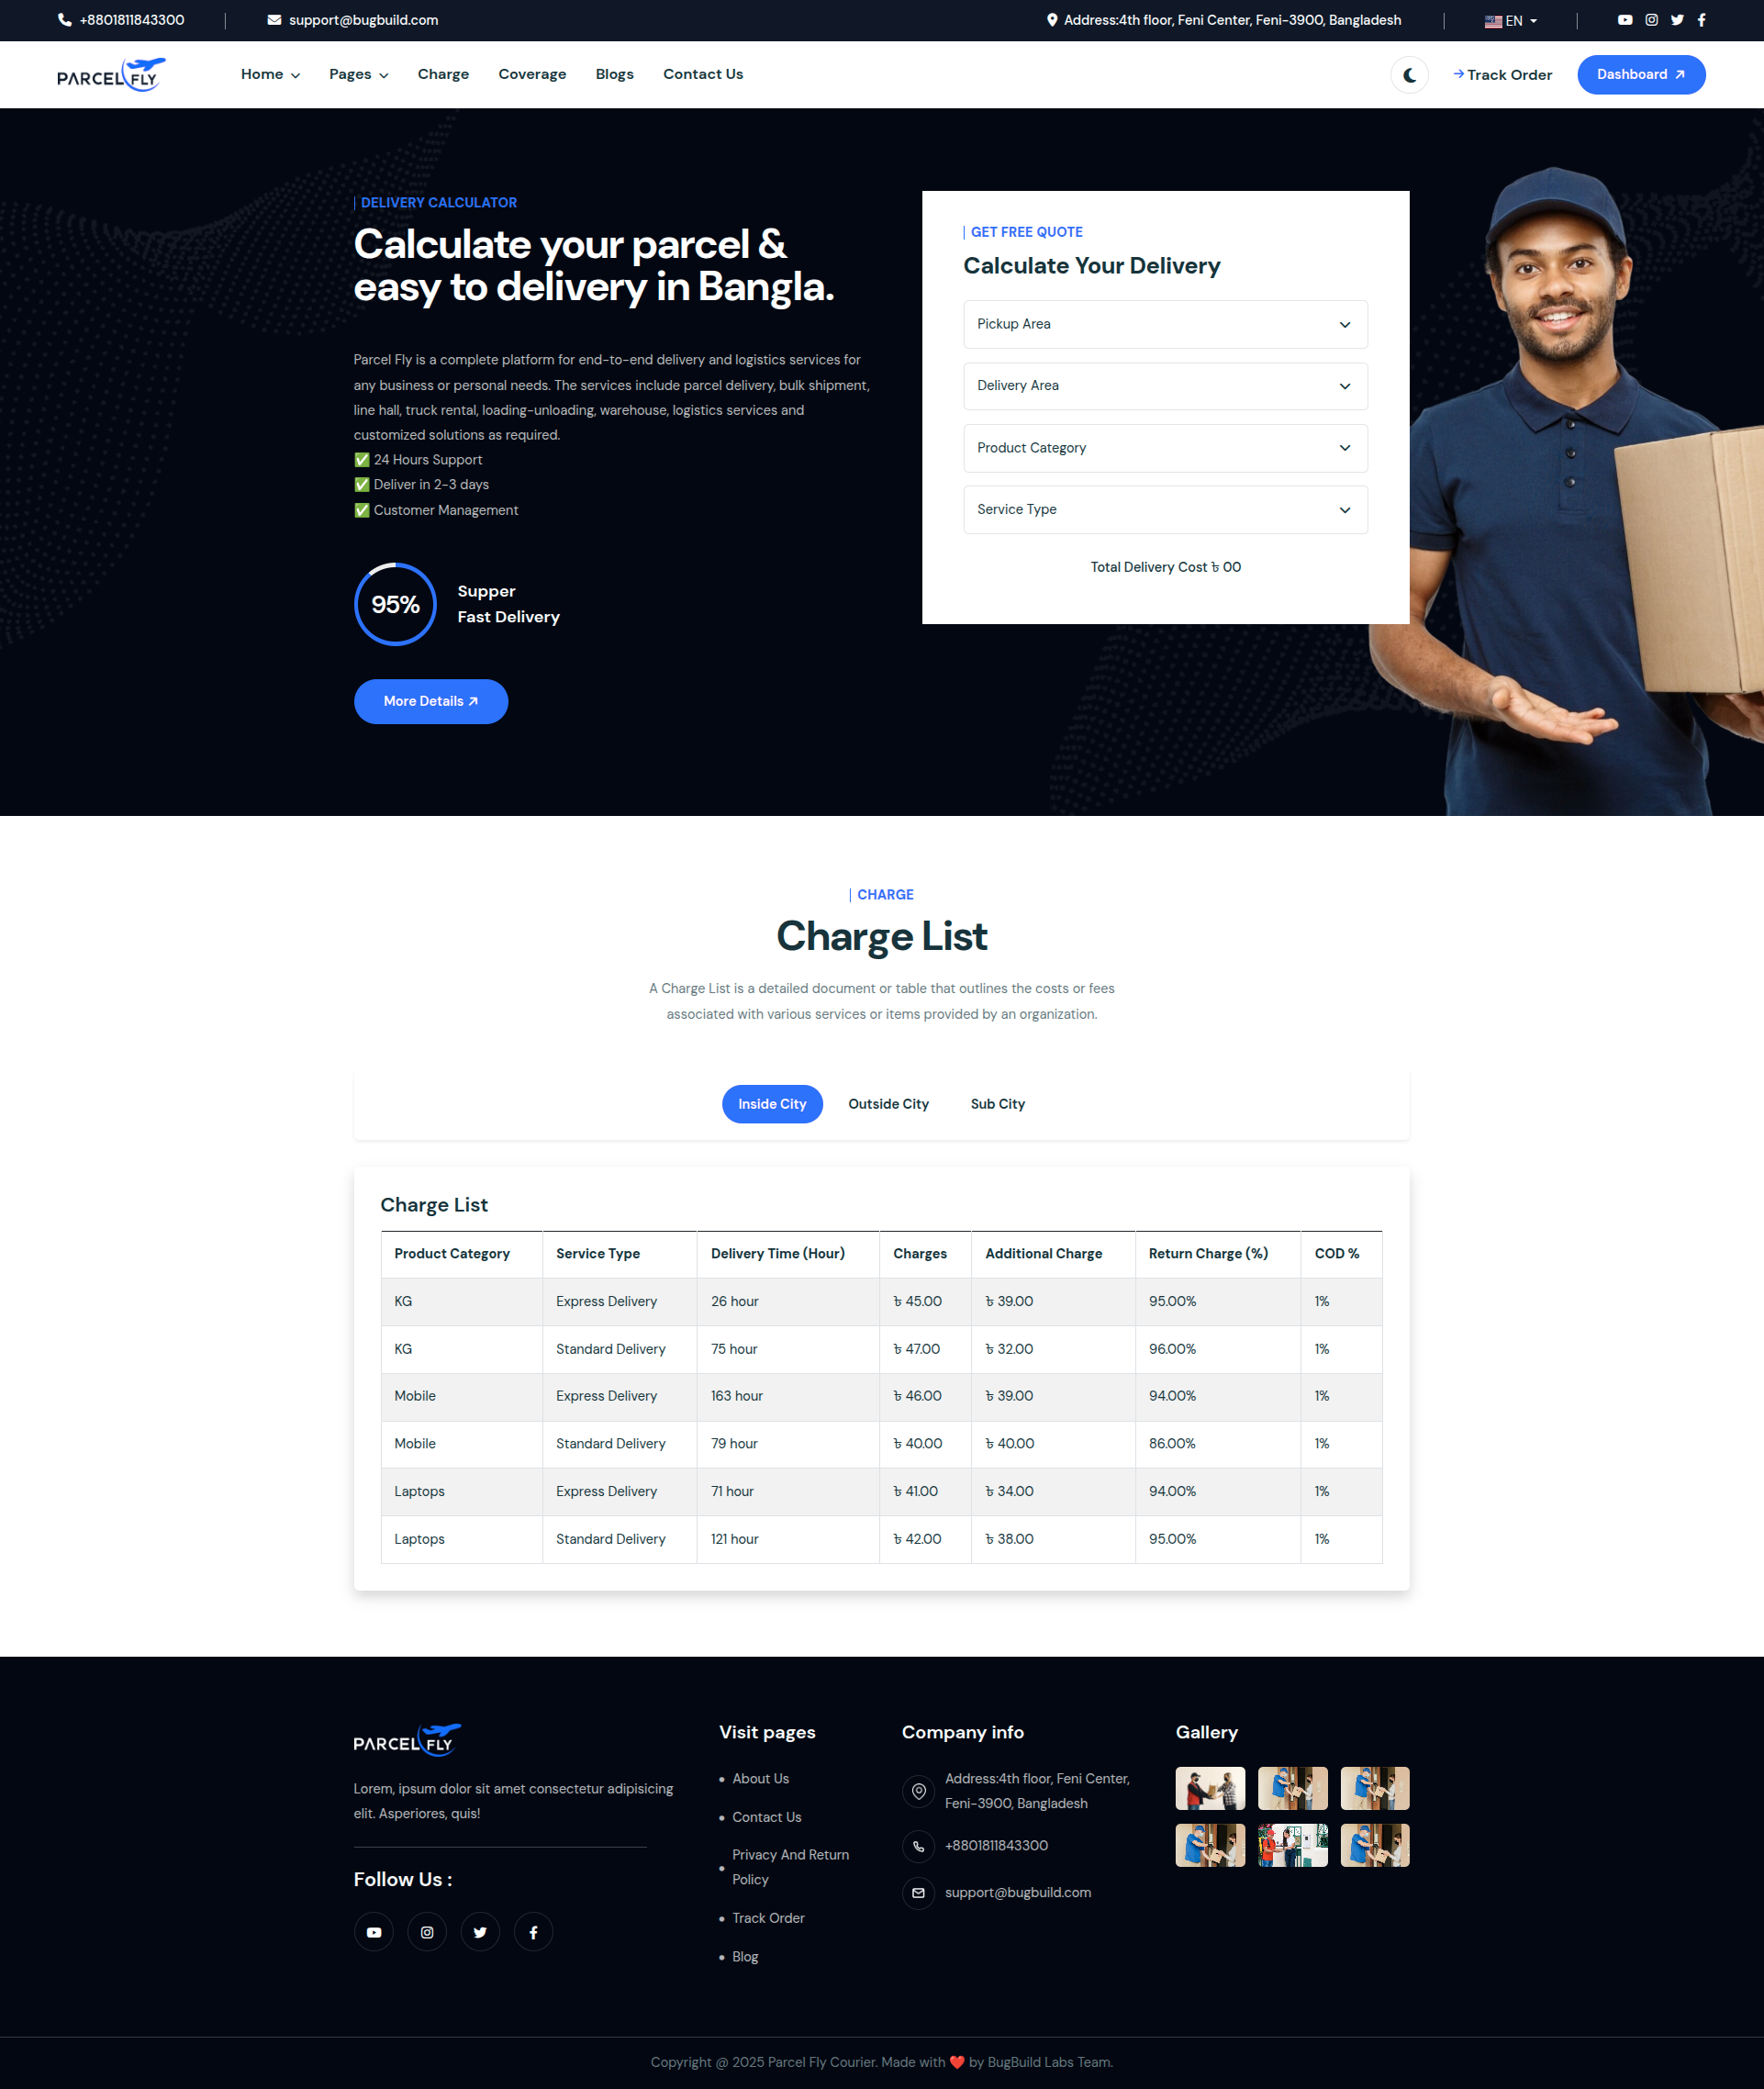
Charges Page
The public charges page presents the pricing structure used by ParcelFly delivery services.
- Rate Visibility: Visitors can review parcel charge rules before creating shipments.
- Public Reference: Merchants and customers can use this page to understand pricing expectations.
- Service Clarity: The screen supports transparent parcel charge communication.
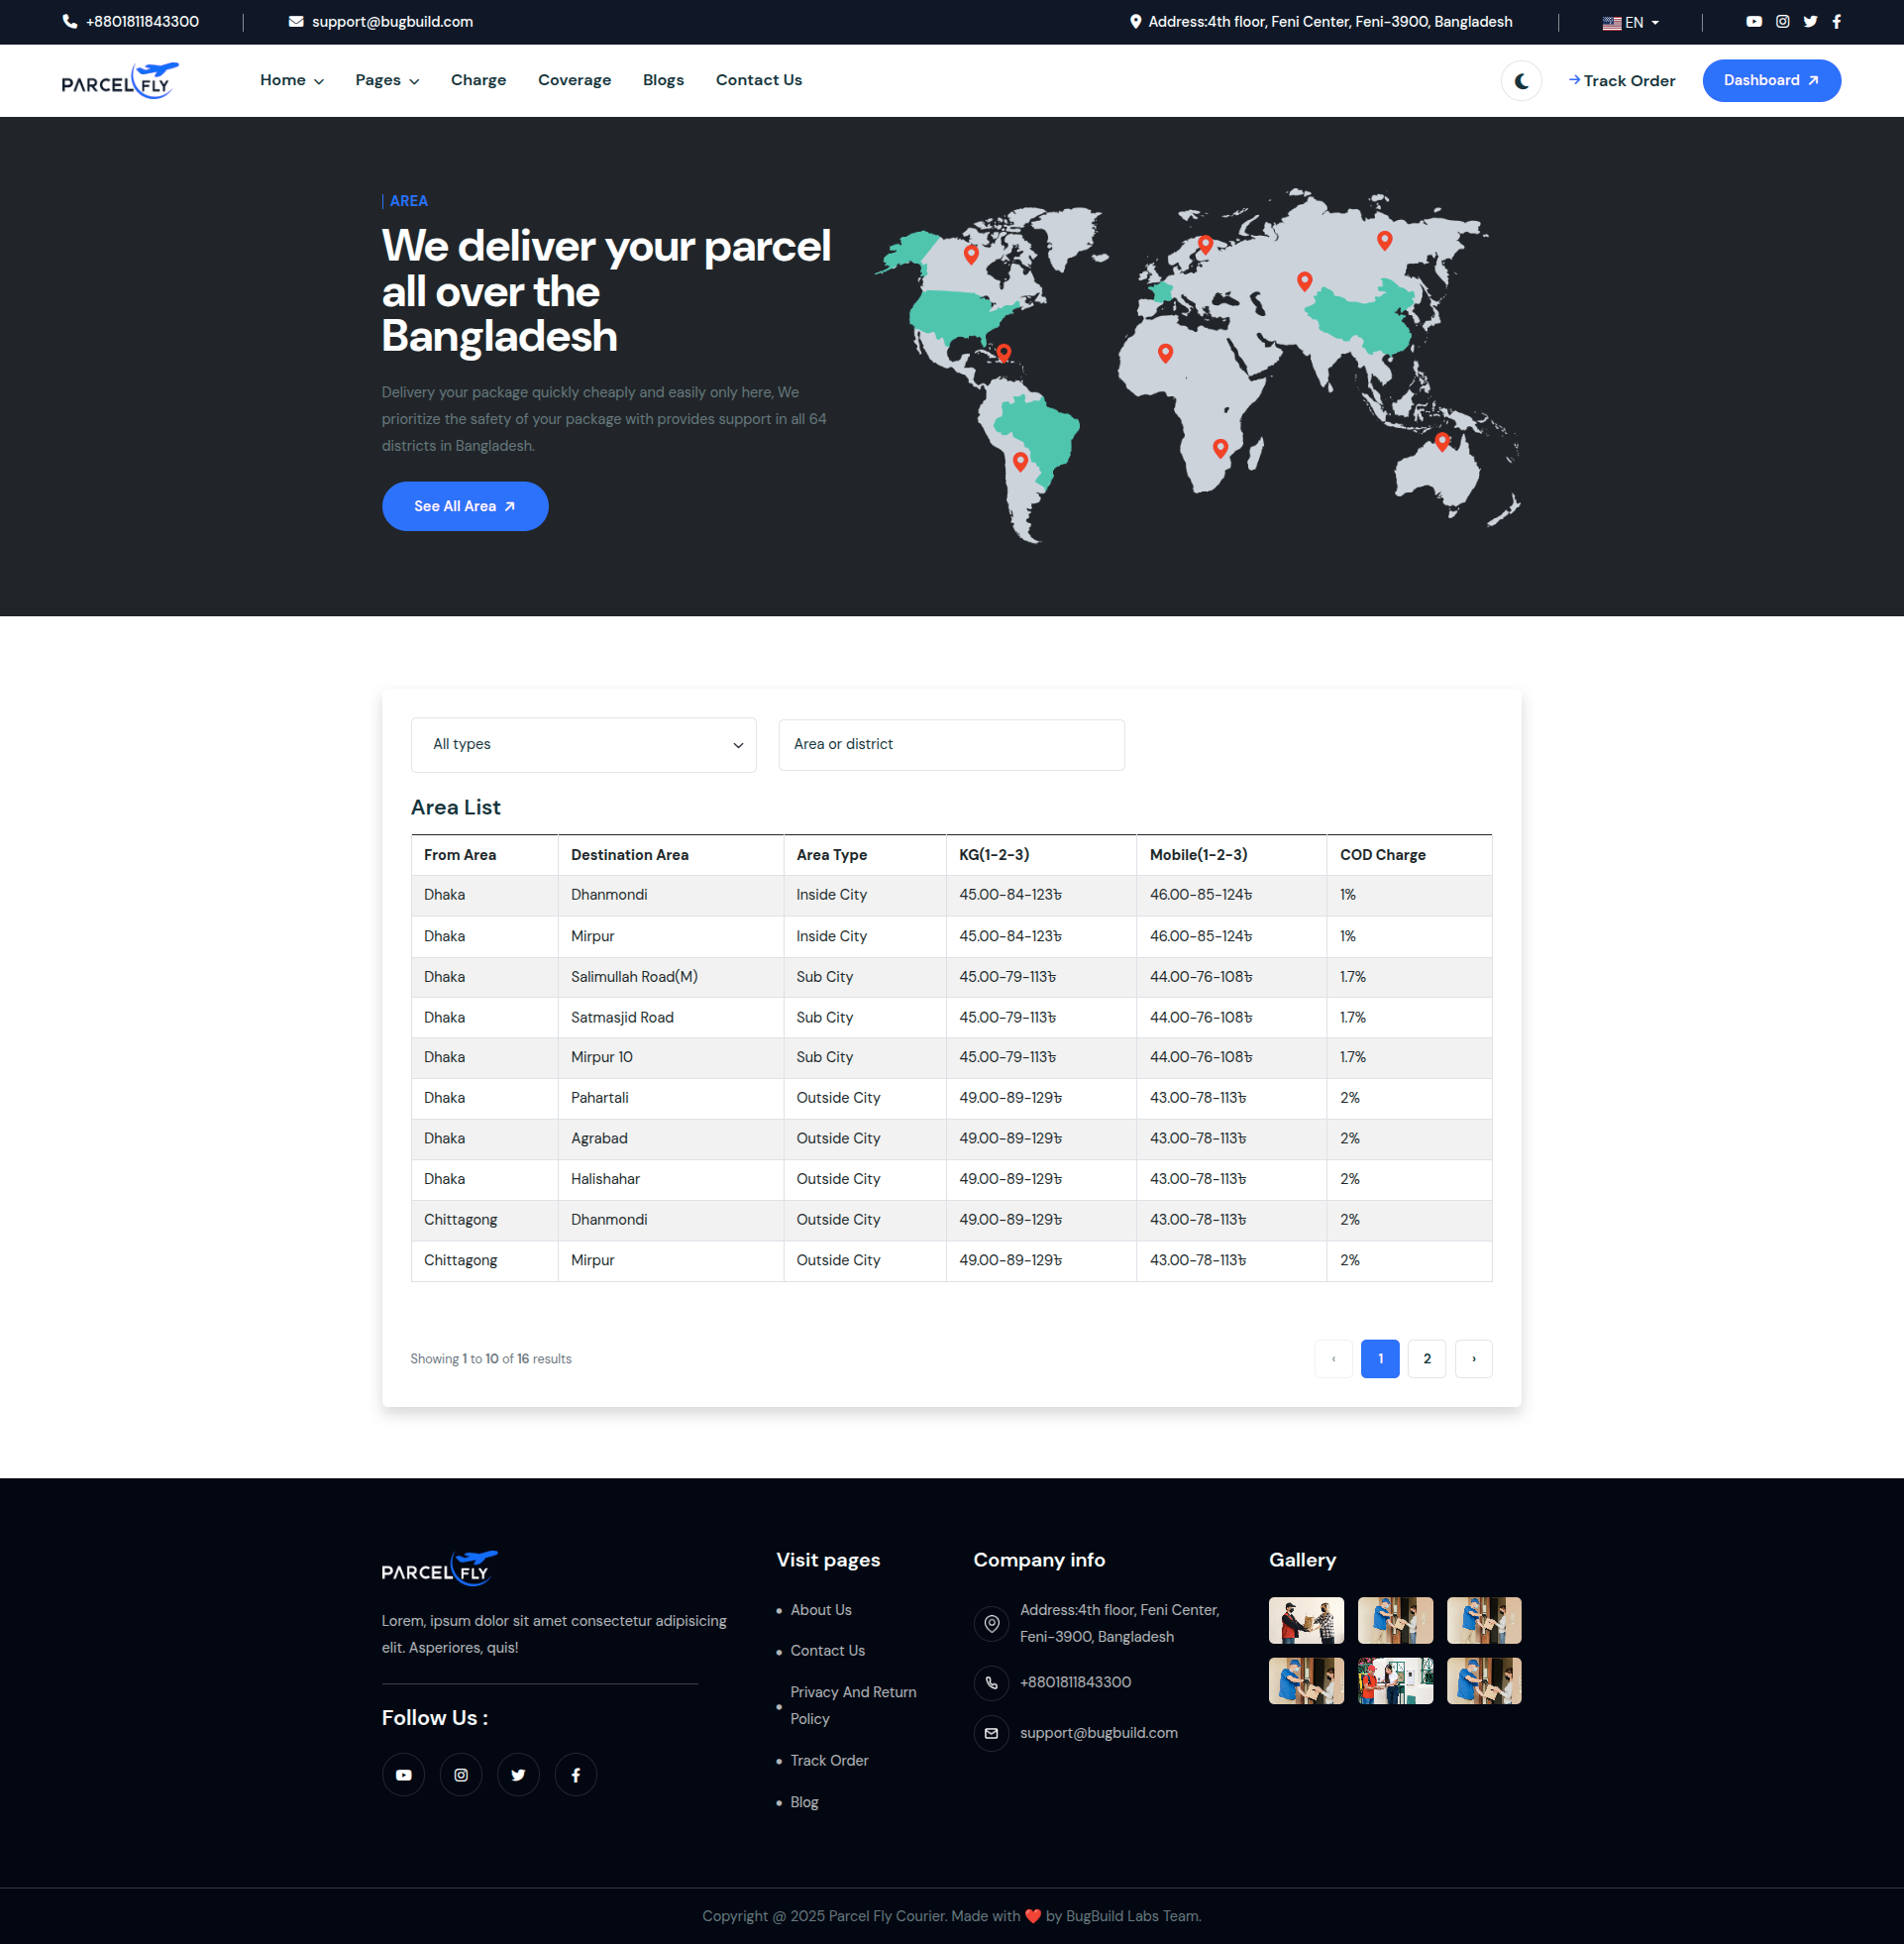
Coverage Page
The coverage page lists the delivery areas currently served by ParcelFly.
- Coverage Visibility: Users can confirm whether a destination is supported.
- Area Information: Coverage is displayed in a structured way for easier lookup.
- Operational Support: This page helps merchants and customers plan deliveries before shipment creation.
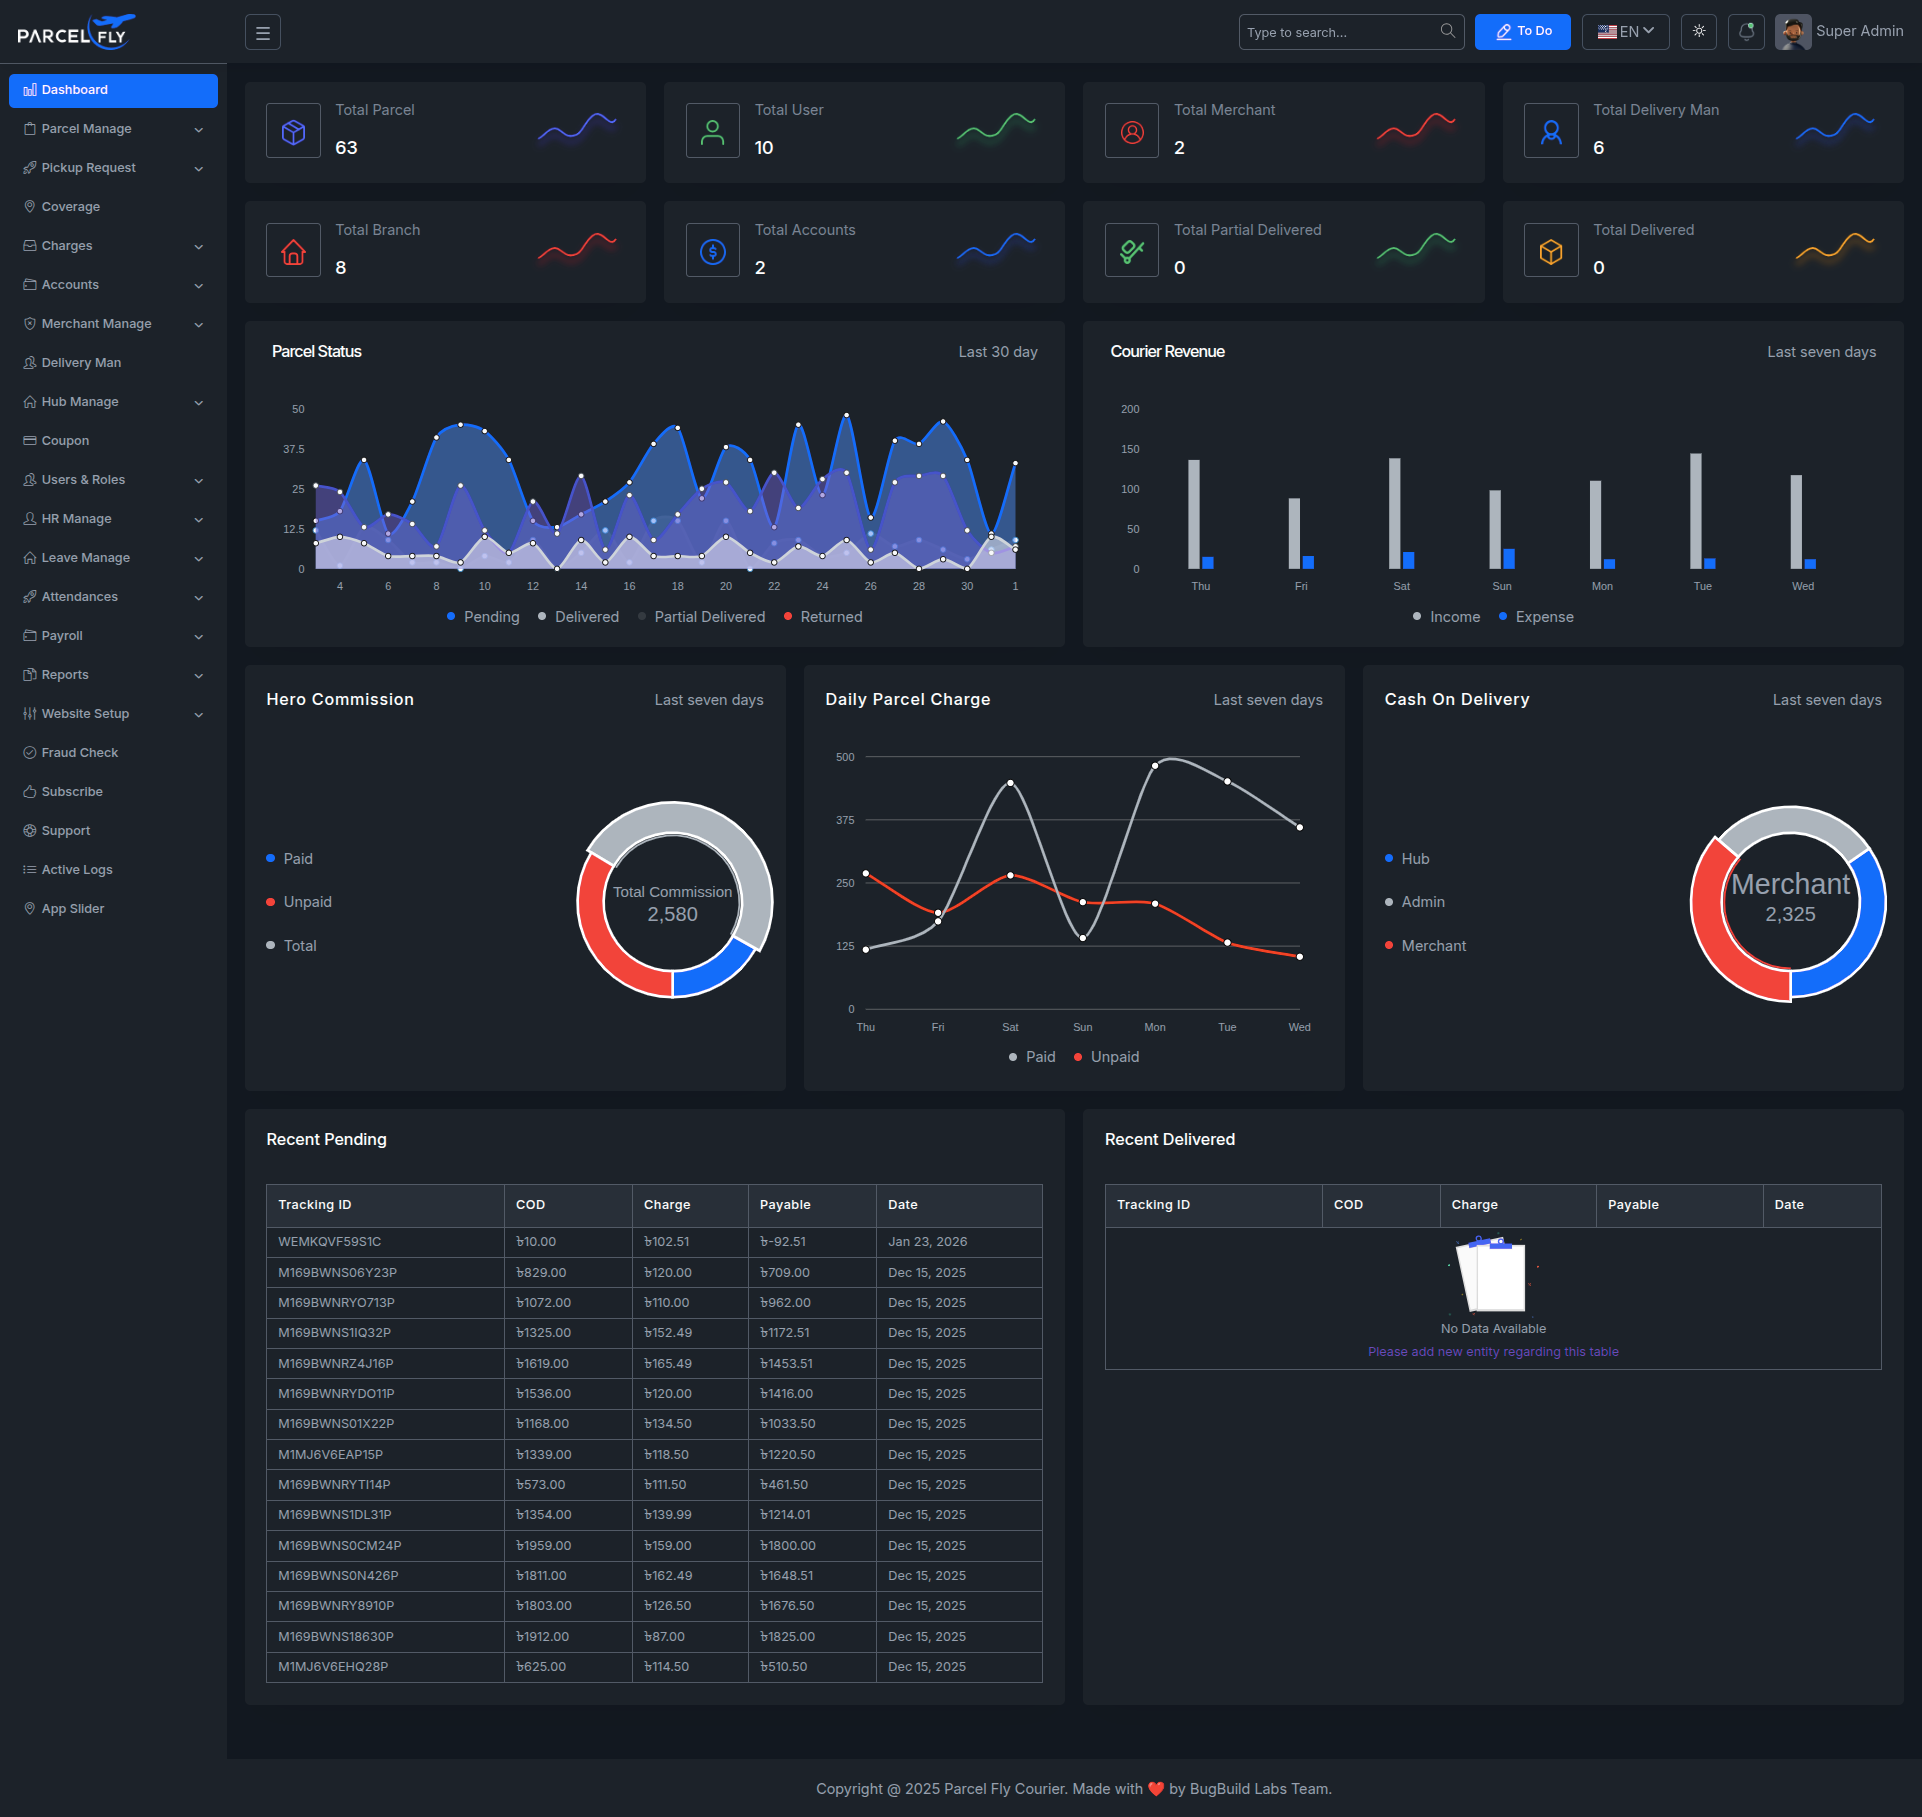
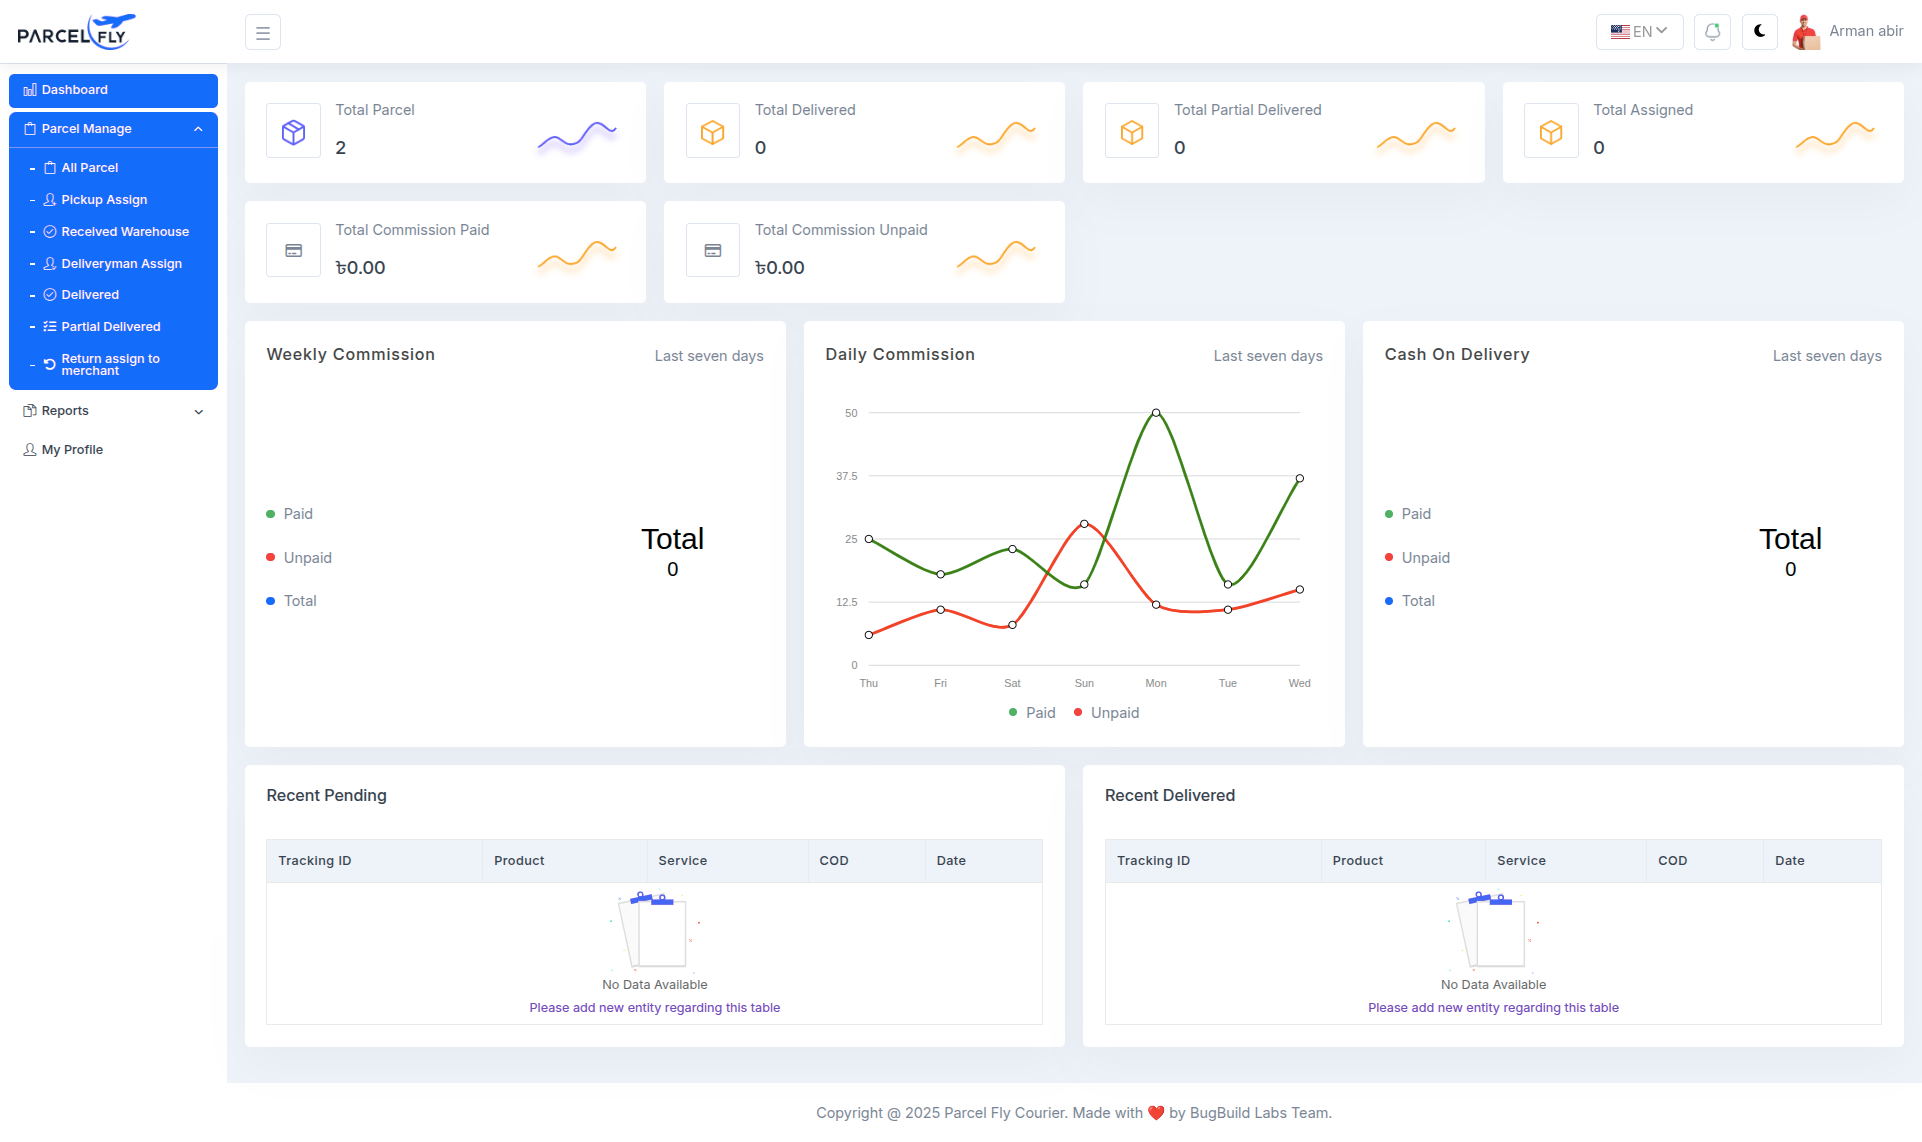
Admin Dashboard
The admin dashboard serves as the main control center for parcel operations, user activity, merchant accounts, and financial summaries.
- Summary Cards: Shows counts for parcels, users, merchants, delivery men, branches, and accounts.
- Charts: Includes parcel status, courier revenue, commission, daily parcel charge, and cash-on-delivery analytics.
- Recent Tables: Displays recent pending and delivered parcel information for quick operational review.
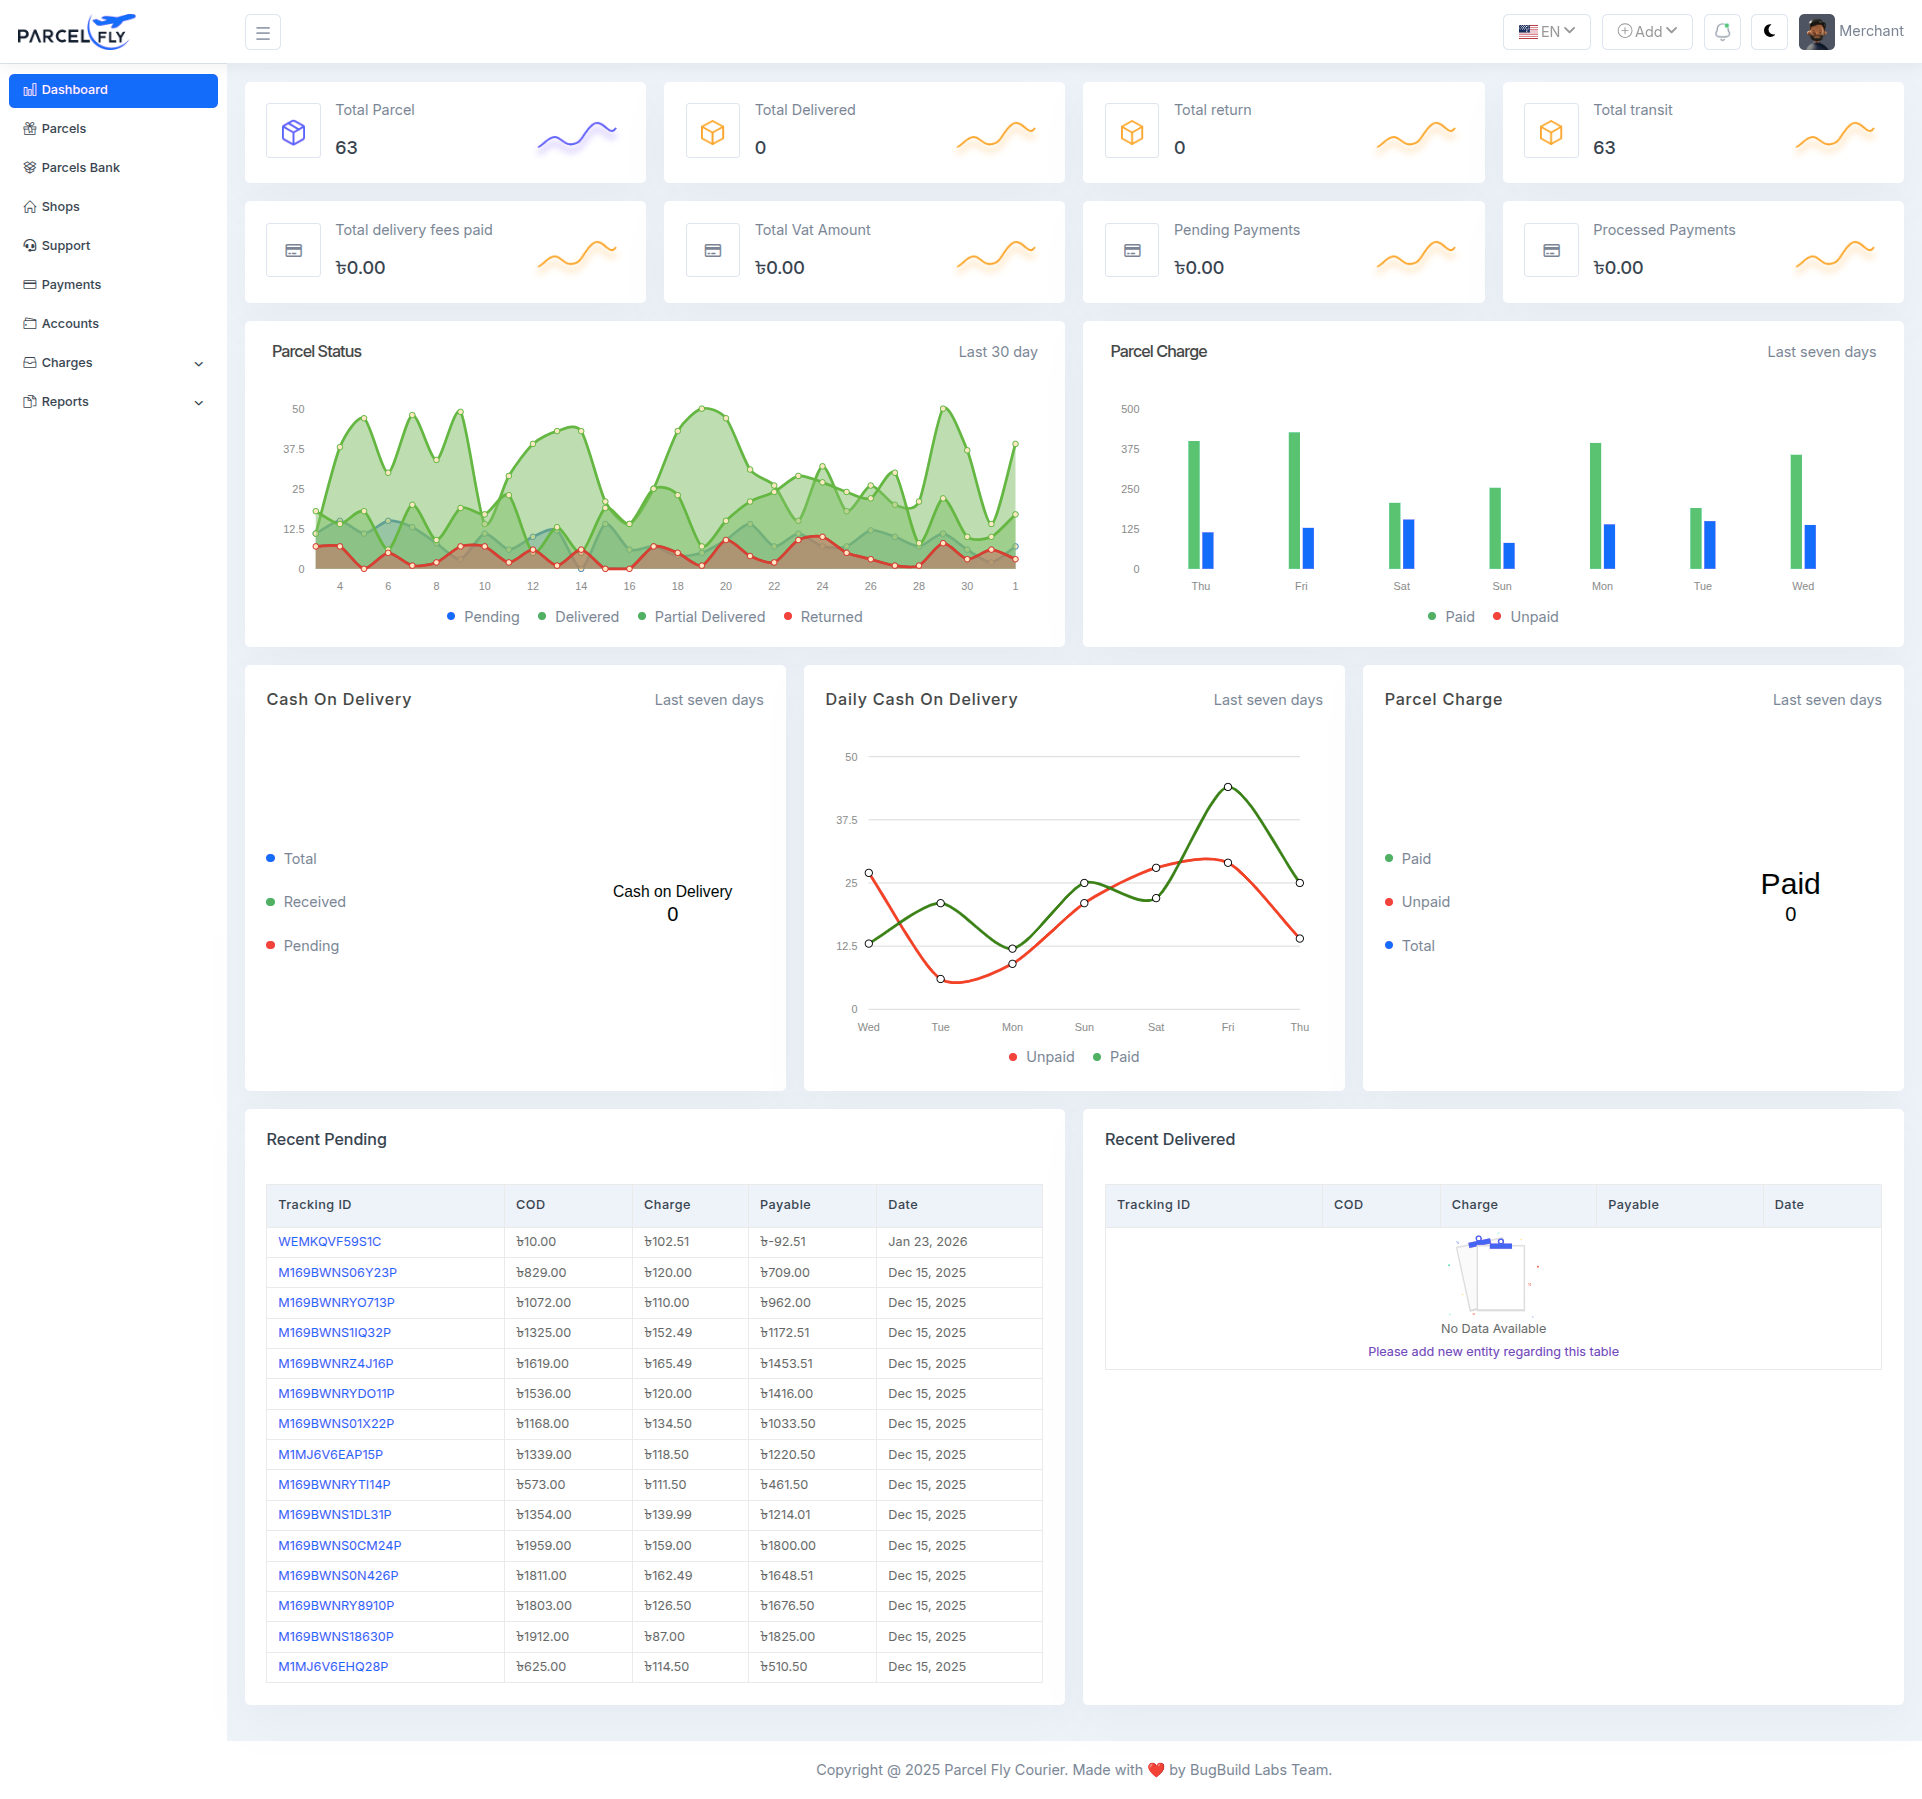
Merchant Panel Dashboard
The merchant dashboard gives merchants a focused workspace for parcel and payment activities.
- Merchant Summary: Shows merchant-side parcel counts and business metrics.
- Quick Access: Supports merchant workflow around parcel creation, parcel monitoring, and account actions.
- Role-specific View: Keeps the interface aligned with merchant responsibilities rather than admin controls.
Deliveryman Panel Dashboard
The deliveryman dashboard presents role-specific parcel information for field teams.
- Assigned Work: Delivery personnel can review parcel counts and delivery-related status data.
- Operational Focus: The layout supports parcel handling, assignment awareness, and day-to-day delivery activity.
- Role Separation: The panel keeps delivery operations distinct from merchant and admin responsibilities.
Pending Parcels
The pending parcels screen helps operations teams review shipments that still need action.
- Status Monitoring: Focus on parcels that are not yet delivered or completed.
- Operational Follow-up: Use this view to identify parcels that need assignment, processing, or delivery action.
- Queue Control: Supports day-to-day parcel management by isolating open work.

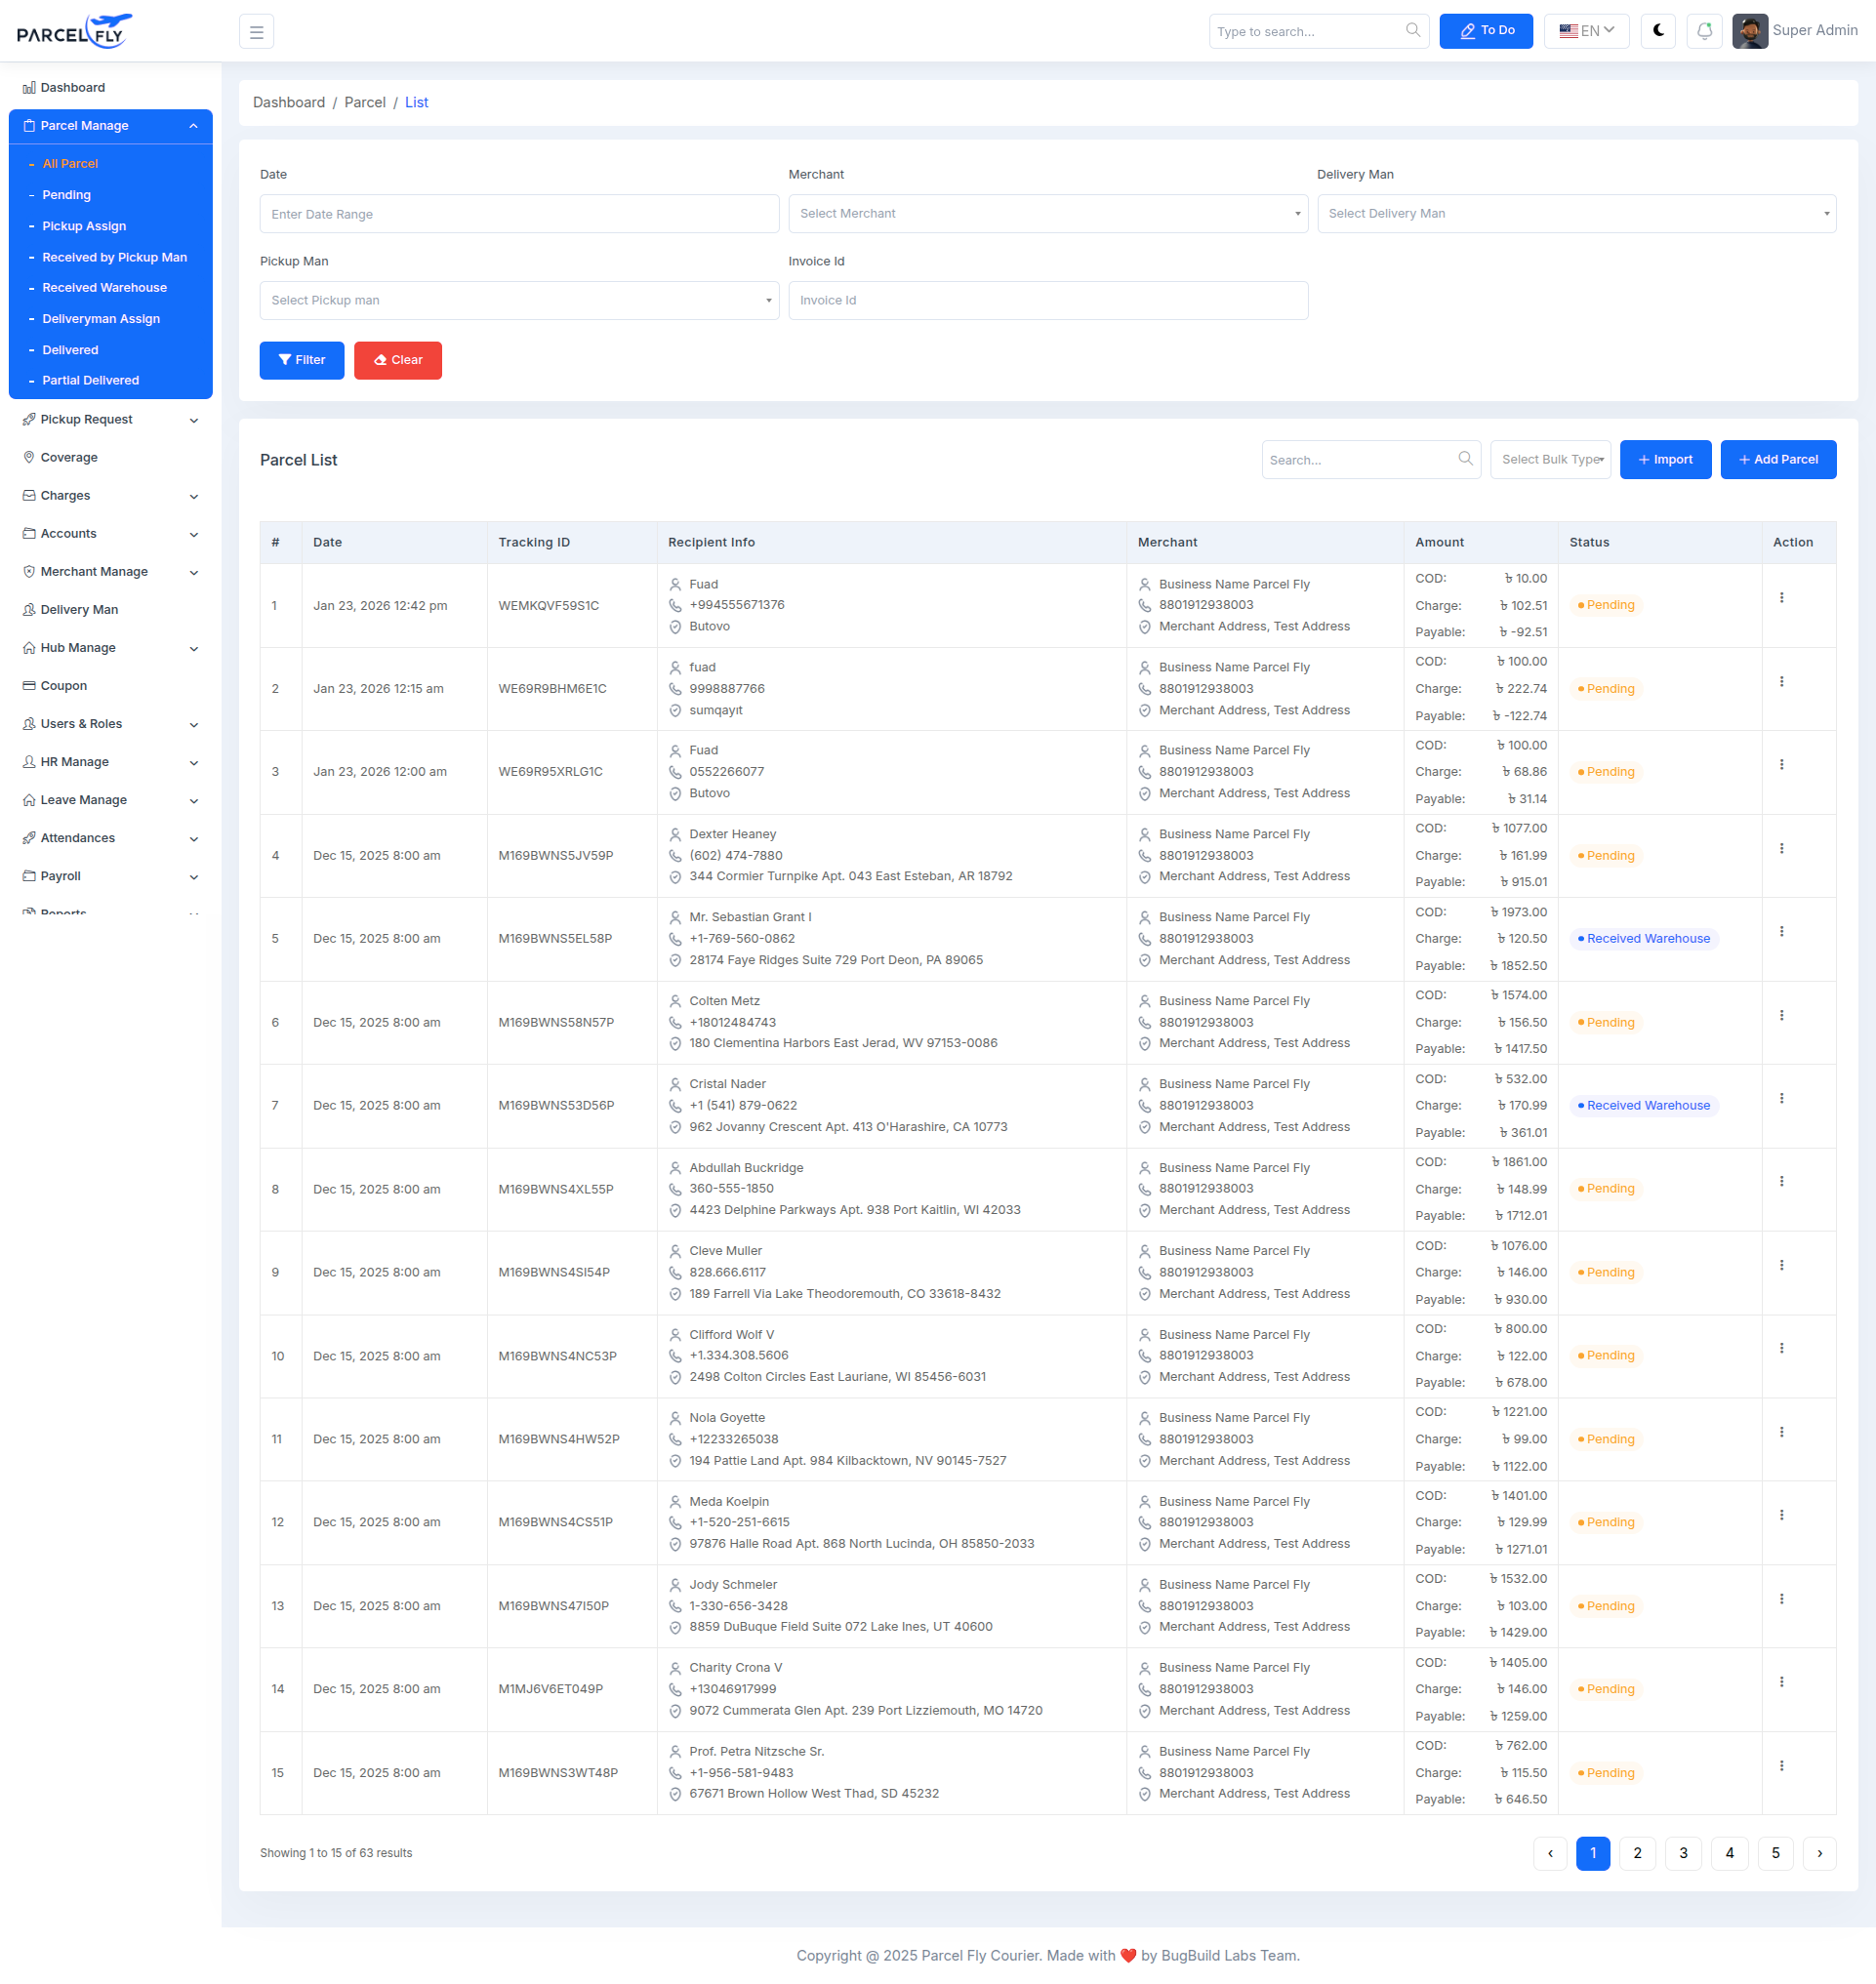
Parcel List
The parcel list is the central operational table for all parcels recorded in the system.
- Filtering: Supports date range, merchant, delivery man, pickup man, and invoice-based filters.
- Parcel Table: Displays tracking ID, recipient information, merchant details, amounts, current status, and actions.
- Workflow Control: Gives quick access to parcel review and downstream actions.
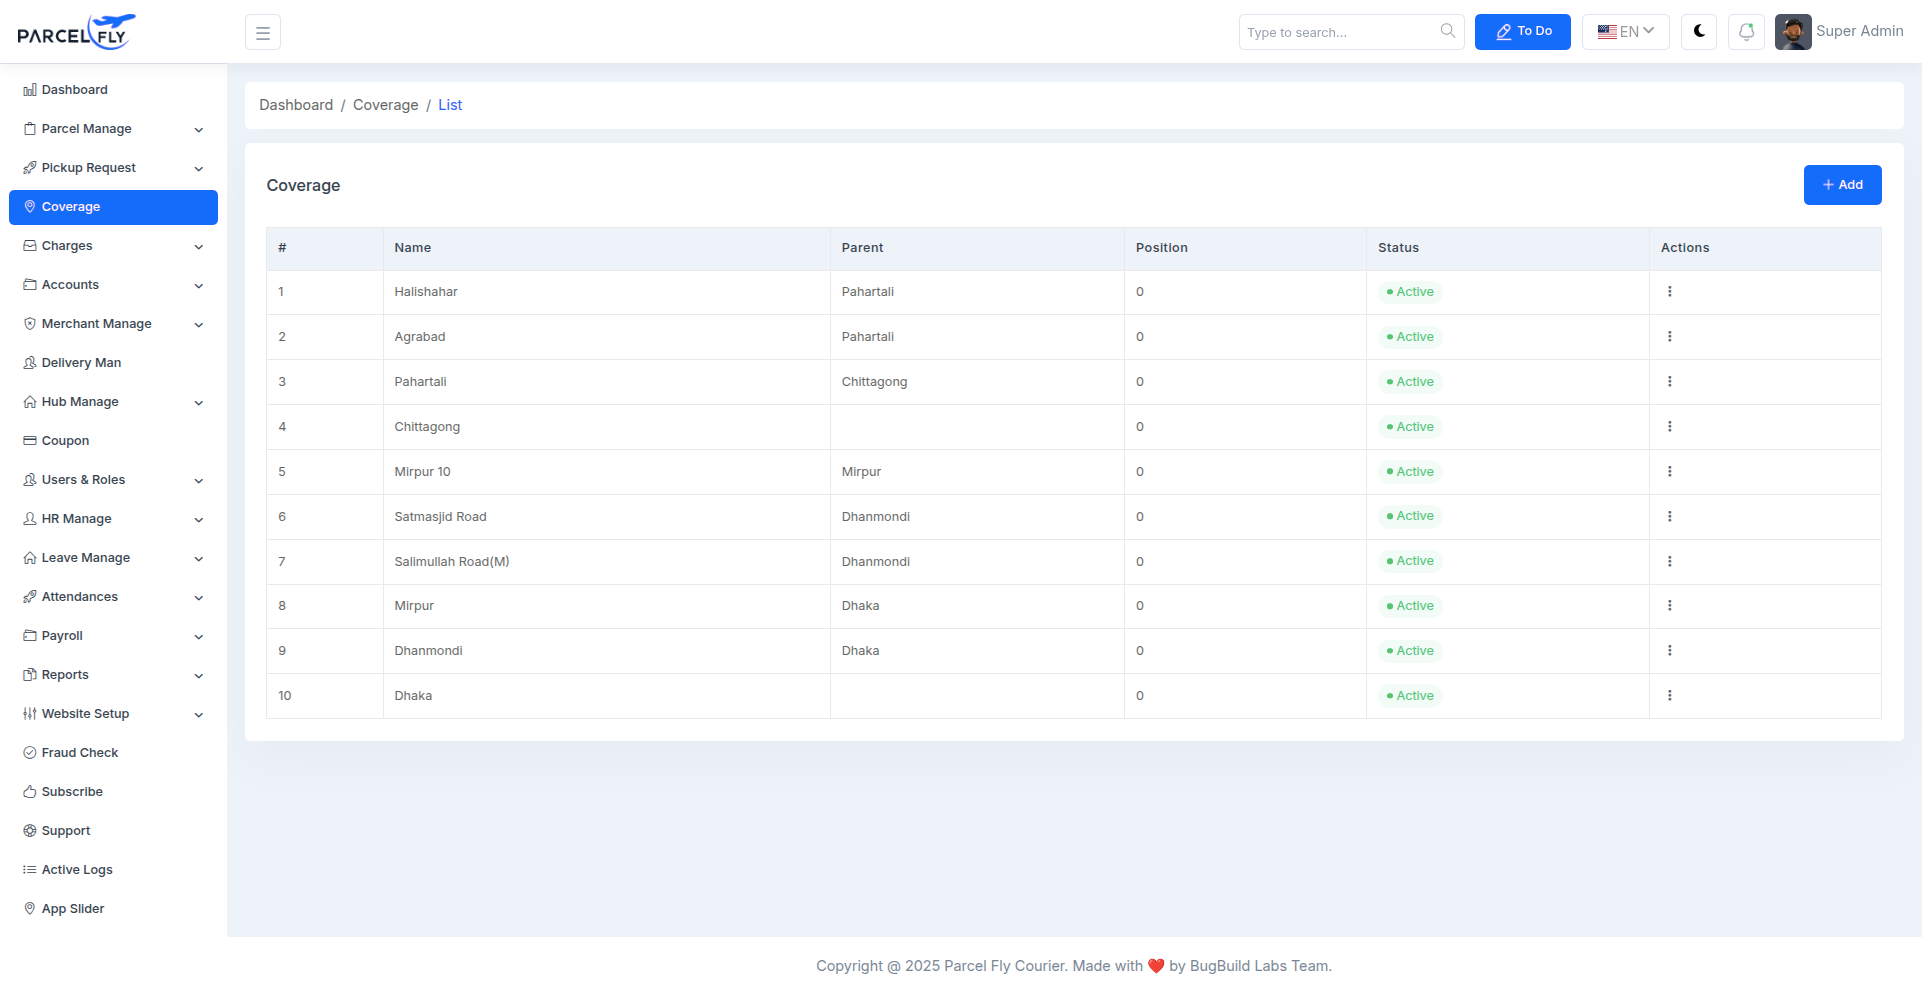
Coverage List
The coverage list allows administrators to manage supported delivery areas from the backend.
- Area Hierarchy: Shows coverage names, parent areas, and position values.
- Status Control: Coverage entries can be kept active or managed from the action menu.
- Location Management: Helps define service availability across cities and sub-areas.
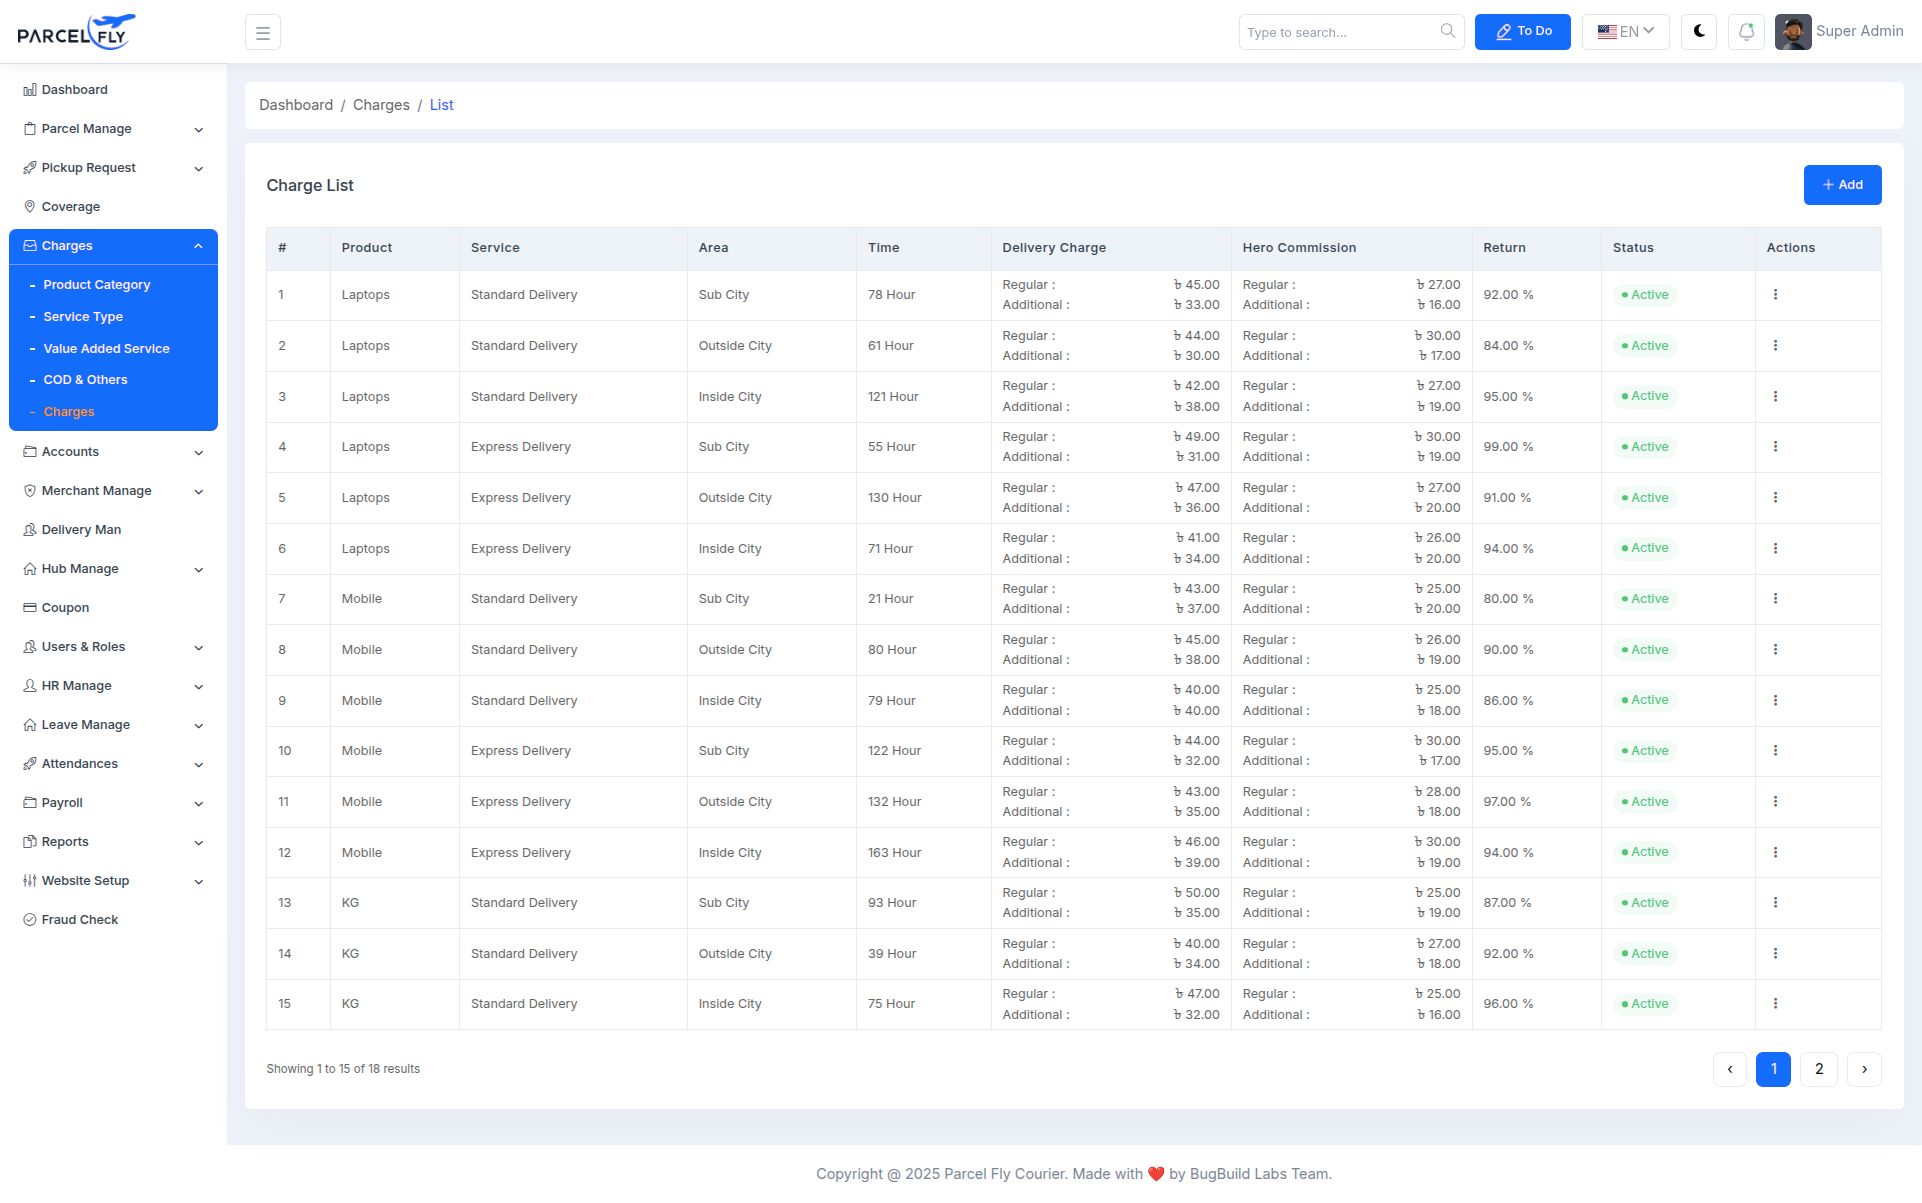
Charges List
The charges list is used to review configured pricing rules across product types, service types, and delivery areas.
- Pricing Table: Shows product, service, area, delivery time, delivery charge, commission, return charge, and status.
- Business Rules: Keeps delivery pricing visible and manageable from one screen.
- Action Menu: Admins can maintain and update charge records as business requirements change.
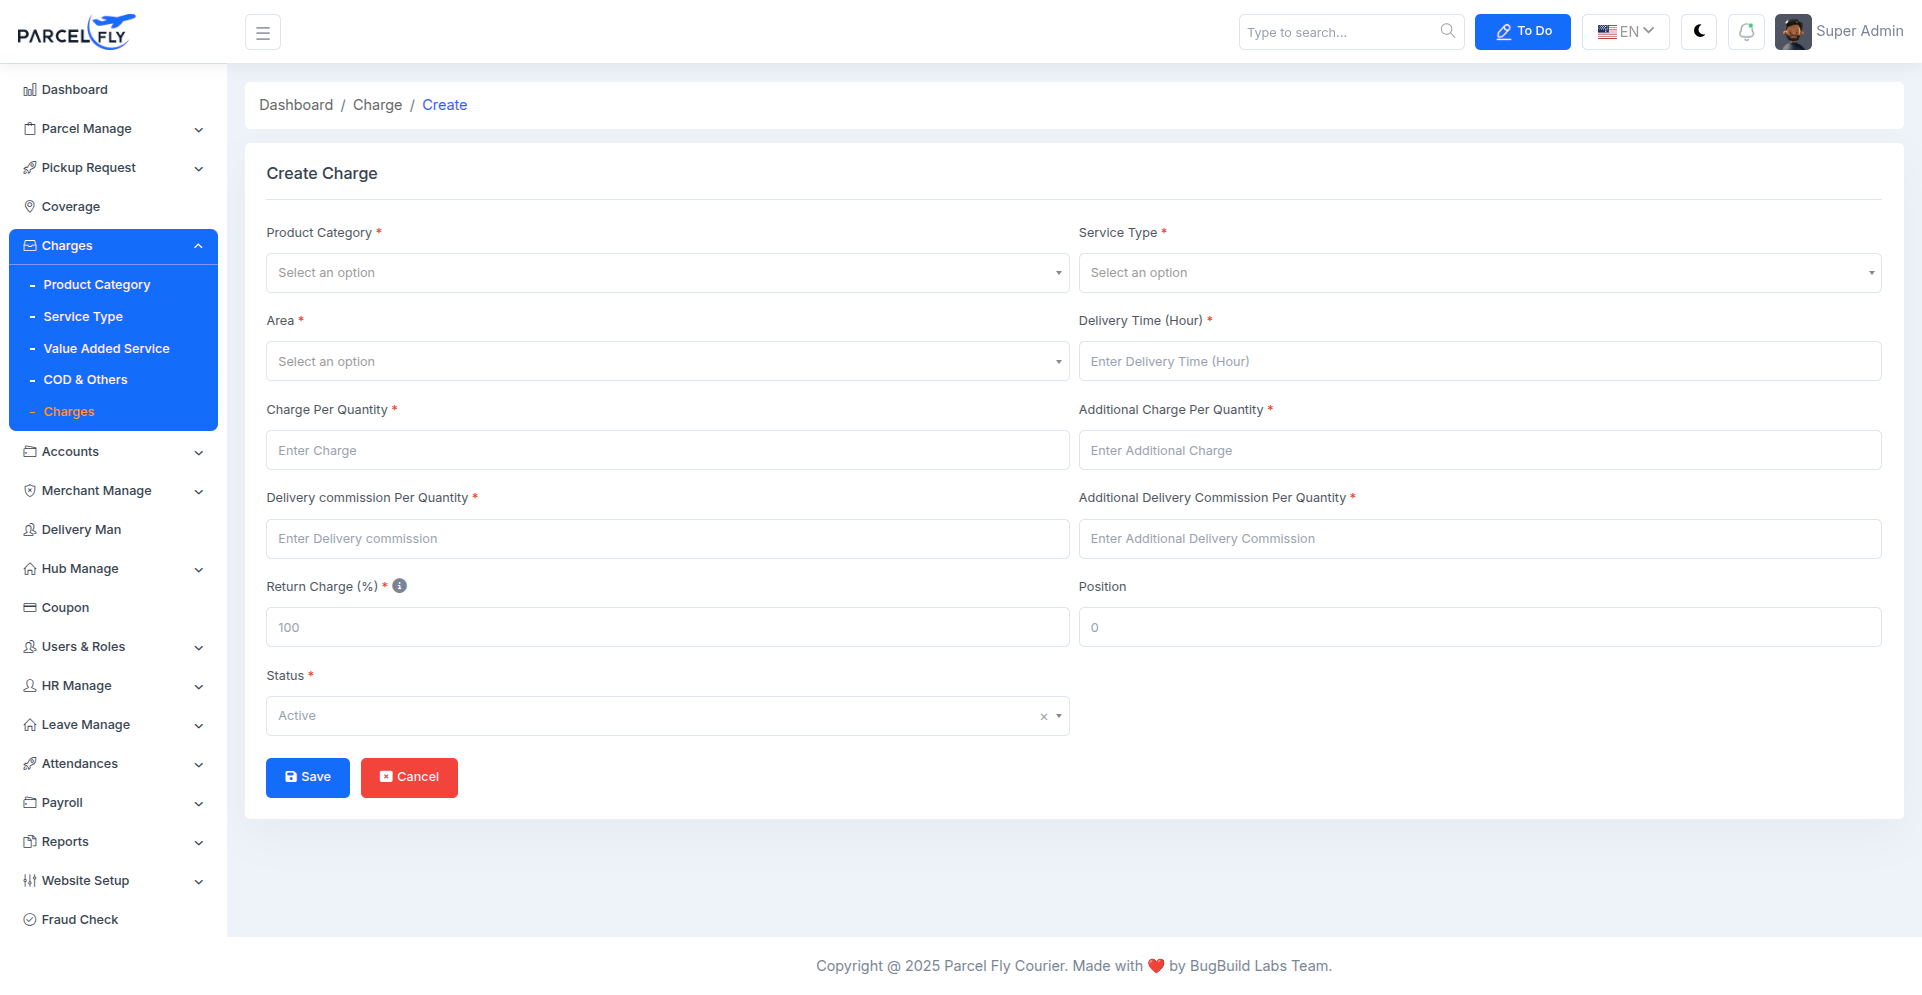
Create Charge
The create charge form allows administrators to define a new pricing rule for deliveries.
- Charge Inputs: Configure product category, service type, area, delivery time, and pricing values.
- Commission Setup: Set delivery commission, additional commission, and return charge percentages.
- Status & Position: Control visibility and ordering of the charge rule.
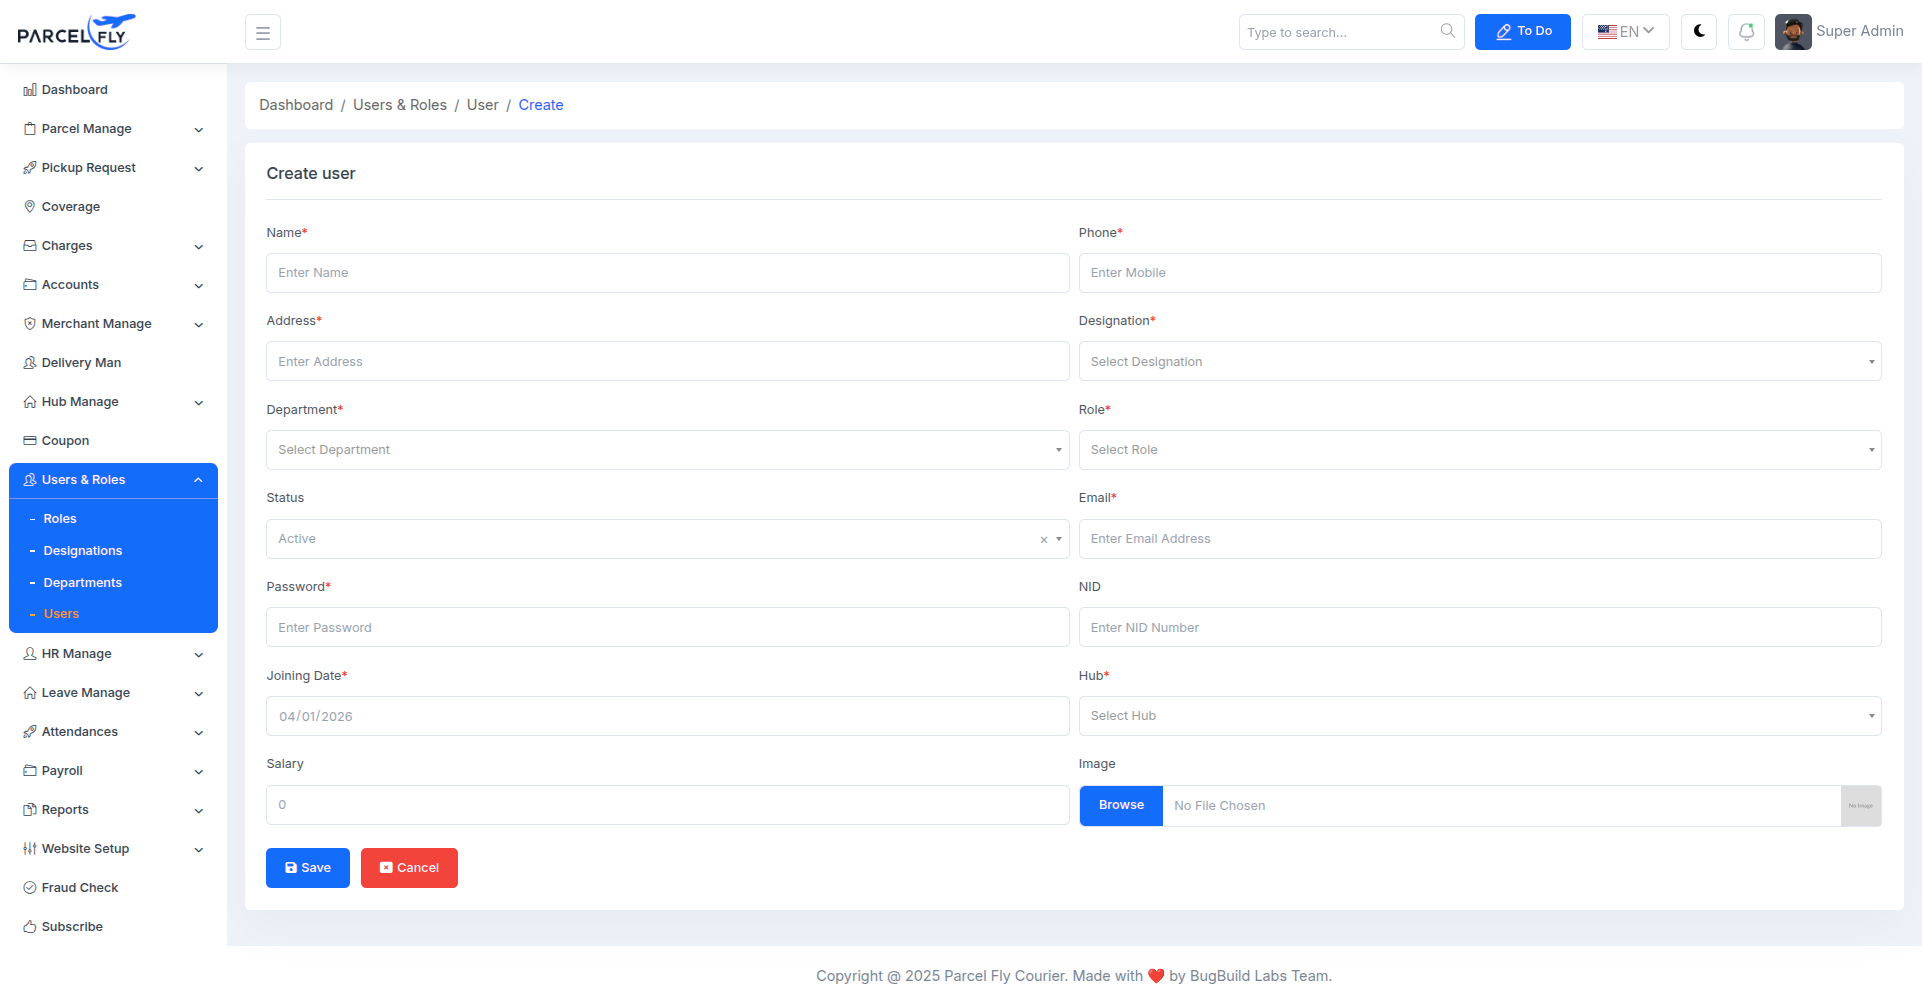
Create User
The create user form is used to onboard internal users into the ParcelFly backend system.
- User Details: Includes name, phone, address, department, designation, role, and email.
- Account Setup: Allows password entry, joining date, hub assignment, salary, and status.
- Profile Media: Supports image upload for the user profile.
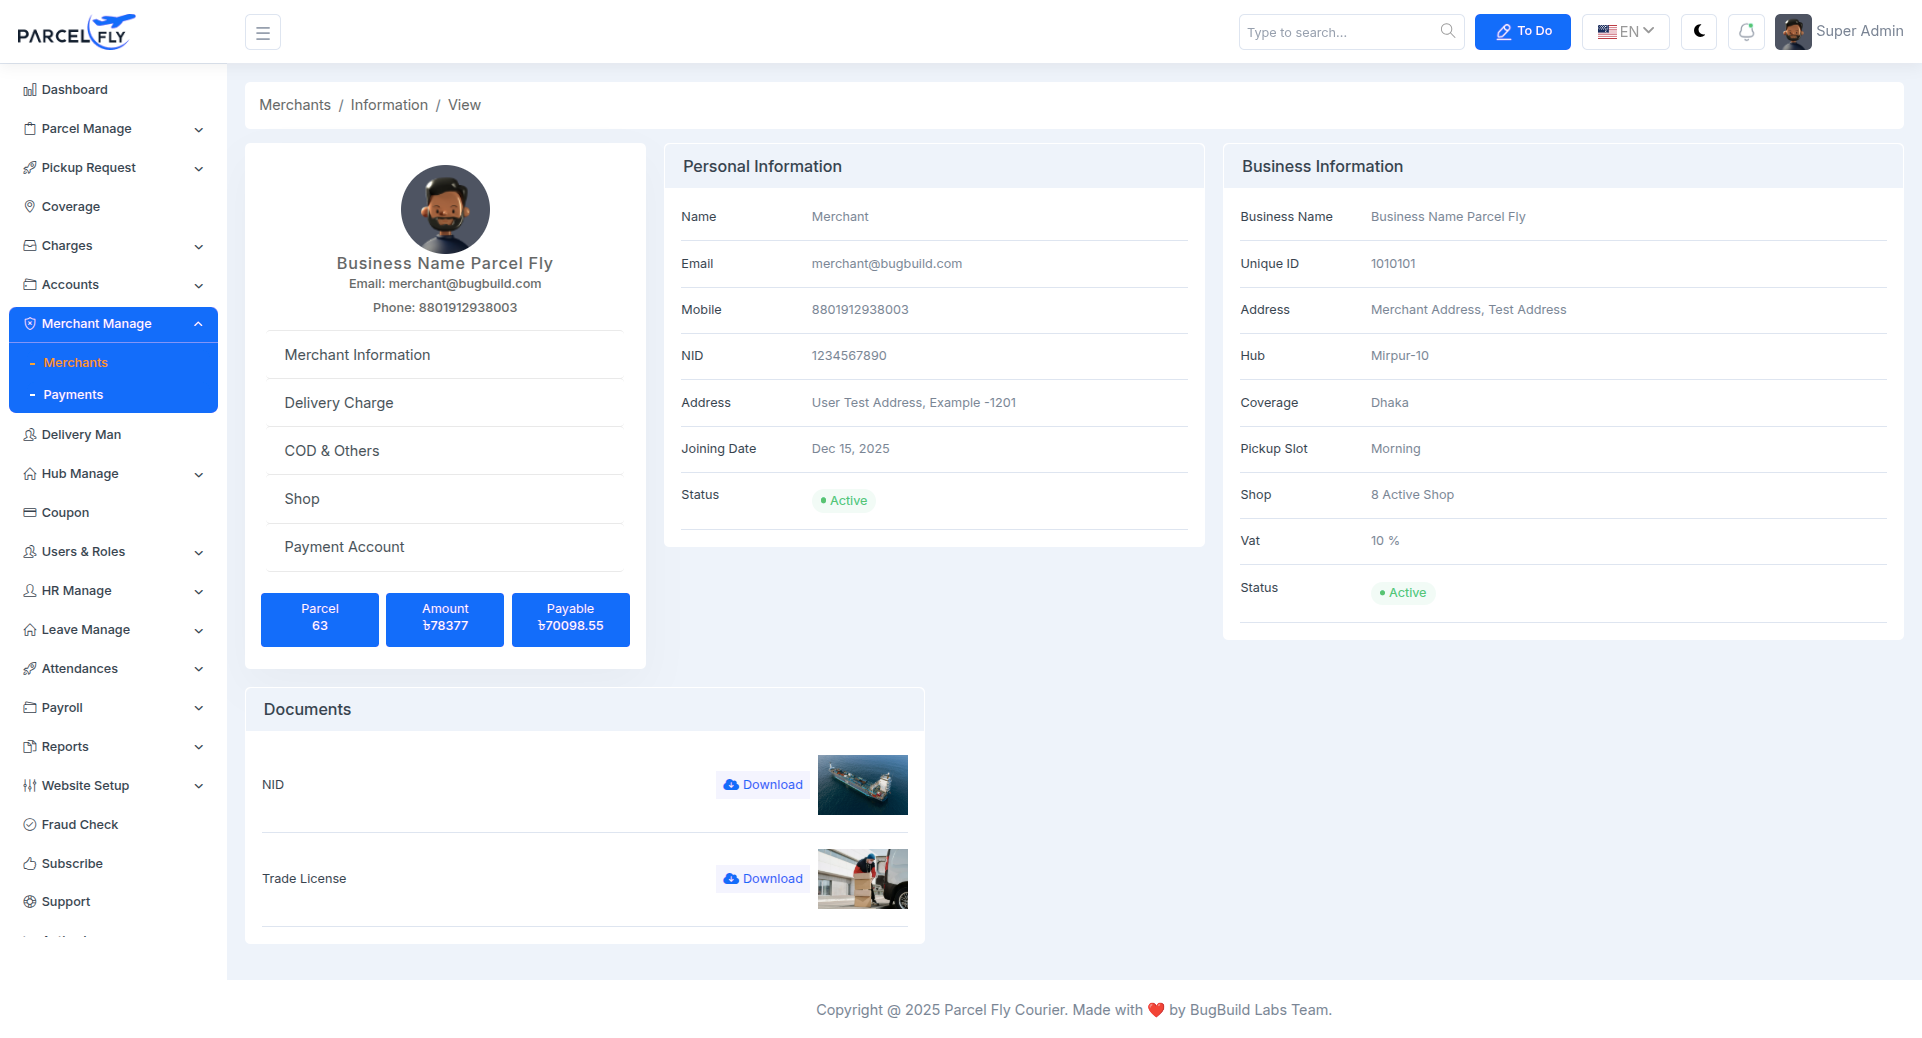
Merchant Details
The merchant details screen presents a complete merchant profile for operational and account review.
- Personal & Business Info: Shows merchant identity, contact details, hub, coverage, shop, and status.
- Financial Summary: Displays parcel count, amount, and payable values.
- Documents: Includes downloadable merchant documents such as NID or trade license files.
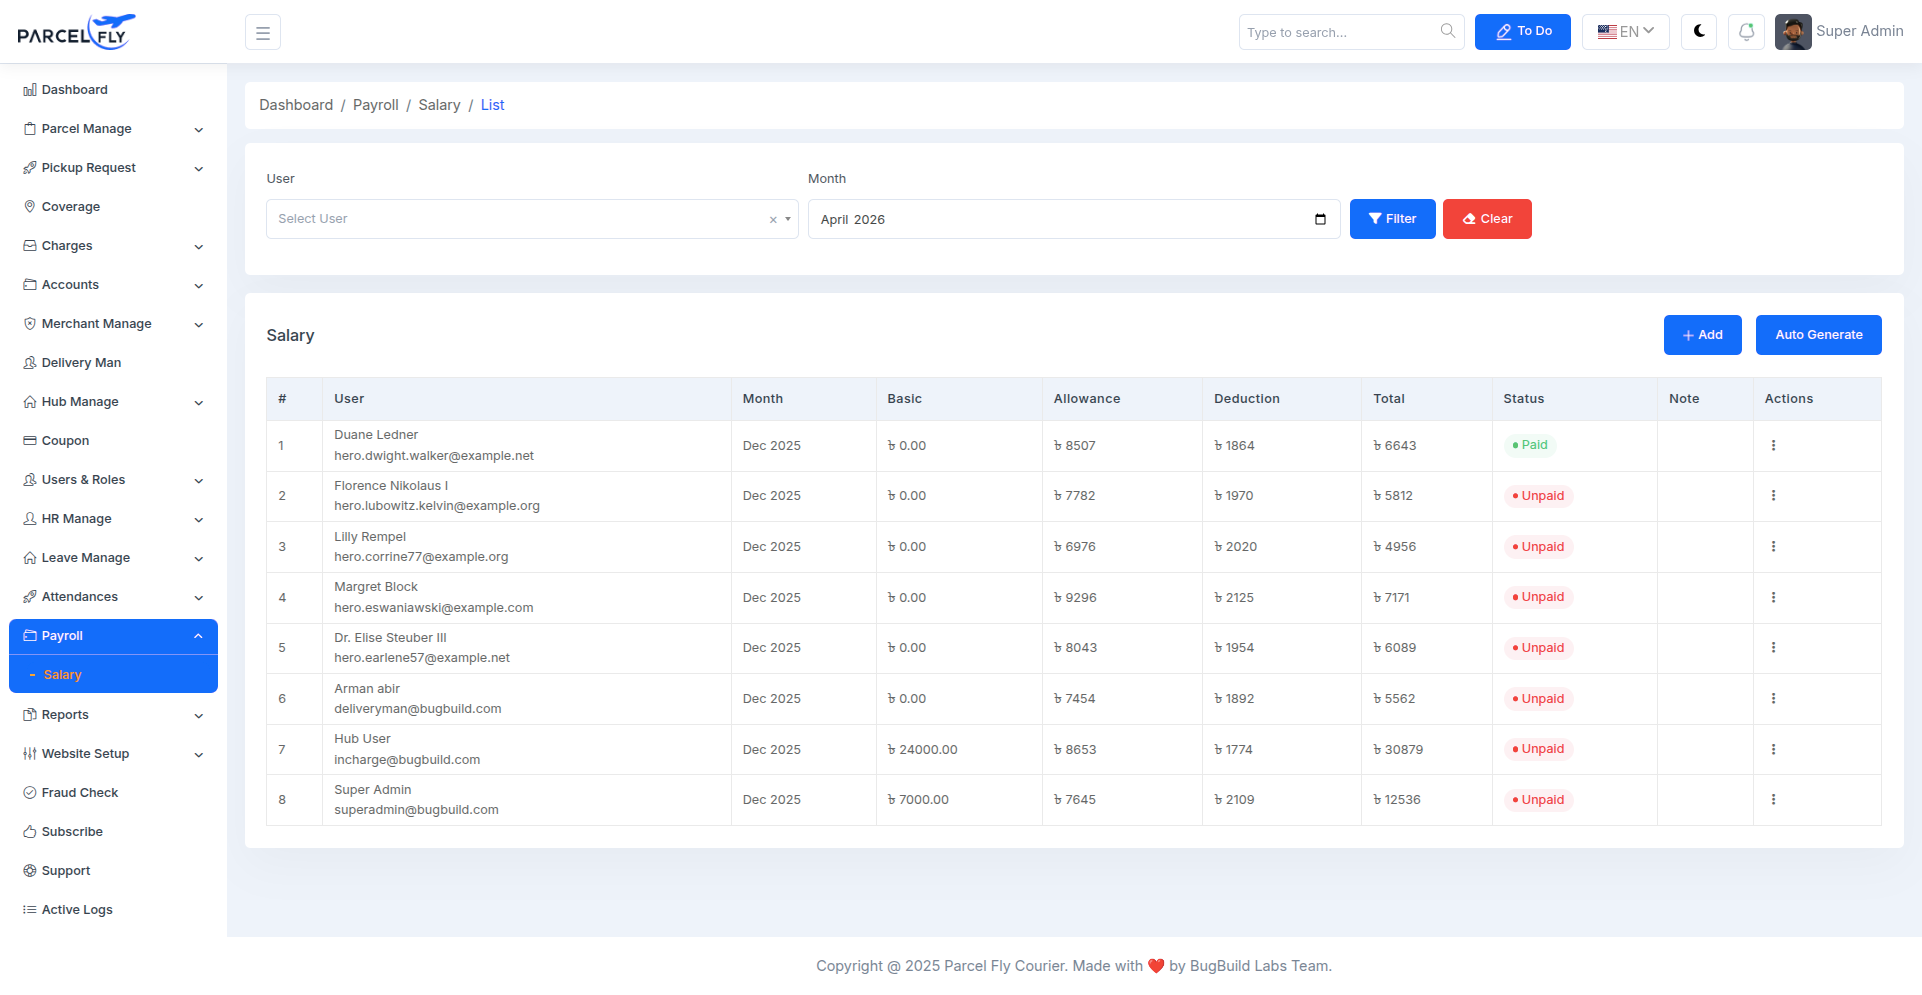
Payroll List
The payroll list helps administrators manage and review salary records for staff members.
- Salary Table: Shows user, month, basic salary, allowance, deduction, total, status, and notes.
- Filtering: Salary records can be filtered by user and month.
- Actions: Supports payroll management with add and auto-generate controls.
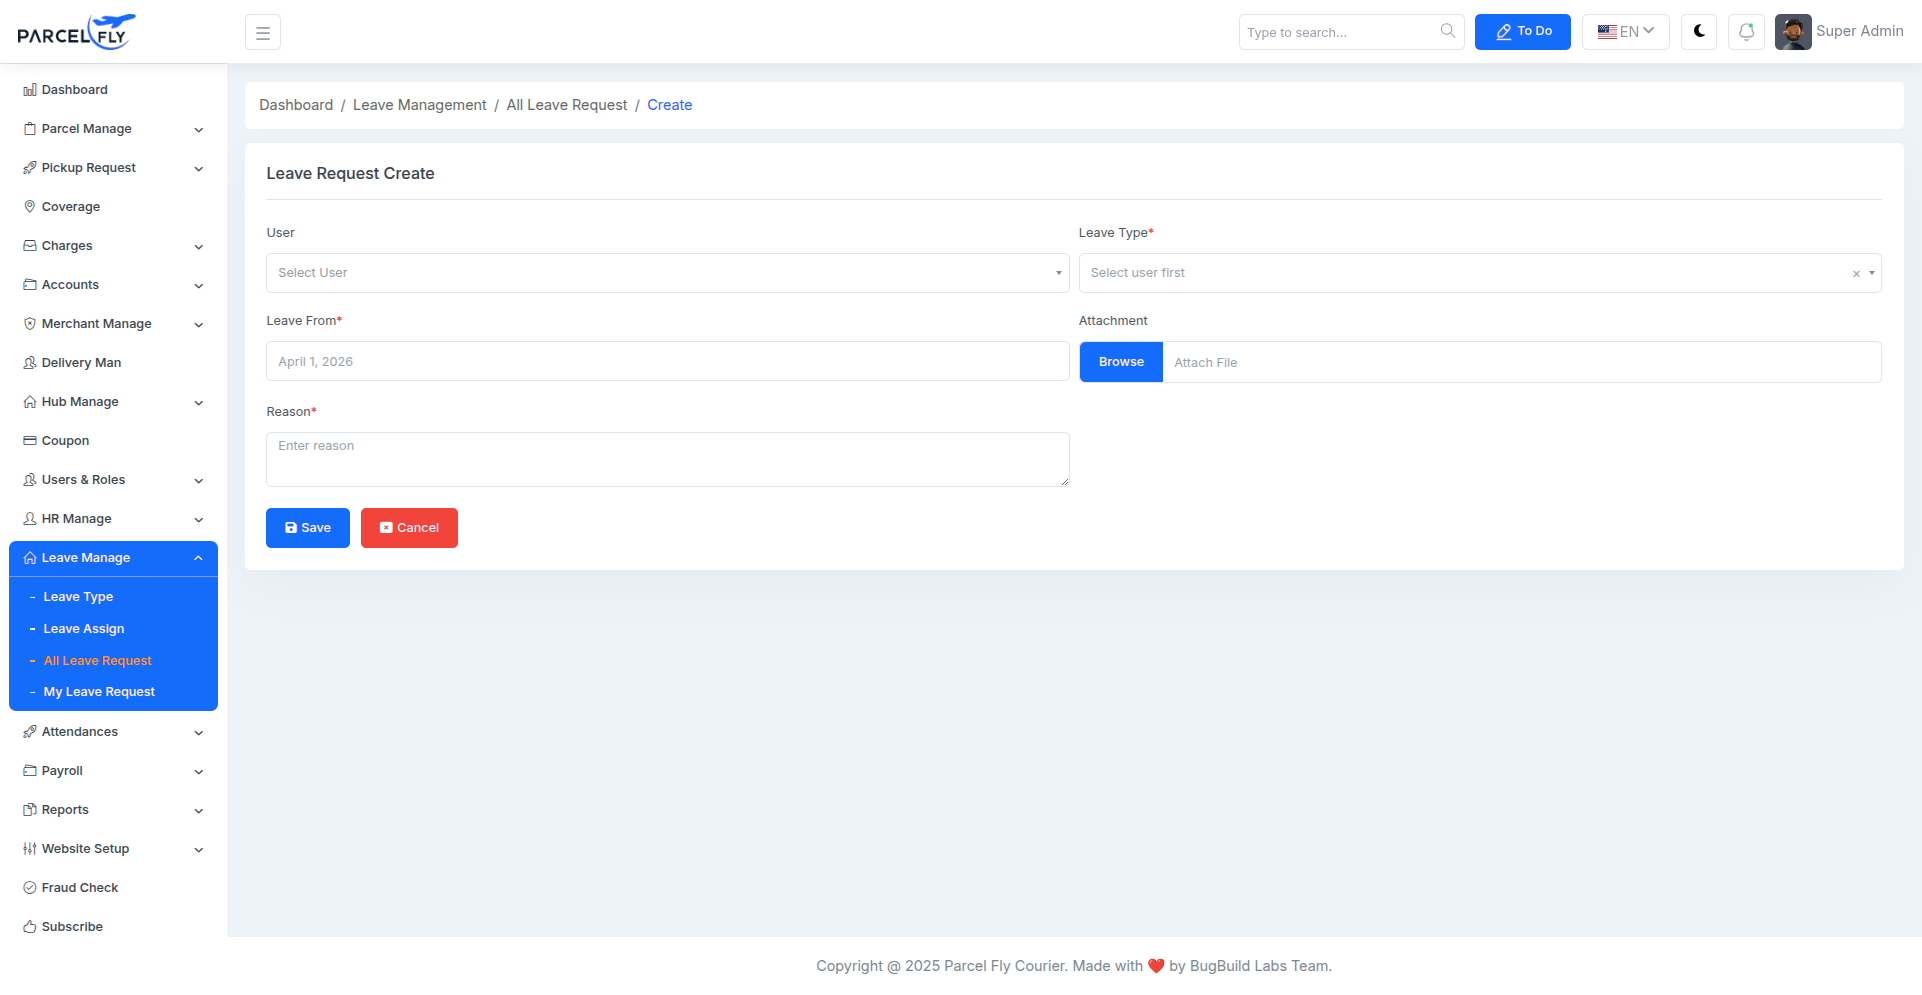
Leave Request Create
The leave request form is used to submit employee leave applications through the HR module.
- Request Form: Enter leave dates, leave type, and supporting details.
- HR Workflow: Supports internal leave approval and attendance-related record keeping.
- Structured Submission: Keeps leave data organized for managers and HR teams.
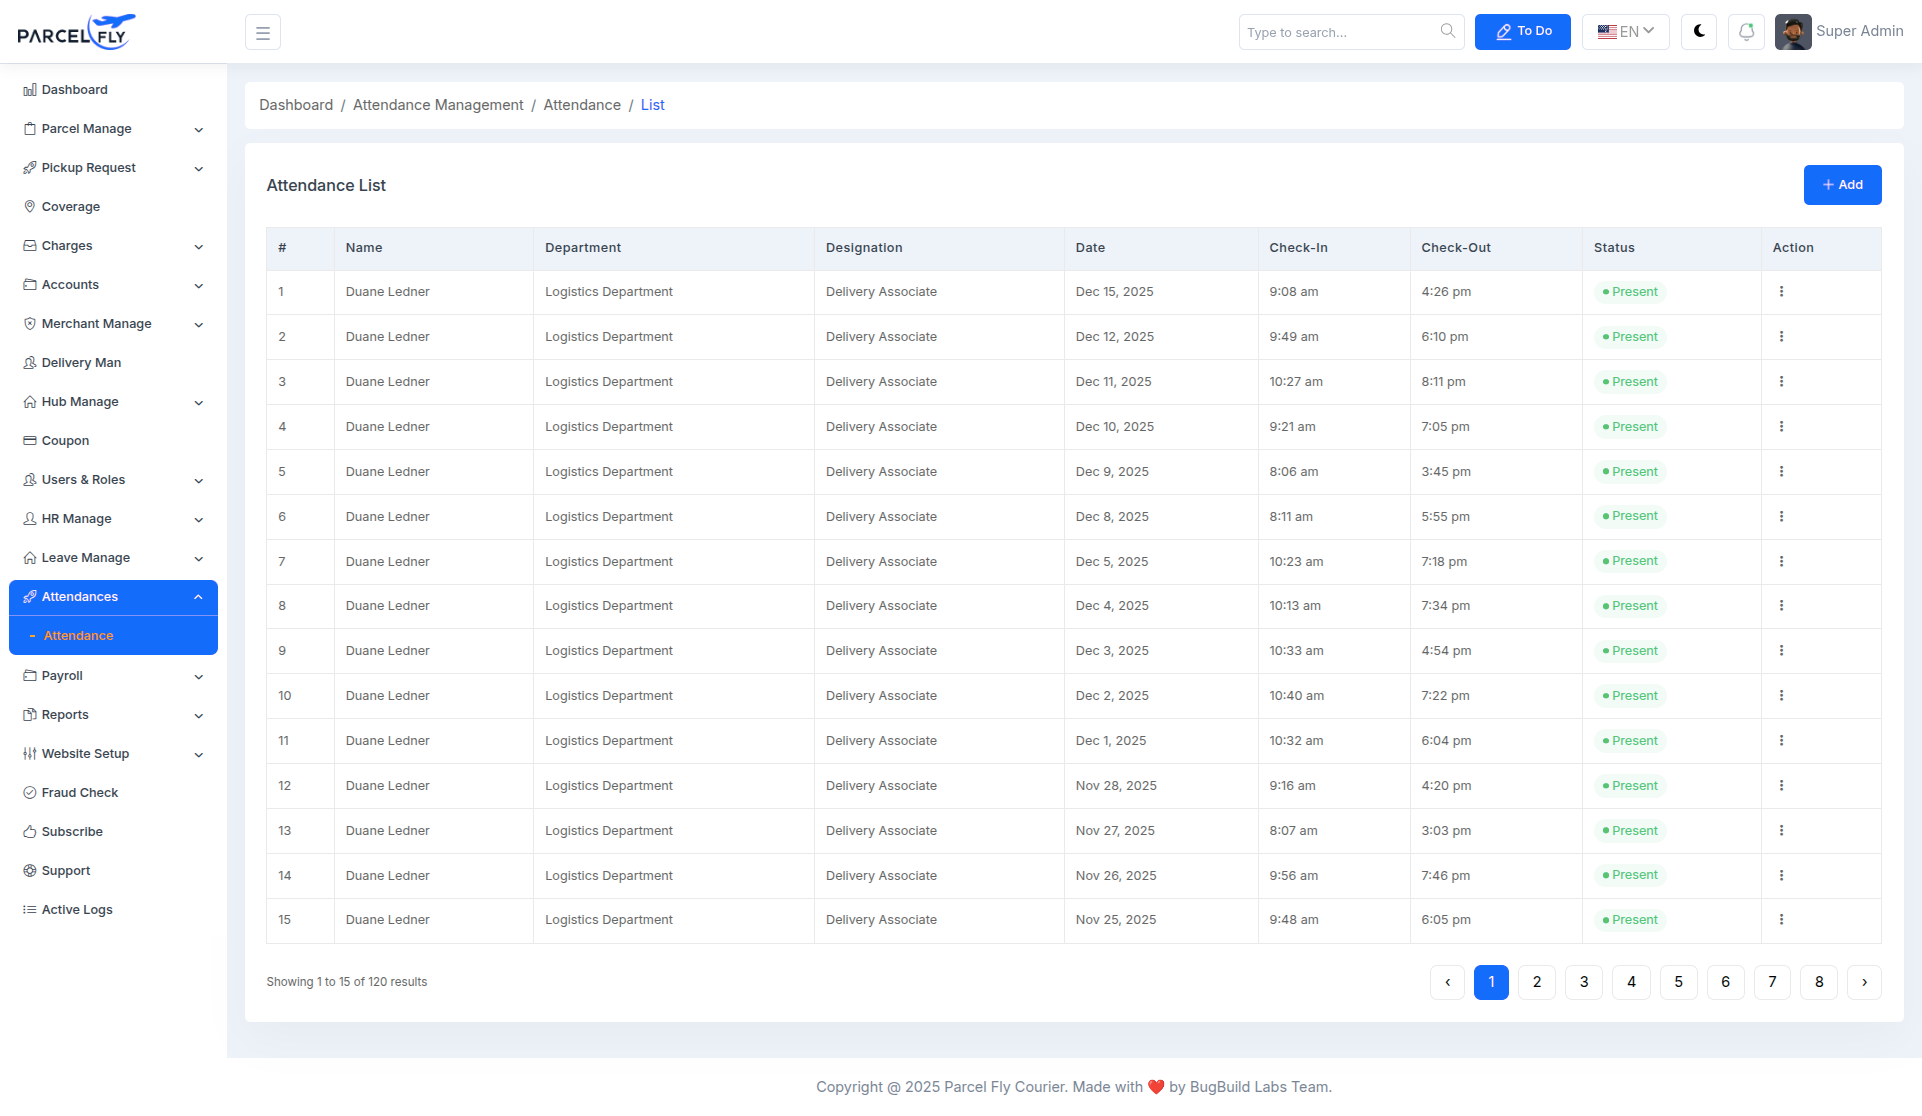
Attendance List
The attendance list helps HR teams monitor staff presence and attendance records.
- Attendance Tracking: View attendance-related records for staff operations.
- HR Monitoring: Supports workforce management and internal attendance review.
- Operational Support: Keeps attendance data accessible for HR and payroll coordination.
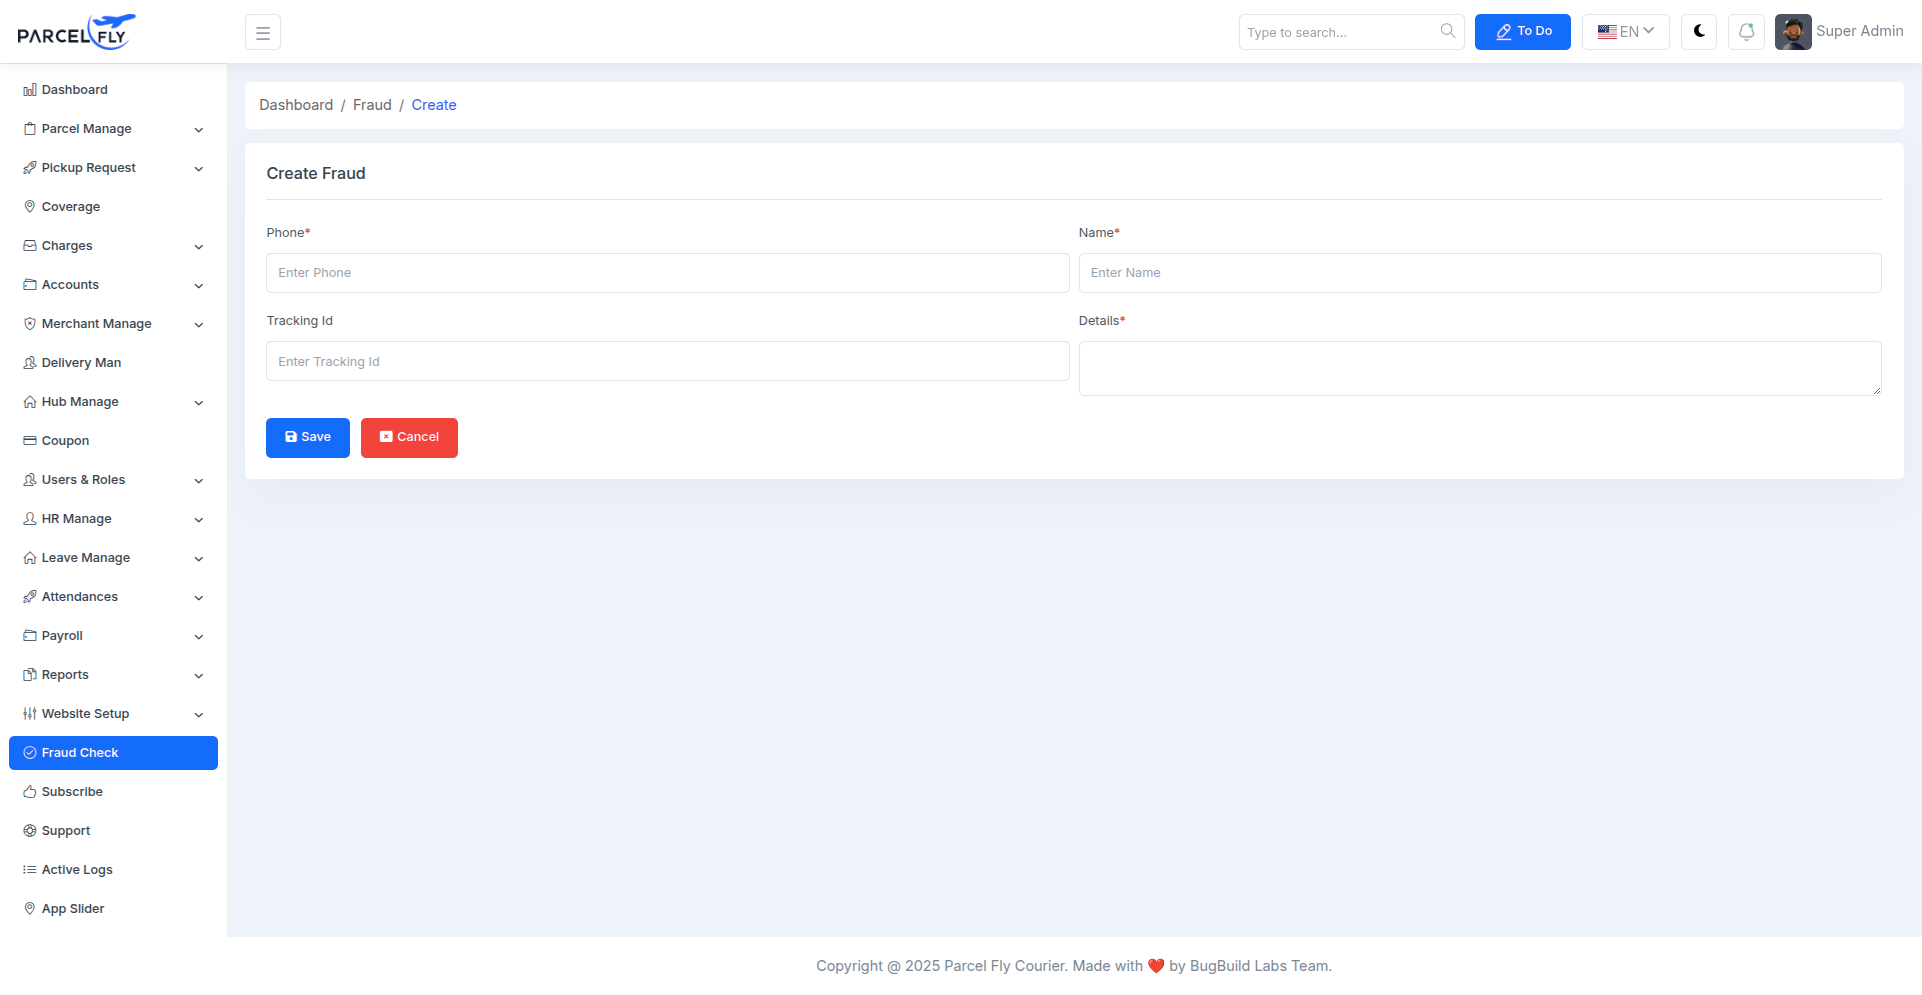
Fraud Check Create
The fraud check form allows administrators to record and review suspicious activity or fraud-related information.
- Case Entry: Create a structured fraud-check record from the backend.
- Risk Documentation: Maintain operational notes or fraud-related evidence in one place.
- Internal Control: Supports compliance and risk-review workflows.
Dark Theme Preview
The backend also supports a dark theme, giving users an alternate visual mode for day-to-day dashboard work.
- Theme Switch: Users can work with a darker interface for long sessions or visual preference.
- Same Data Layout: Core dashboard cards, charts, and tables remain accessible in the dark theme.
- UI Consistency: Keeps the same functionality while changing the visual presentation.
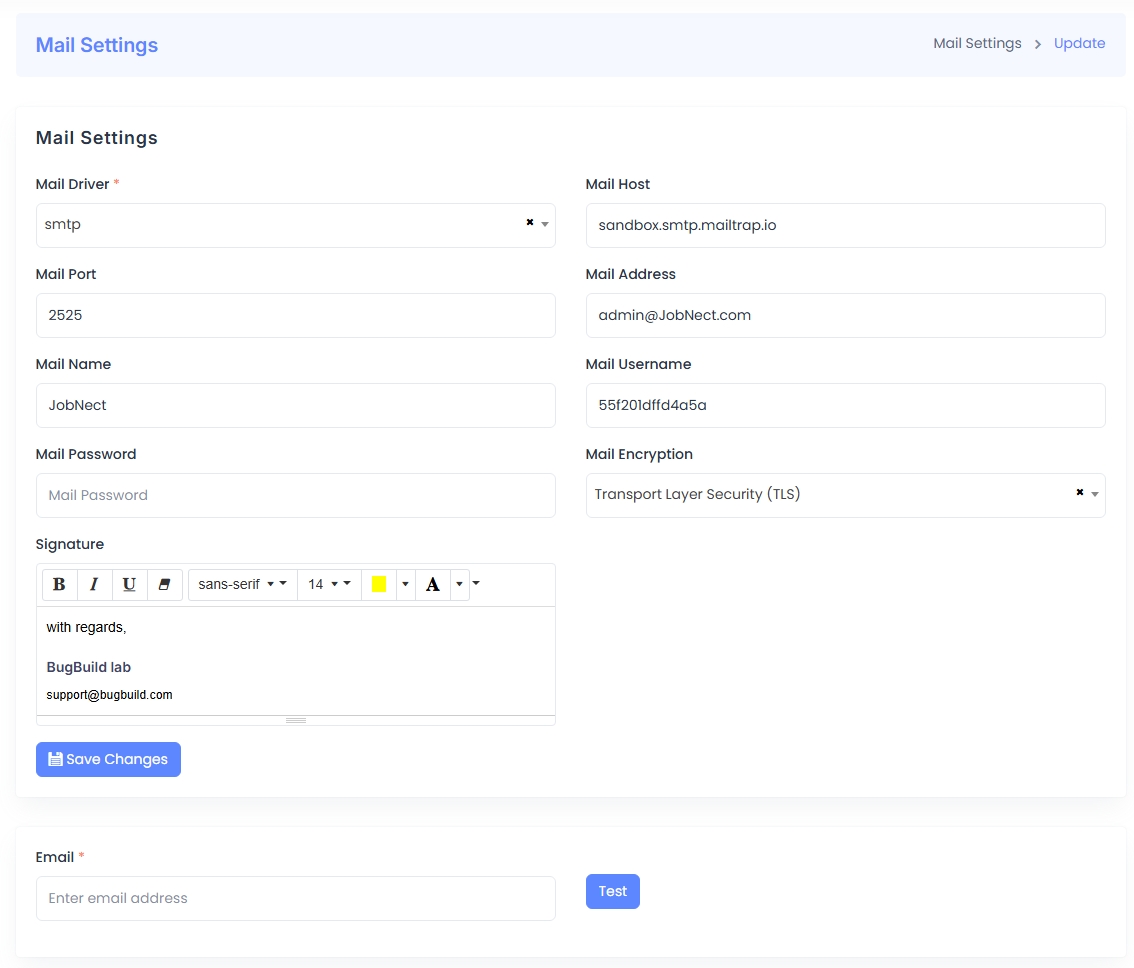
Mail Settings
The Mail Settings panel is used to configure email delivery through SMTP or other supported drivers. It includes fields for the mail host, port, encryption method, authentication credentials, and sender identity.
- Driver & Host: Define the mail driver (SMTP) and mail server host (e.g., Mailtrap).
- Port & Encryption: Specify port number and encryption method (TLS/SSL).
- Authentication: Enter mail username, password, and sender address.
- Sender Identity: Configure the senderâs name and signature with optional formatting.
- Test Functionality: A test email can be sent to verify configuration before going live.
After saving, you can use the built-in test email feature to confirm that the configuration is working correctly.
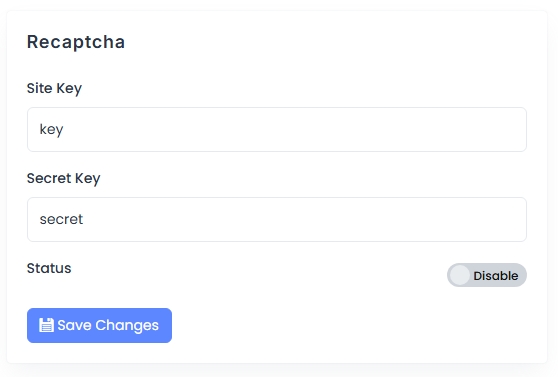
Recaptcha
The Recaptcha configuration section protects the application from spam and abuse by using Google reCAPTCHA. Administrators must provide a valid Site Key and Secret Key from the Google reCAPTCHA console.
- Site Key: This is used in the frontend integration of reCAPTCHA.
- Secret Key: Used in the backend to verify the userâs response.
- Status Toggle: Enable or disable reCAPTCHA functionality site-wide.
Click Save Changes to apply the updated reCAPTCHA settings.
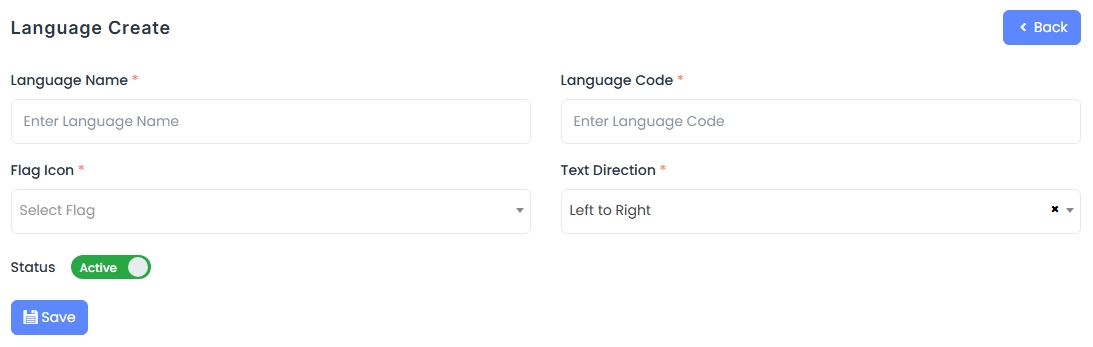
Language Management
The Language Management module allows administrators to manage localization by adding supported languages and translating system phrases.
Module Features:
- Language Create: Form to add a new language with required fields:
- Language Name
- Language Code
- Flag Icon (dropdown)
- Text Direction (e.g., Left to Right, Right to Left)
- Status toggle (Active/Inactive)
- Language List: Displays all configured languages with their flag, name, code, and current status. Each entry includes action buttons for editing or deleting.
- Edit Phrase: Enables translation of application terms per module. Each phrase has a technical key and its translated value, which can be updated inline.
This feature is essential for multilingual deployments, ensuring users see content in their preferred language.