ParcelFly Documentation: This tab contains the web documentation. See New Web Update Guide for everything new in this release.
New Web Update Guide
This release adds new business-line modules (truck, express, line haul, warehouse, shifting, Shop & Ship and more), a smarter scan station and a refreshed look. Local delivery works exactly as before.
- New modules: International Parcel, Freight Forwarding, Truck & Cargo Booking, Express Delivery, Line Haul, Warehouse & Fulfillment, House & Office Shifting, Shop & Ship, Sales CRM, Accounting, API & Webhooks for online stores, and Customer Messages by SMS and WhatsApp.
- Smart scan station: camera and QR scanning, warnings, live totals and a safe bulk update. See Smart Scan Station.
- Brand colour: the logo indigo is now the default; change it any time. See Brand Colour.
- Merchant panel: a grouped sidebar with Create parcel, Bulk import and Fraud check. See Merchant Panel Menu.
- Dashboard analytics: choose the last 7, 30 or 90 days; cards, charts and totals use the same period.
- Security: two-factor login and Log in as; the sign-in page no longer keeps the password in a cookie.
- Fresh installs: the website slider, testimonials, blog and FAQ come with real courier text instead of placeholders.
Getting Started
Welcome to ParcelFly
Thank you for choosing ParcelFly - a modern and scalable parcel delivery management solution built with Laravel. It gives you the tools to manage operations, merchants, payments, and delivery workflows from one system.
This documentation is designed to guide developers, administrators, and product owners through ParcelFly's features, installation process, core modules, and customization possibilities. With an intuitive structure, flexible permission systems, and multi-language support, ParcelFly helps you deliver a seamless parcel management experience.
- Manage parcels, merchants, charges, hubs, and delivery teams from one admin system
- Support parcel tracking, coverage management, and charge configuration
- Includes role-based access, multi-language support, and operational reporting
- Built with clean Laravel architecture for scalable delivery operations
Let's begin your journey with an efficient and modern parcel delivery platform.
Name: ParcelFly - Parcel Delivery Management Script (Laravel)
Version: 1.x
Author: BugBuild Labs | Email: [email protected]
Microsoft Teams: [email protected] | WhatsApp: +8801811843300 | Website: https://bugbuild.com
License: Commercial – Single or Extended Use
Requirements
Before installing ParcelFly - Parcel Delivery Management Script, confirm that your server meets the following requirements.
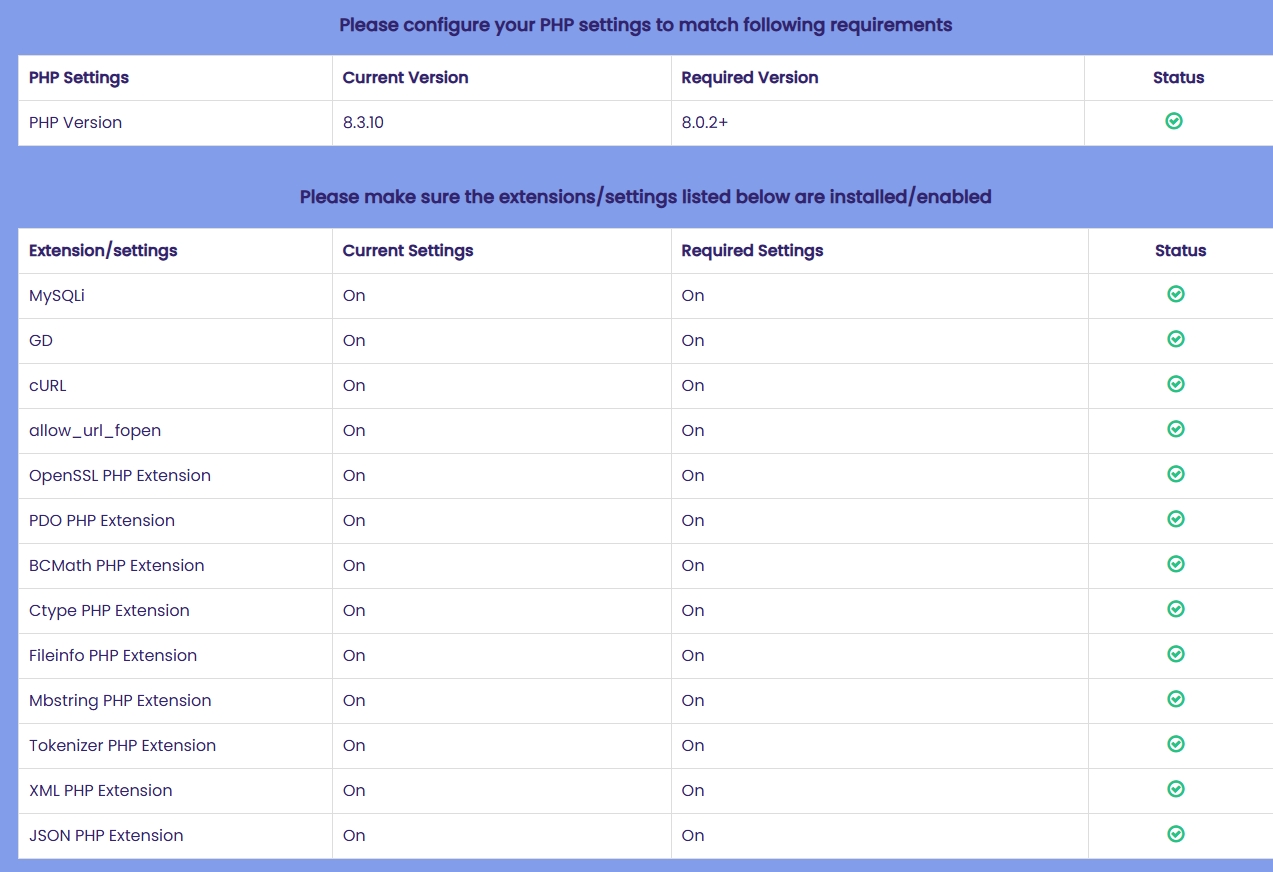
PHP Settings:
- PHP Version: 8.2 or higher
Required PHP Extensions:
- MySQLi
- GD
- cURL
- allow_url_fopen
- OpenSSL
- PDO
- BCMath
- Ctype
- Fileinfo
- Mbstring
- Tokenizer
- XML
- JSON
Database Setup (via cPanel)
Follow these steps to create a database in cPanel.
Step 1 – Login to cPanel:
Open your hosting account's cPanel, usually at https://yourdomain.com/cpanel.
Step 2 – Open MySQL® Database Wizard:
From the cPanel dashboard, open MySQL Database Wizard.
Step 3 – Create Database:
Enter a name for your new database and click Next Step.
Step 4 – Create Database User:
Enter a username and a strong password, then click Create User. Save these credentials securely.
Step 5 – Add User to Database:
Select All Privileges to grant full database access, then click Next Step to finish.
✅ You should now have these ready:
- Database Name
- Database Username
- Password
Upload Files & Set Permissions
Package contents: Main_Files.zip contains four folders: WebSourceCode (Laravel website, admin panel and API), MerchantAppSourceCode (Flutter Merchant App), DeliverymanAppSourceCode (Flutter Deliveryman App) and documentation (this guide).
Step 1 – Upload Application:
Download Main_Files.zip from CodeCanyon and extract it locally. Inside it, compress the contents of the WebSourceCode folder, upload the zip to public_html or www, and extract it on the server. The vendor folder is already included, so Composer is not required.
Step 2 – Set Writable Permissions:
Make sure the following folders and files are writable by the web server:
./routes./resources./public./storage./.env
Command (Linux): chmod -R 775 storage routes resources public .env
If .env does not exist yet, the installer creates it from .env.example on the first visit, so the main application folder must also be writable.
Installation
Follow these steps to install the ParcelFly Laravel application:
1. Launch the Installer:
Open your domain in a browser, for example https://yourdomain.com. The installation wizard will load automatically.
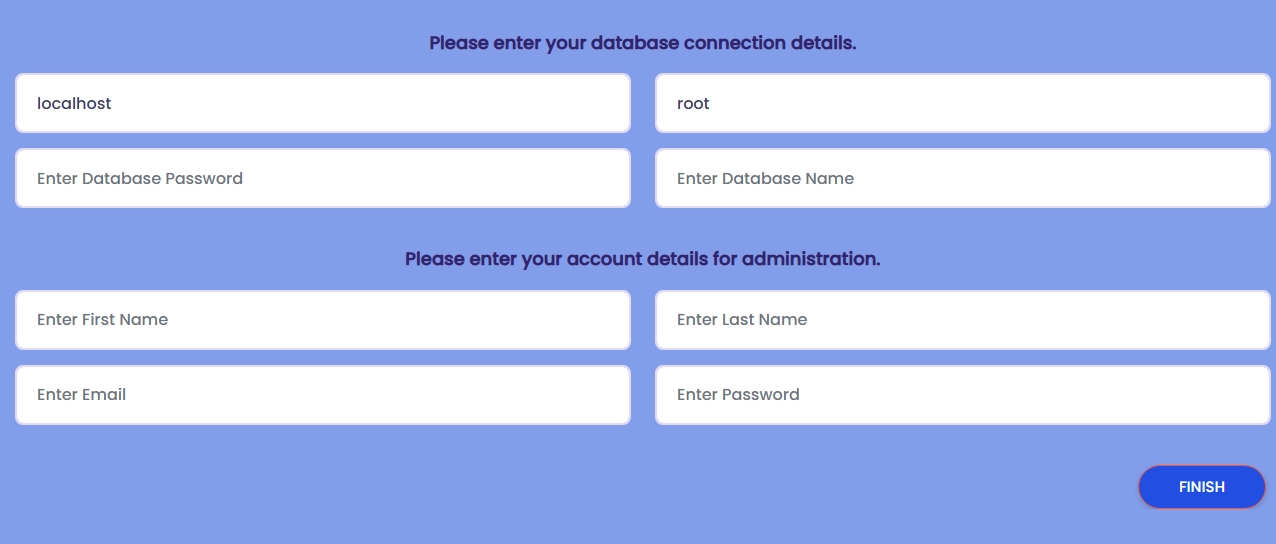
2. Enter Database Configuration:
Enter the database host, usually localhost, then provide the database name, username, and password.
3. Setup Admin Account:
Create the primary administrator account that will be used to access the backend after installation.
first name, last name, email, and a secure password
4. Complete Installation: After completing all required fields and verifying permissions, click FINISH to complete the installation.
Homepage
The ParcelFly homepage is the main public entry point for visitors, merchants, and customers. It highlights the platform, promotes delivery services, and guides users toward the most-used public actions.
- Hero Area: Presents the brand, promotional messaging, and primary call-to-action buttons.
- Service Sections: Highlights delivery features, service benefits, operational strengths, and client-focused content blocks.
- Navigation: Links visitors to login, charges, coverage, blogs, contact pages, and parcel tracking.
This page introduces the ParcelFly brand and directs visitors to the most relevant public workflows.

Homepage Sections
This view shows the extended homepage layout beyond the hero section, including service and company information.
- Operational Highlights: Displays benefits, workflow messaging, and service illustrations.
- Data Presentation: Includes charges, shipment process summaries, client reviews, and FAQ-style sections.
- Marketing Flow: Helps visitors understand ParcelFly before they proceed to login or parcel-related actions.

Login
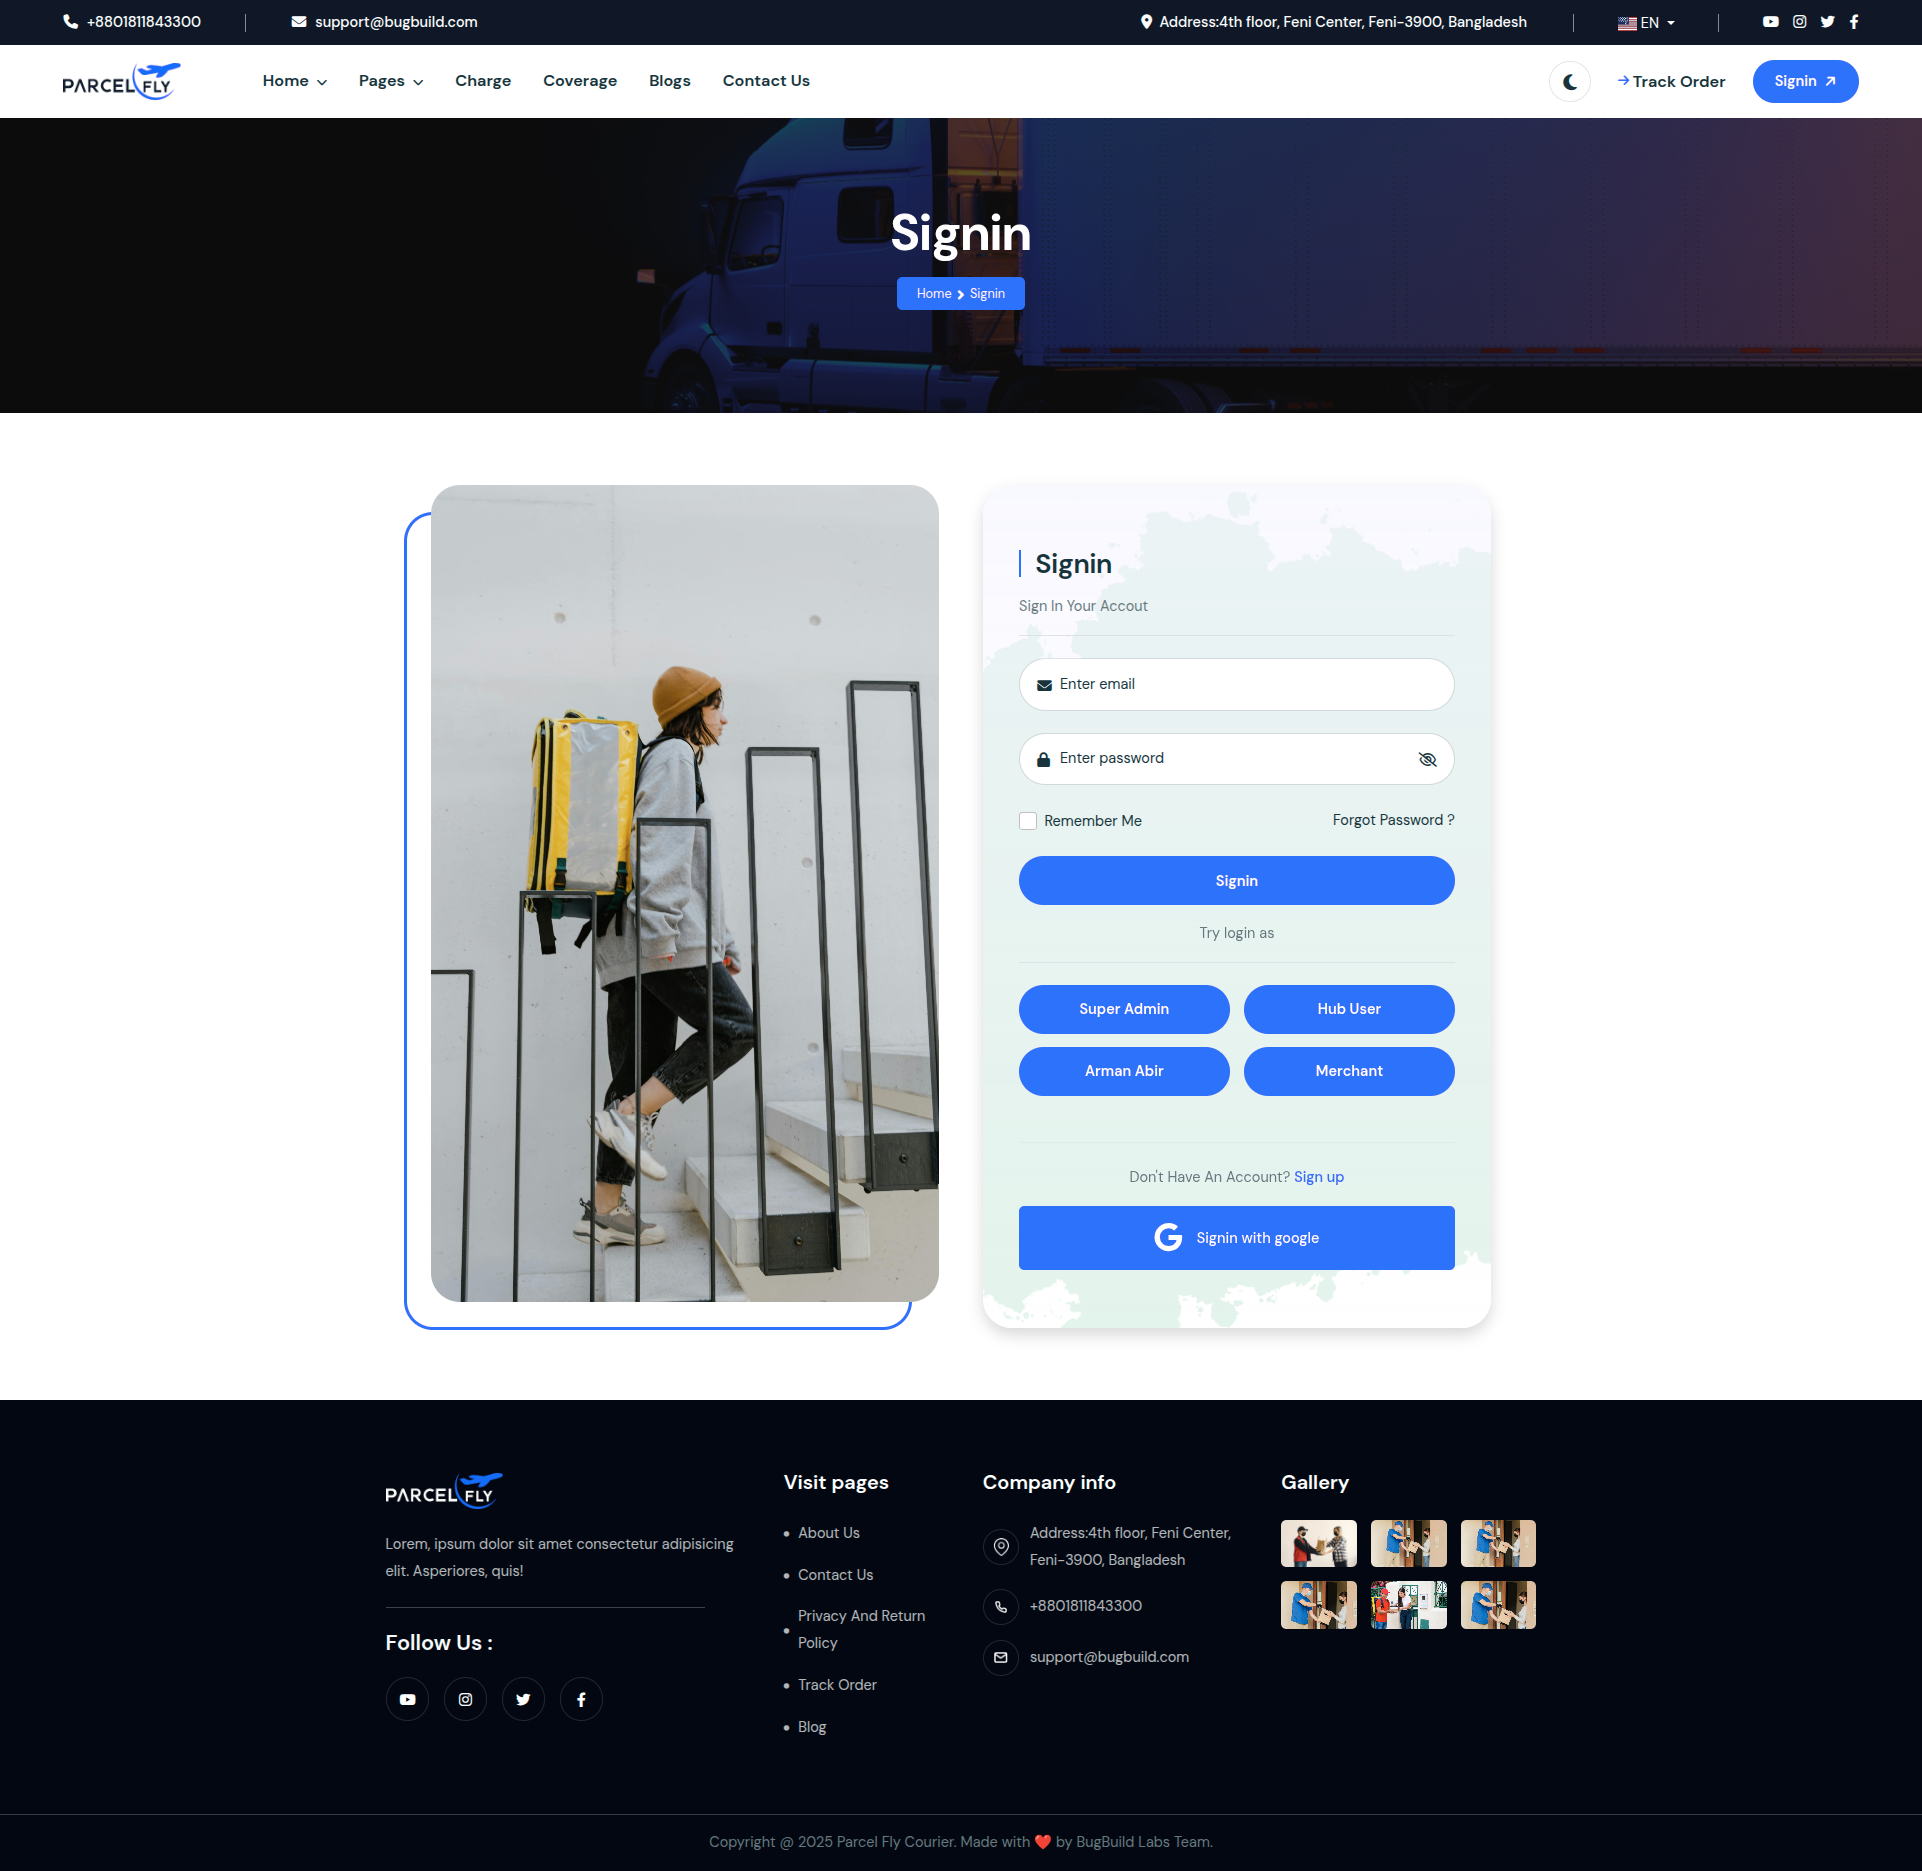
The web login page is used by administrators and internal staff to access the ParcelFly backend.
Step 1: Enter the registered Email Address in the first input field.
Step 2: Enter the account Password. The eye icon can be used to review the password.
Step 3: Click Signin to open the dashboard. The page also provides quick access to the forgot-password flow.
The page supports standard email and password authentication and may also include additional login methods when enabled.
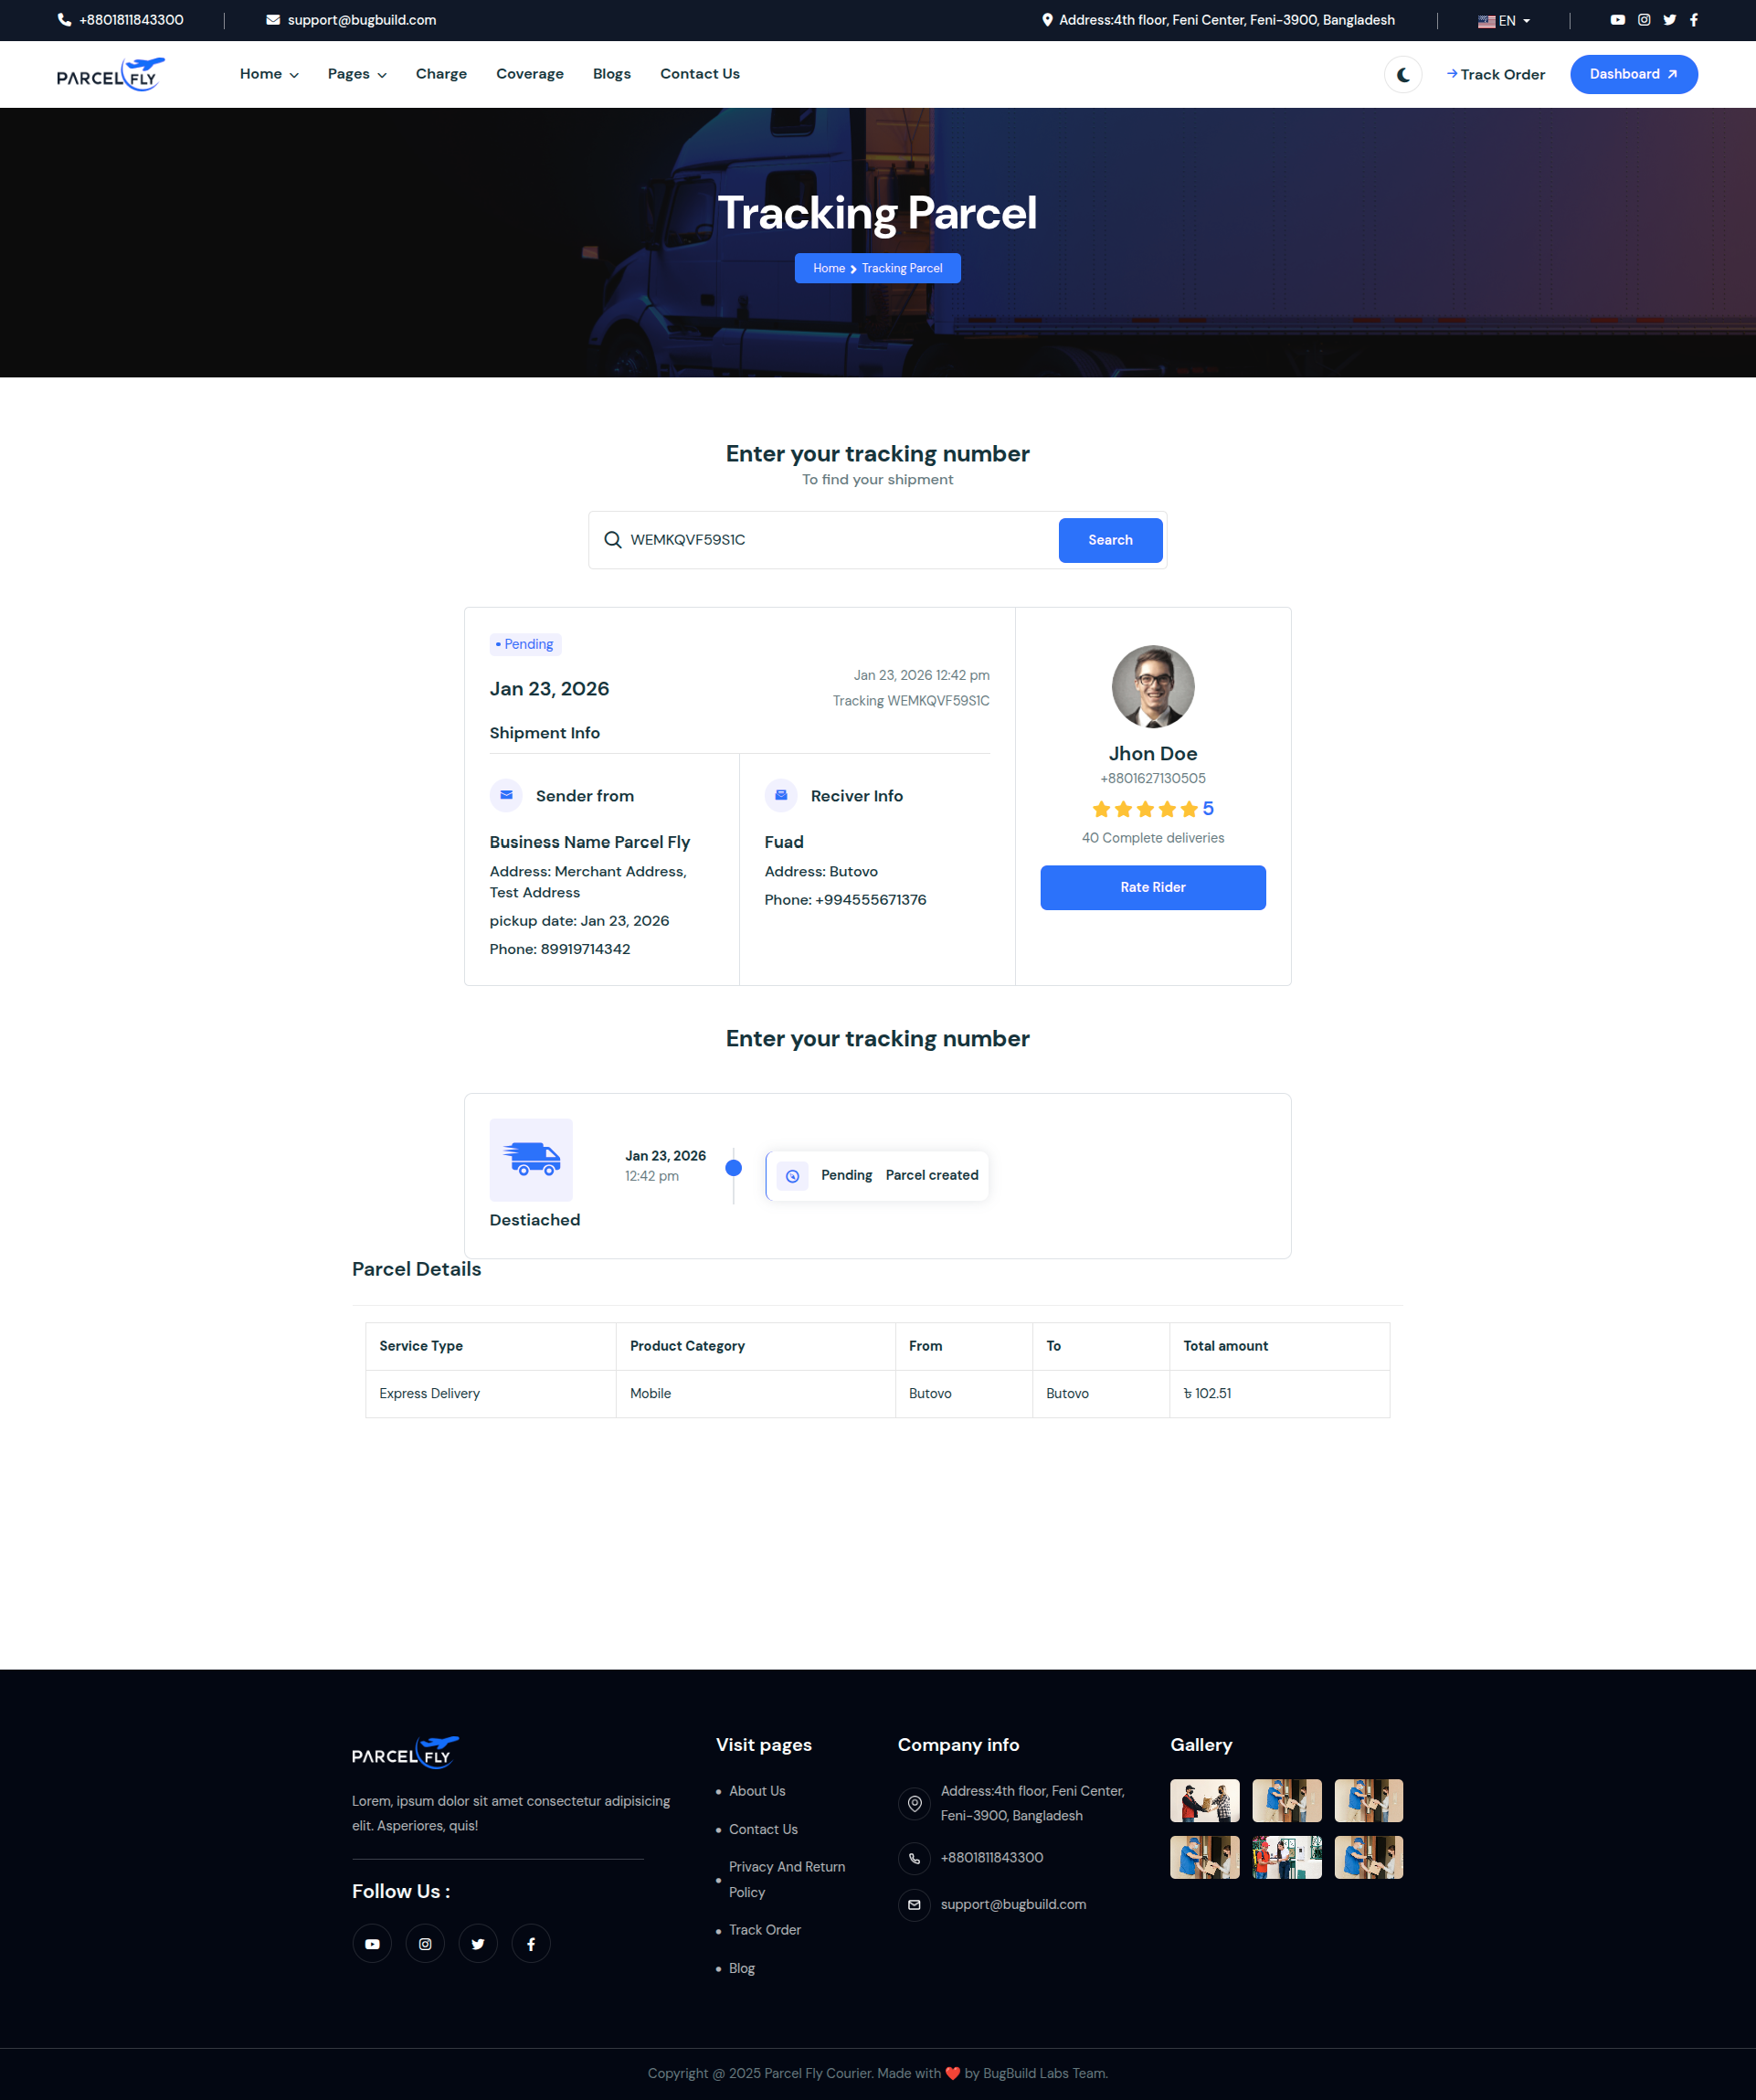
Parcel Tracking
The public tracking page allows customers to check parcel progress without signing in.
- Tracking Input: Customers enter a tracking ID to search for a parcel.
- Parcel Results: The page returns shipment details and delivery progress for the entered parcel.
- Self-service Access: This gives customers a simple self-service tracking experience.
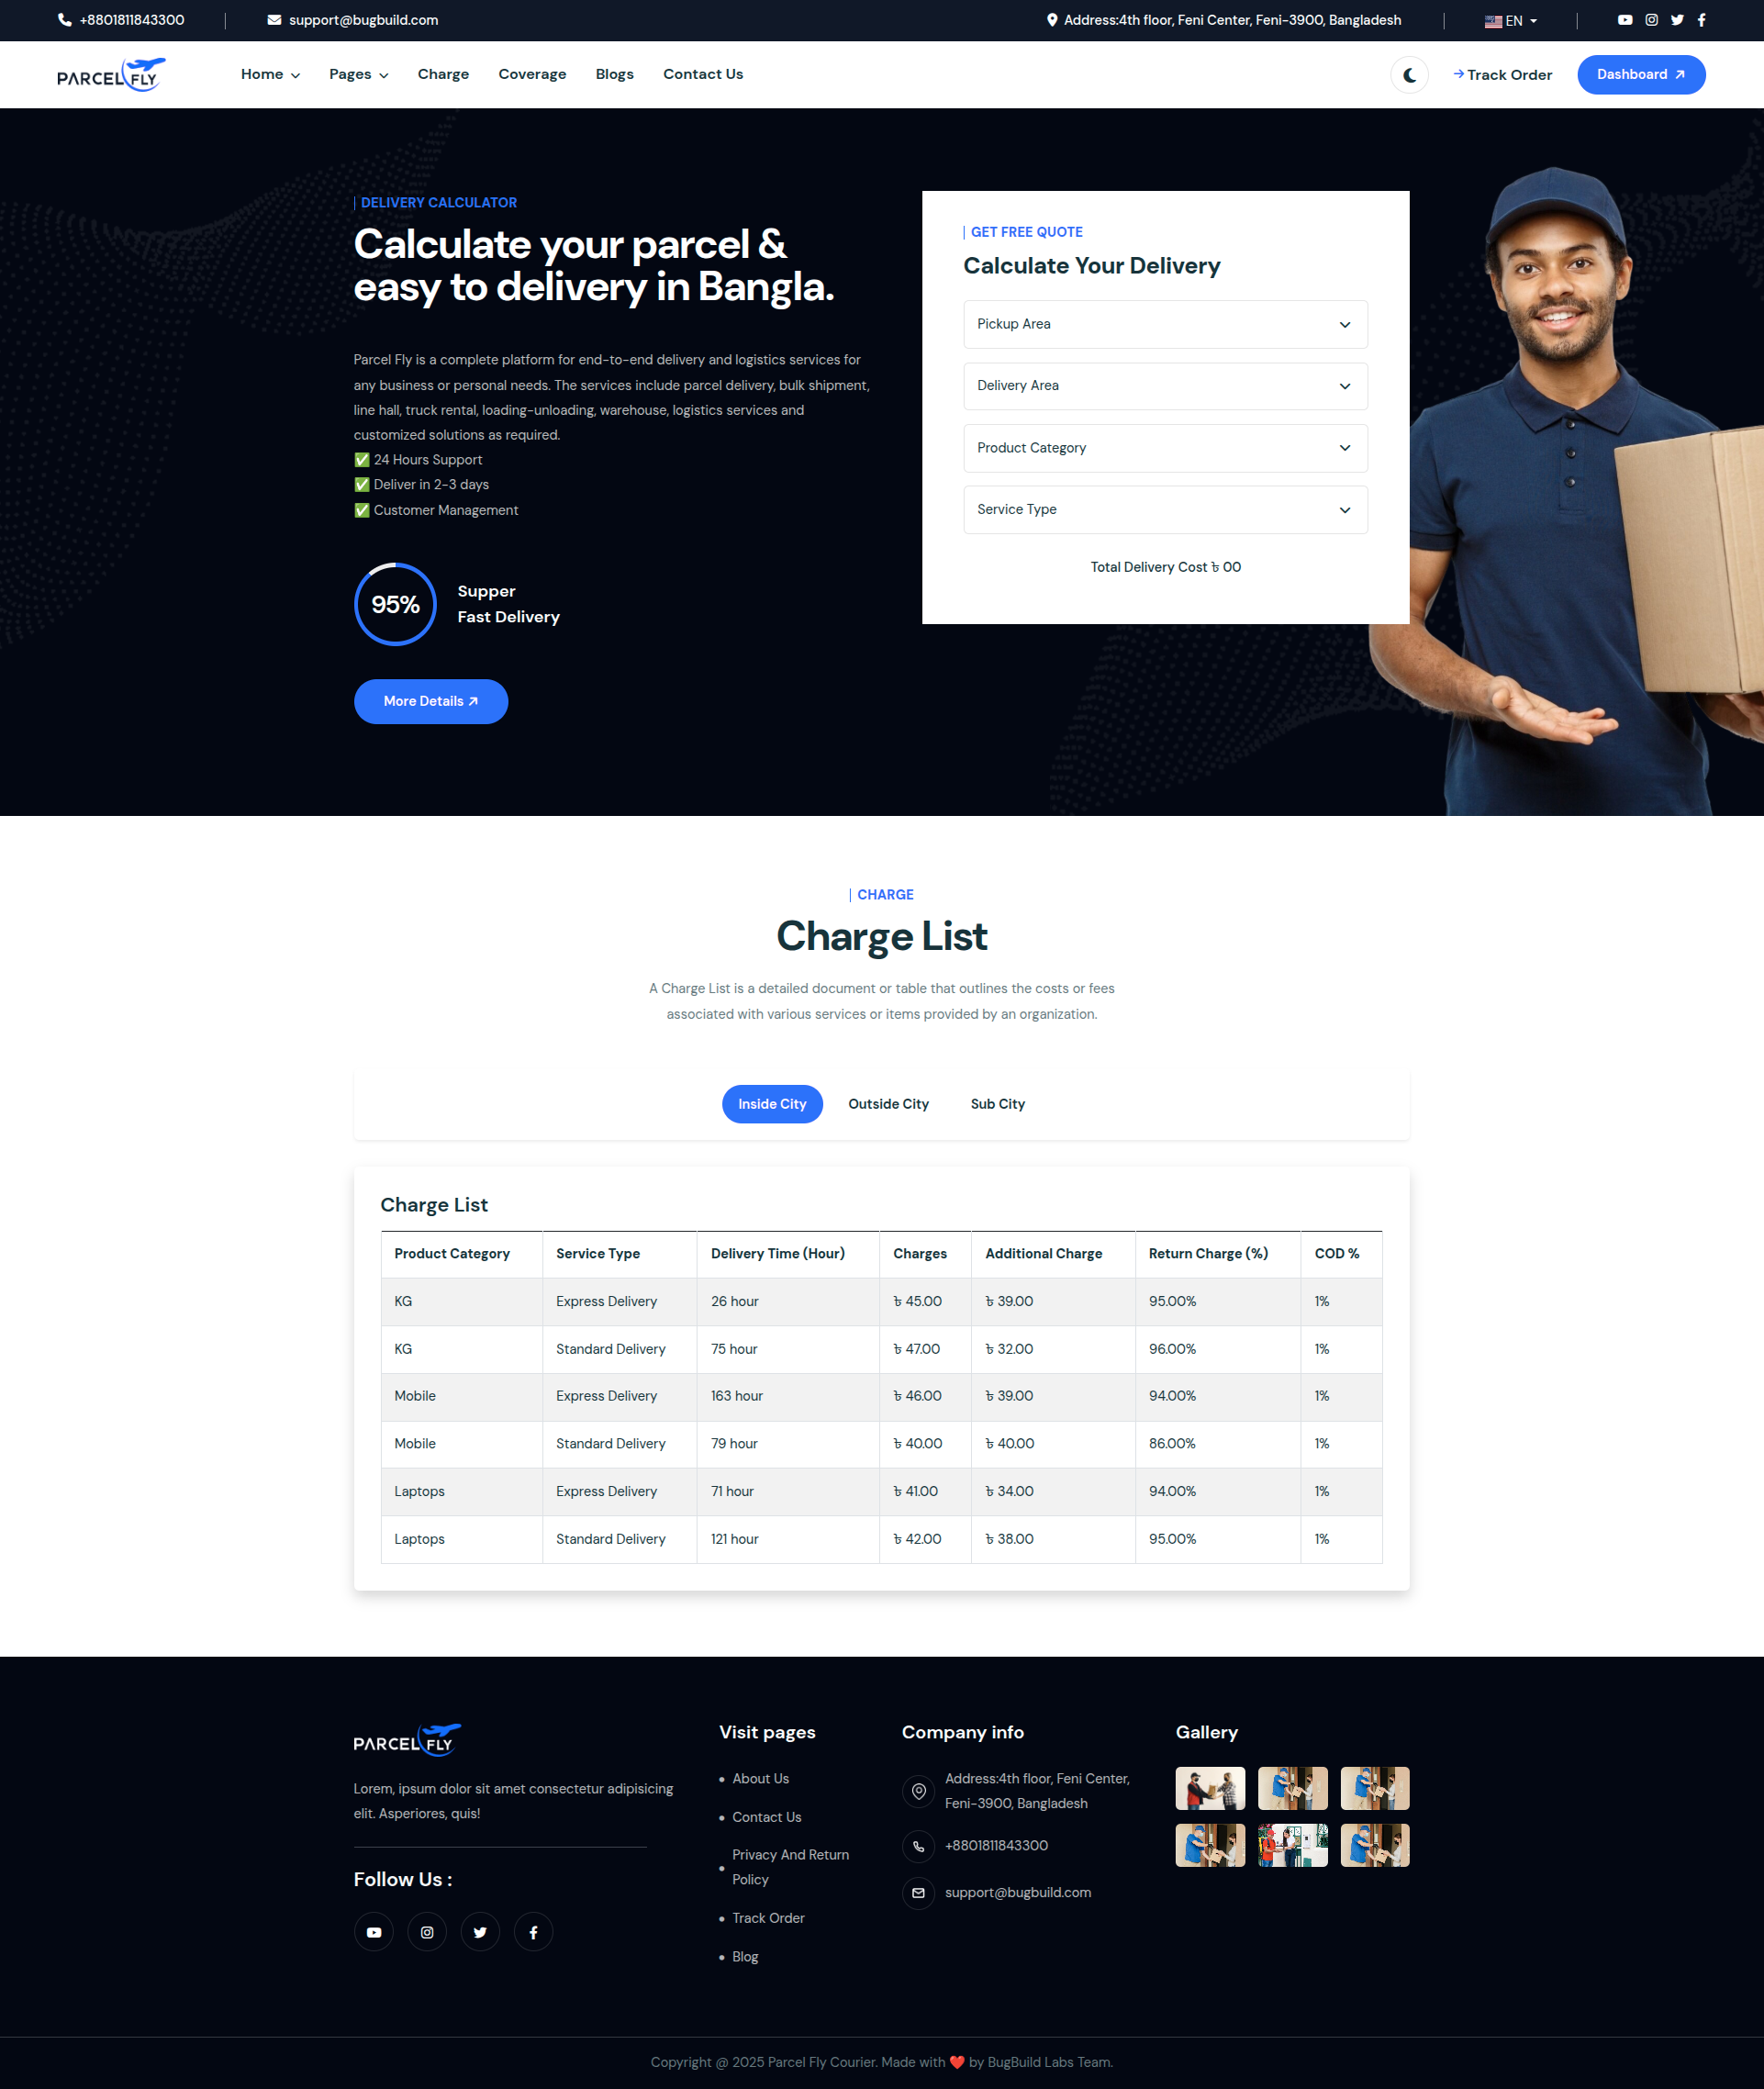
Charges Page
The public charges page presents the pricing structure used by ParcelFly delivery services.
- Rate Visibility: Visitors can review parcel charge rules before creating shipments.
- Public Reference: Merchants and customers can use this page to understand pricing expectations.
- Service Clarity: The screen supports transparent parcel charge communication.
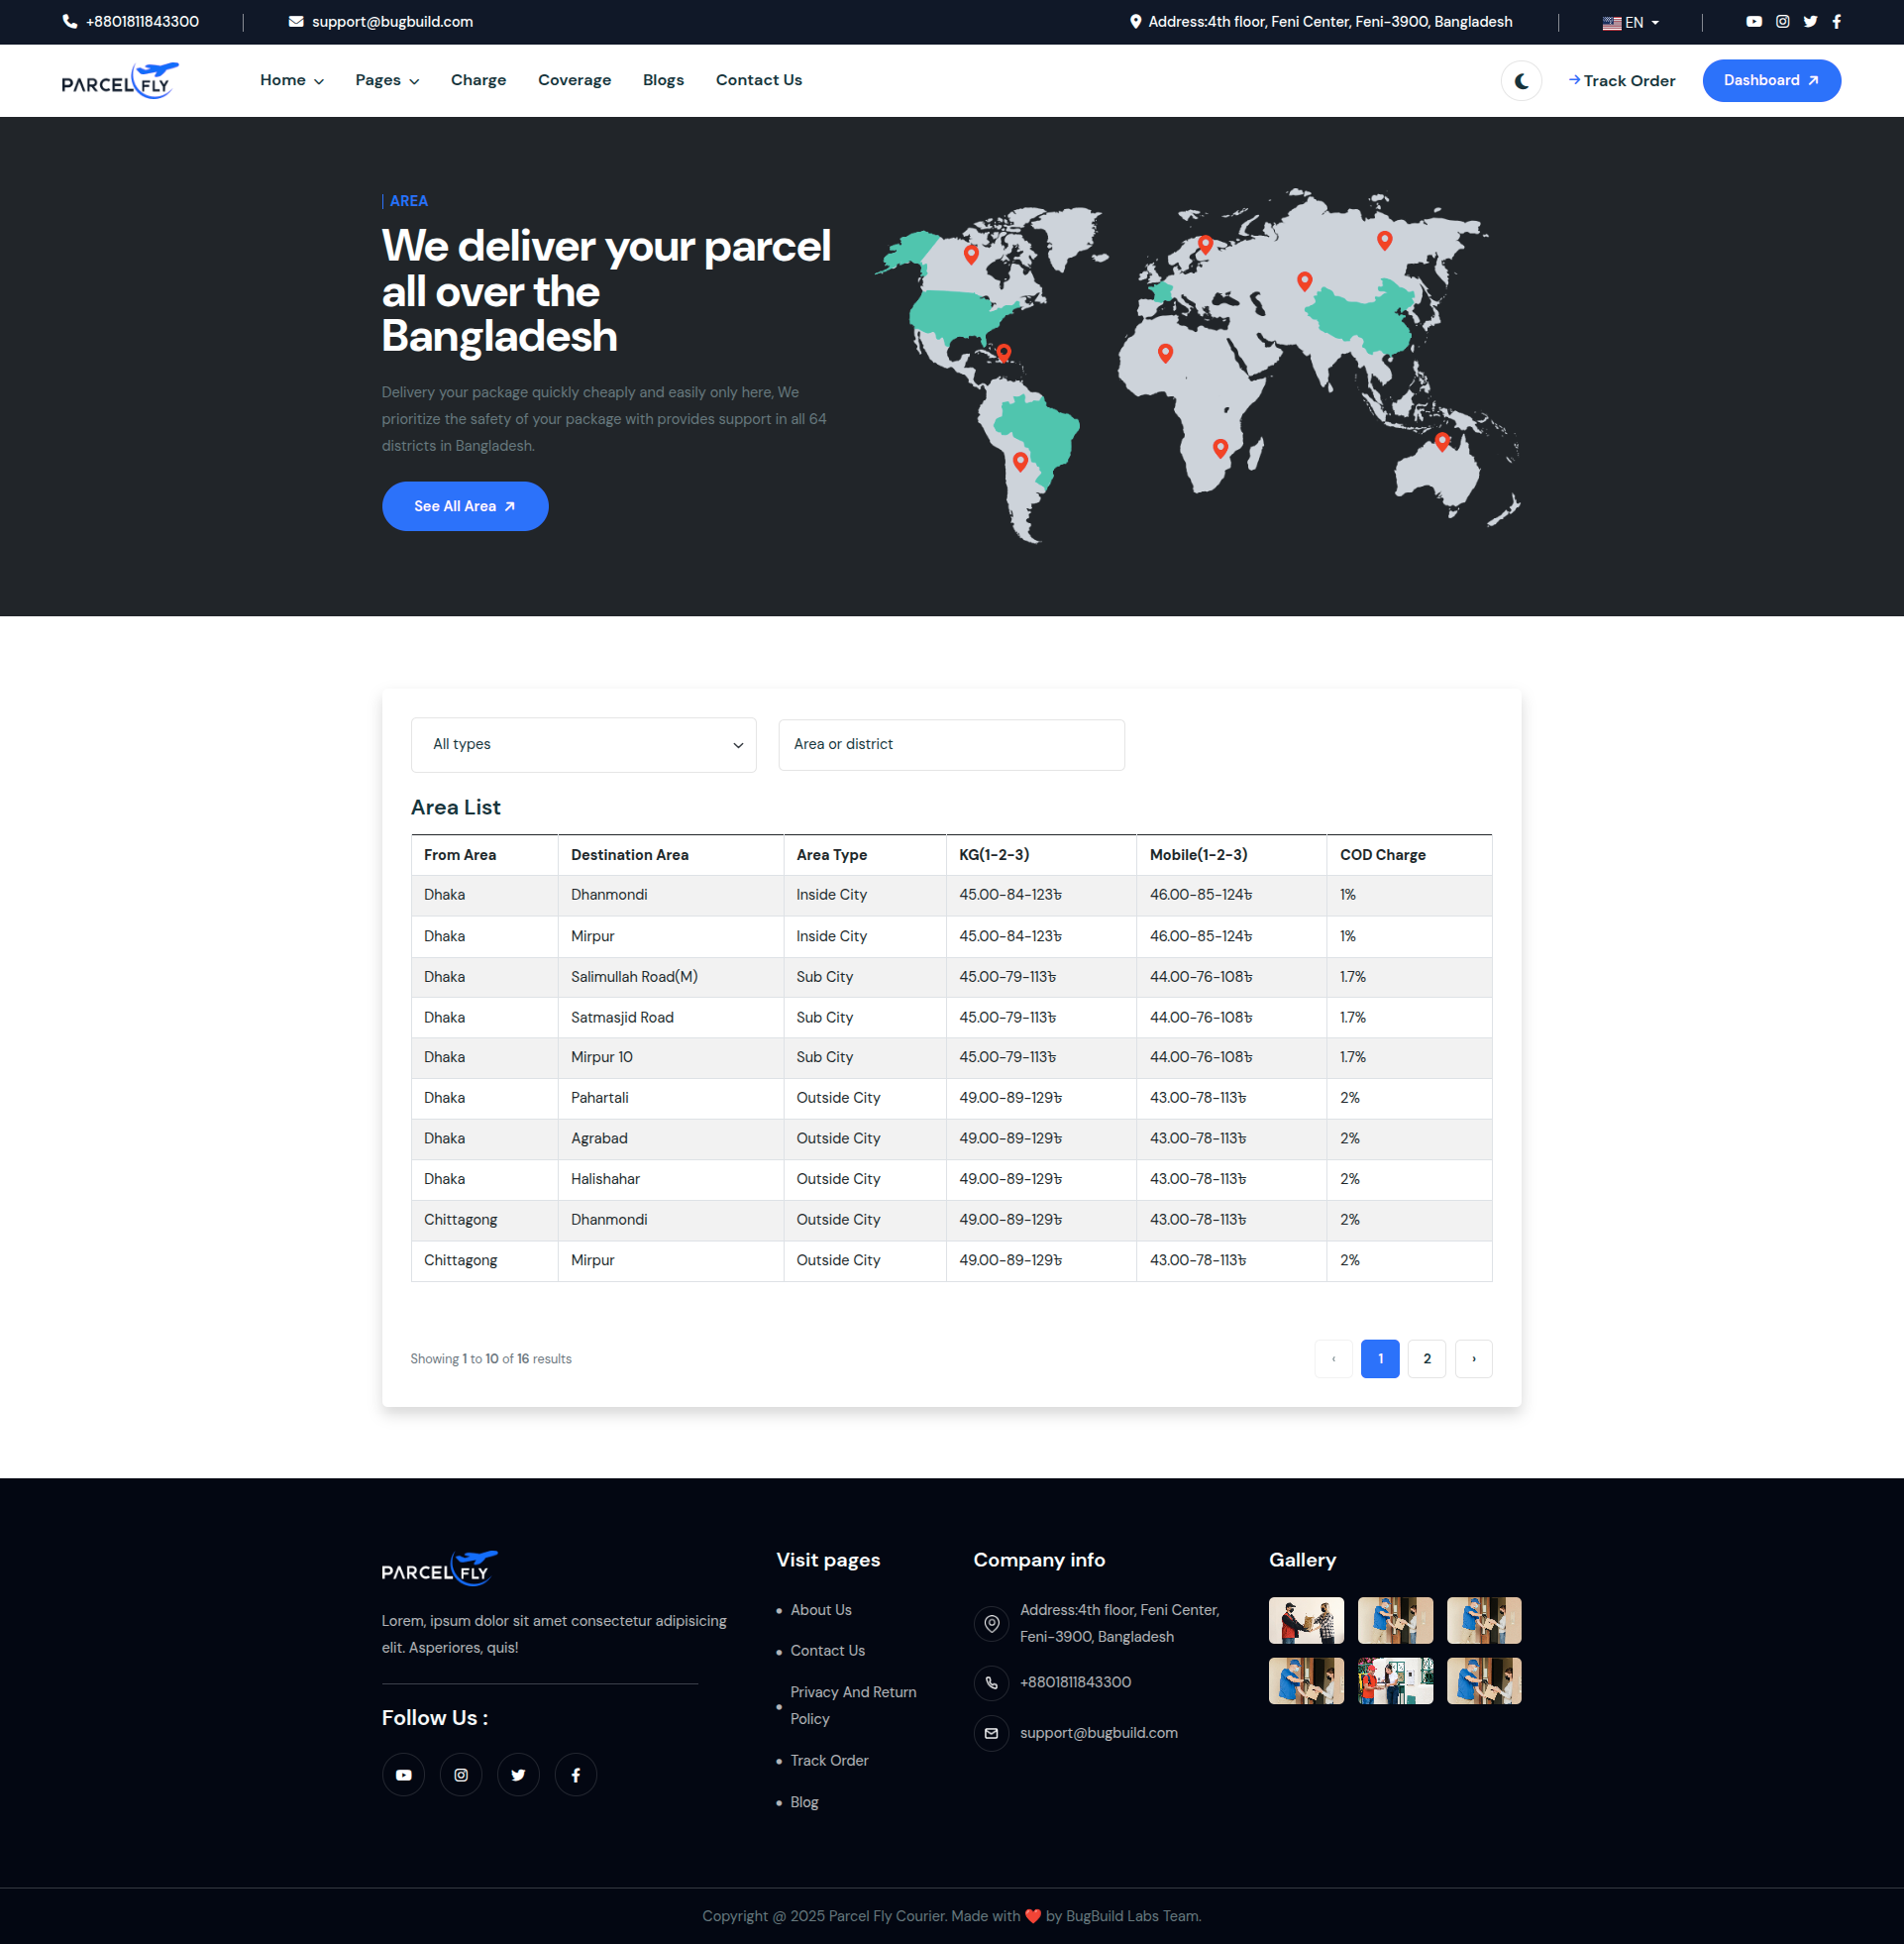
Coverage Page
The coverage page lists the delivery areas currently served by ParcelFly.
- Coverage Visibility: Users can confirm whether a destination is supported.
- Area Information: Coverage is displayed in a structured way for easier lookup.
- Operational Support: This page helps merchants and customers plan deliveries before shipment creation.
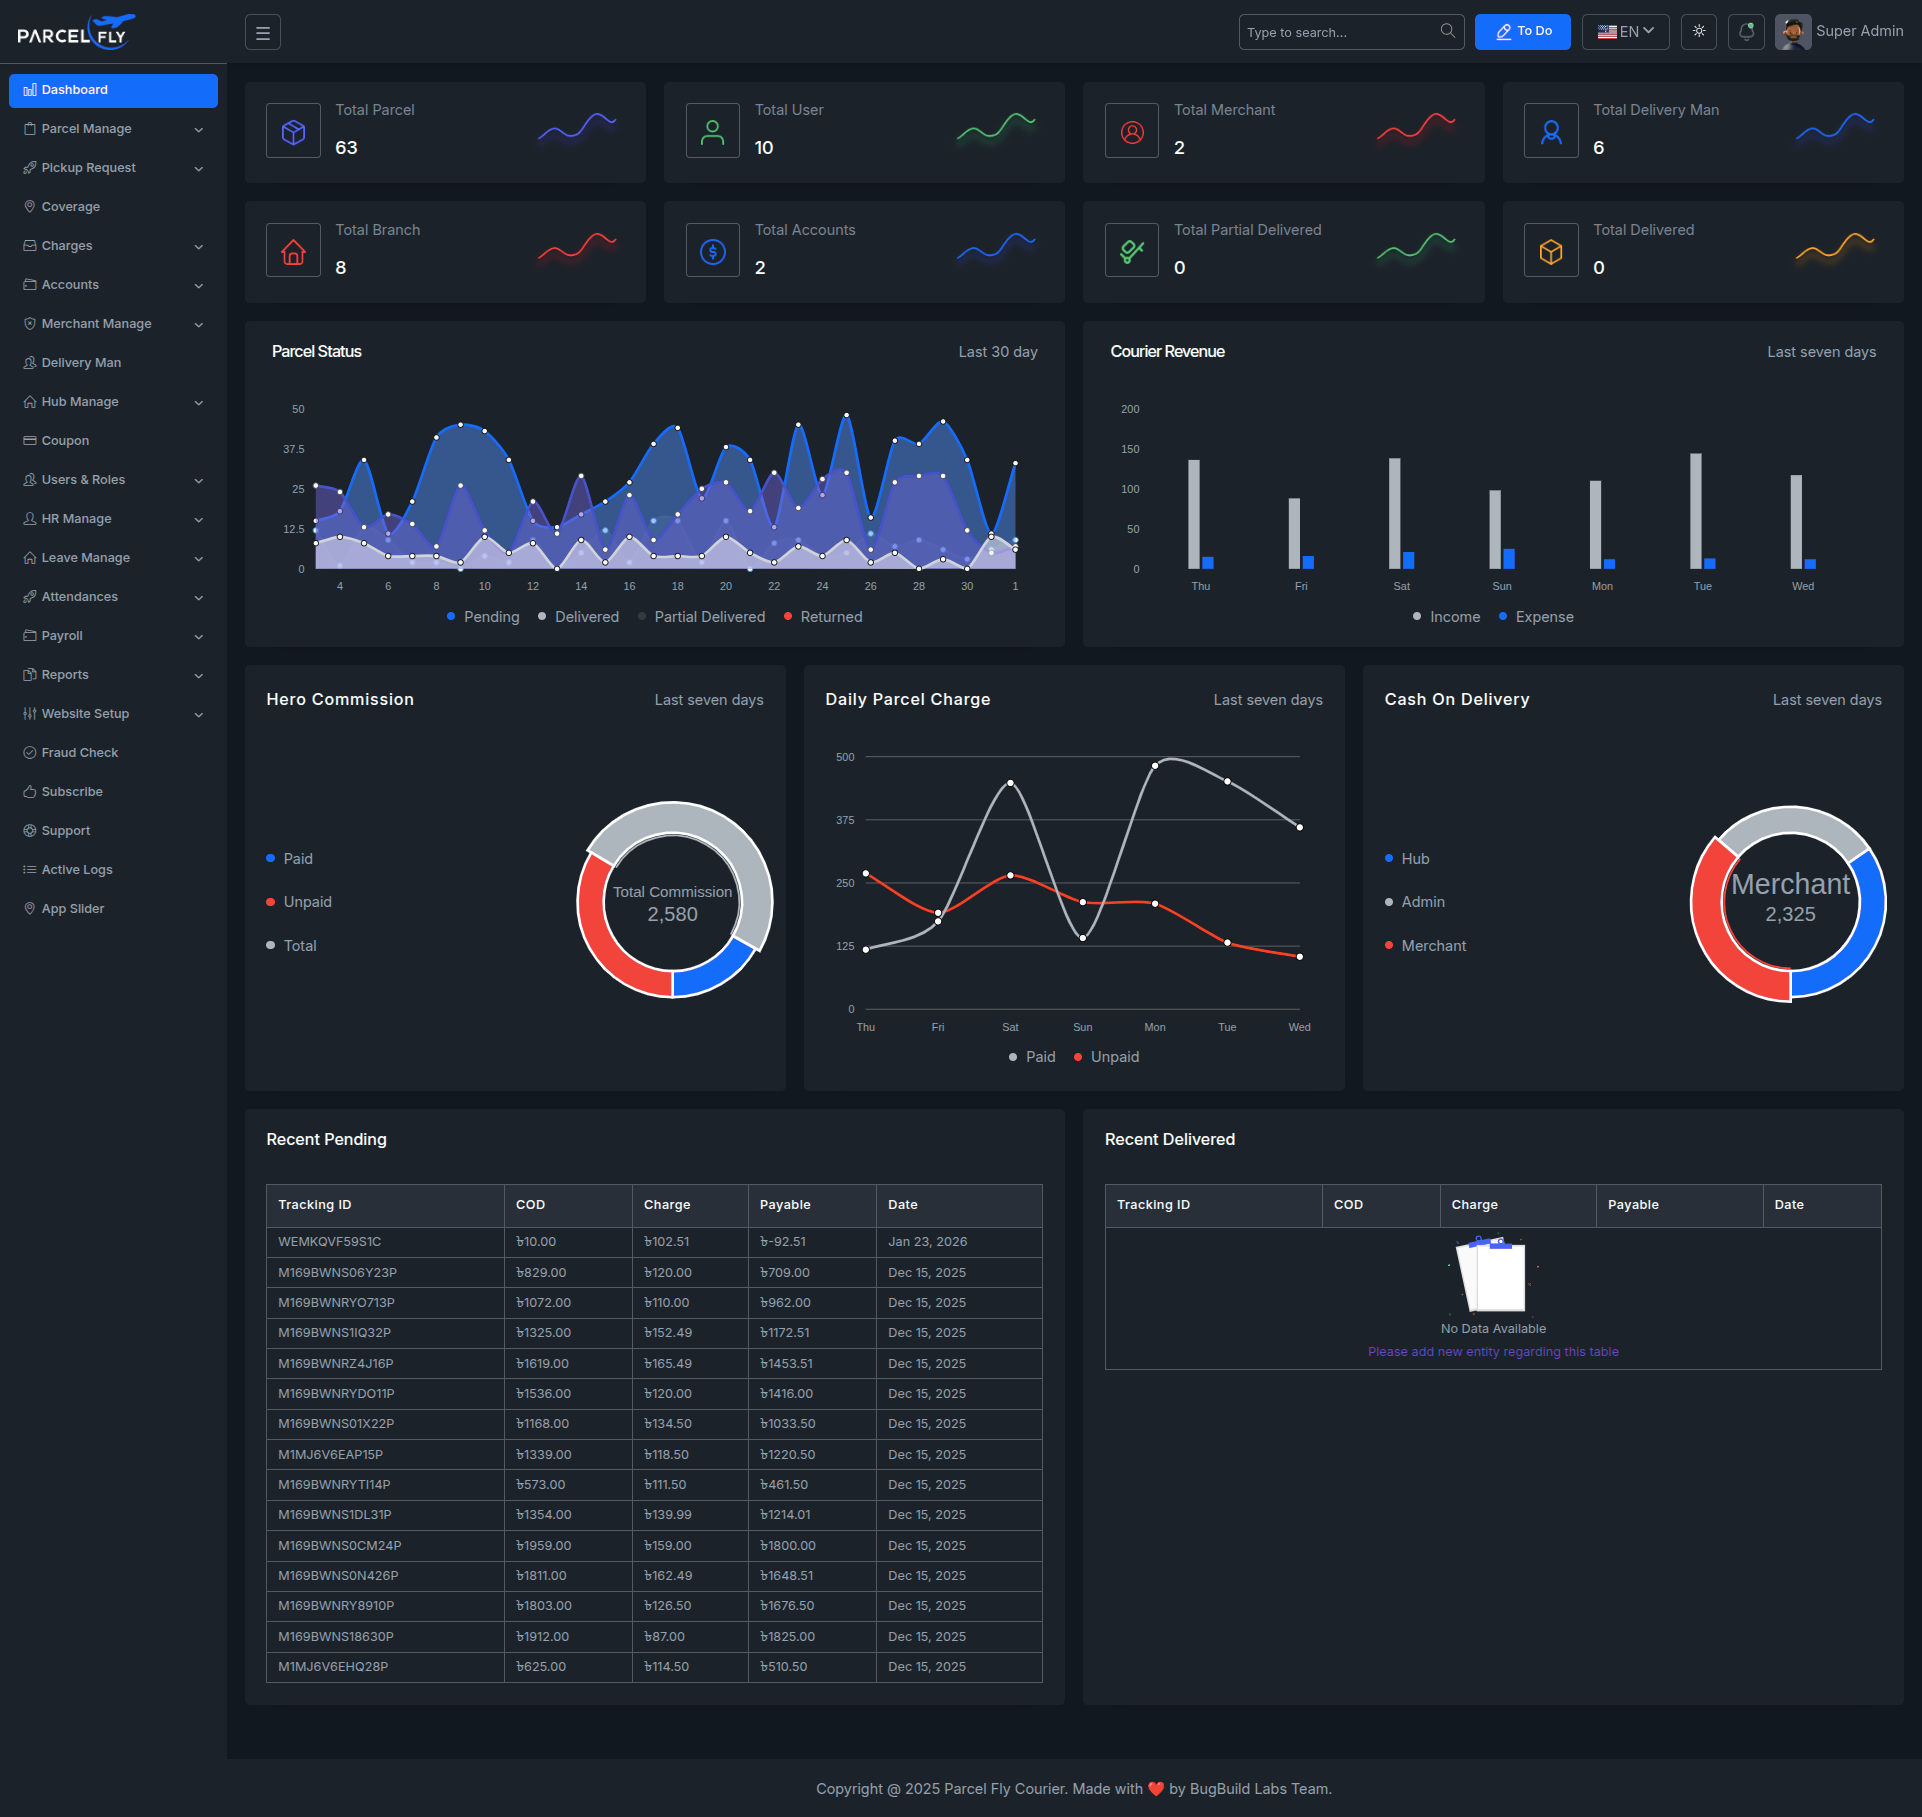
Admin Dashboard
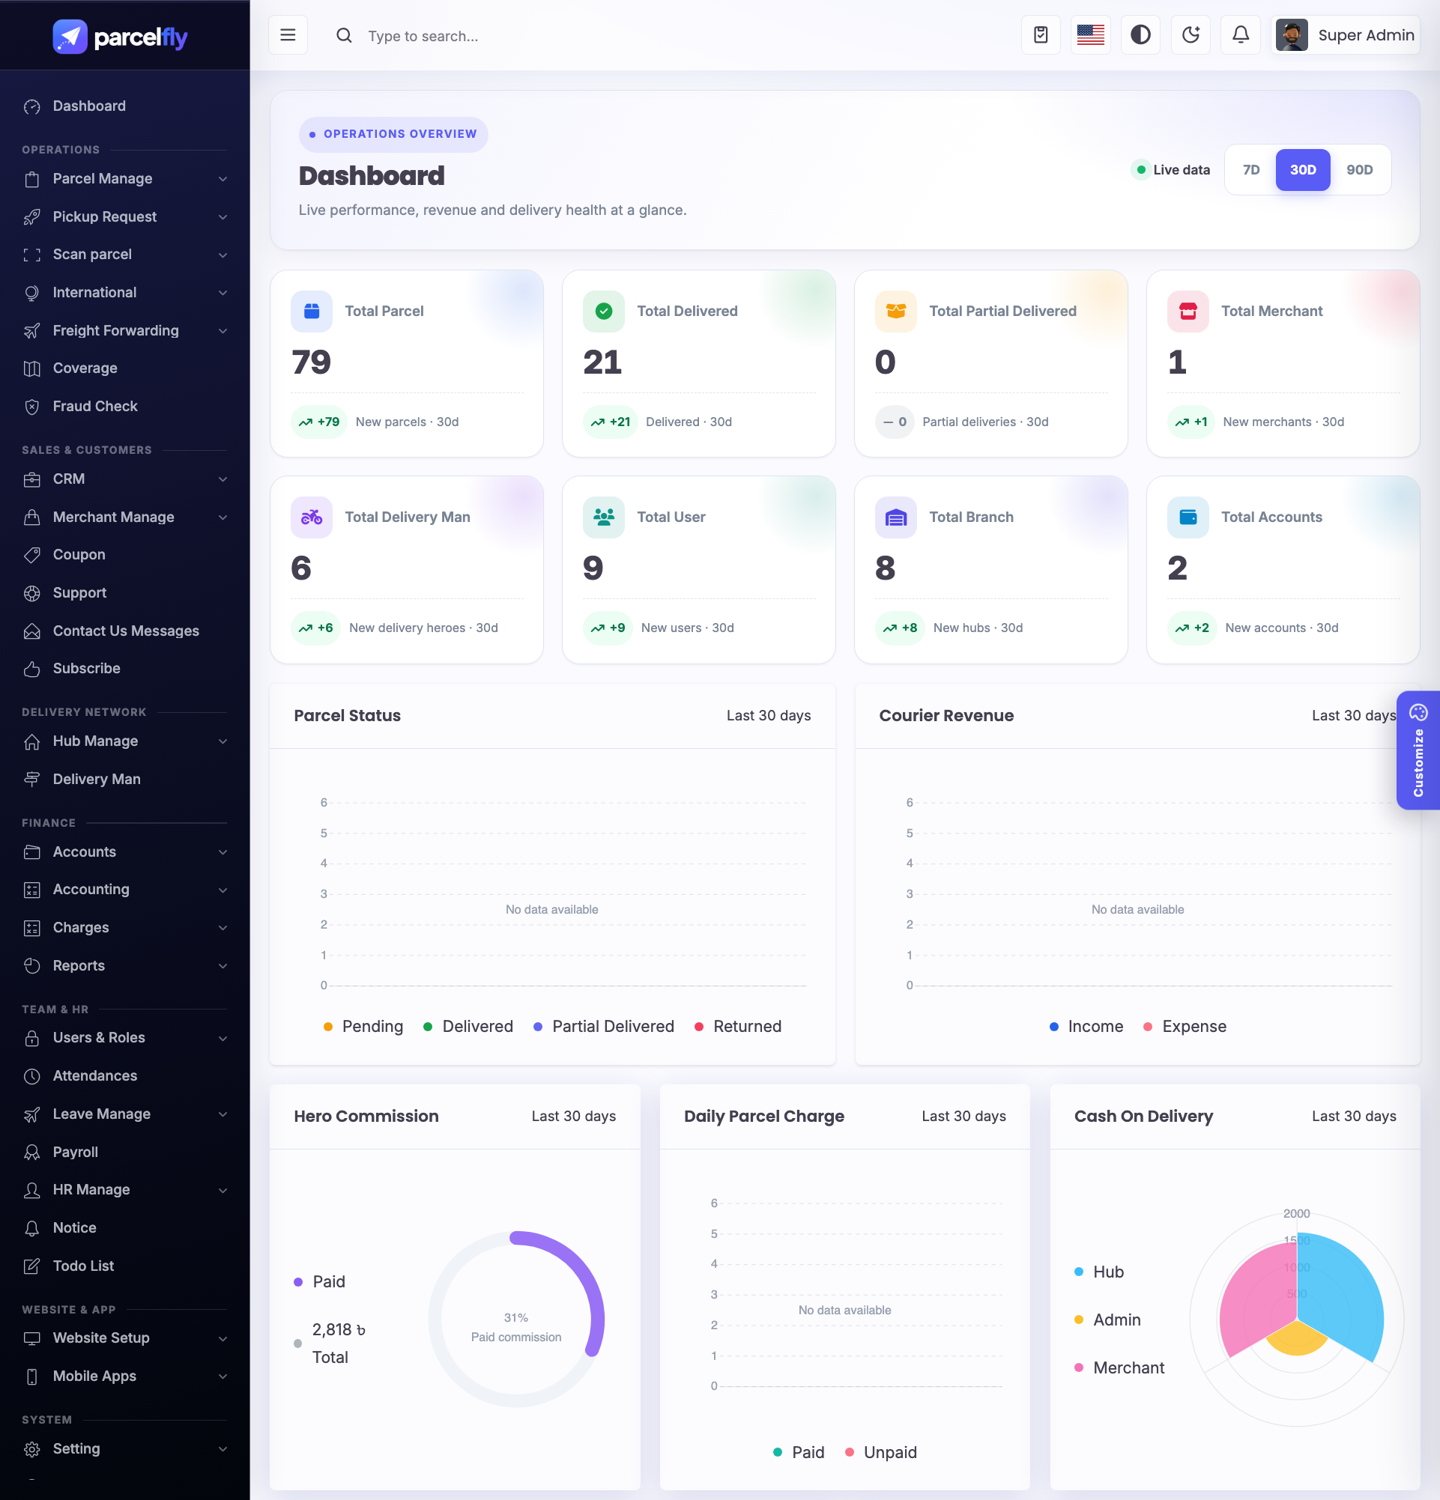
The updated admin dashboard is the live operations control center for parcel activity, account growth, revenue, delivery performance and cash collection.
- 7 / 30 / 90 day control: Select a time period to refresh dashboard activity, charts and financial totals consistently.
- Modern analytics: Parcel status uses stacked columns; revenue uses an area comparison; commission uses a radial payment indicator; charges use horizontal bars; and COD uses a polar distribution.
- Operational summary: Shows total parcels, users, merchants, delivery heroes, hubs, accounts, partial deliveries and delivered parcels, plus selected-period activity.
- Recent tables: Displays recent pending and delivered parcels for quick action.
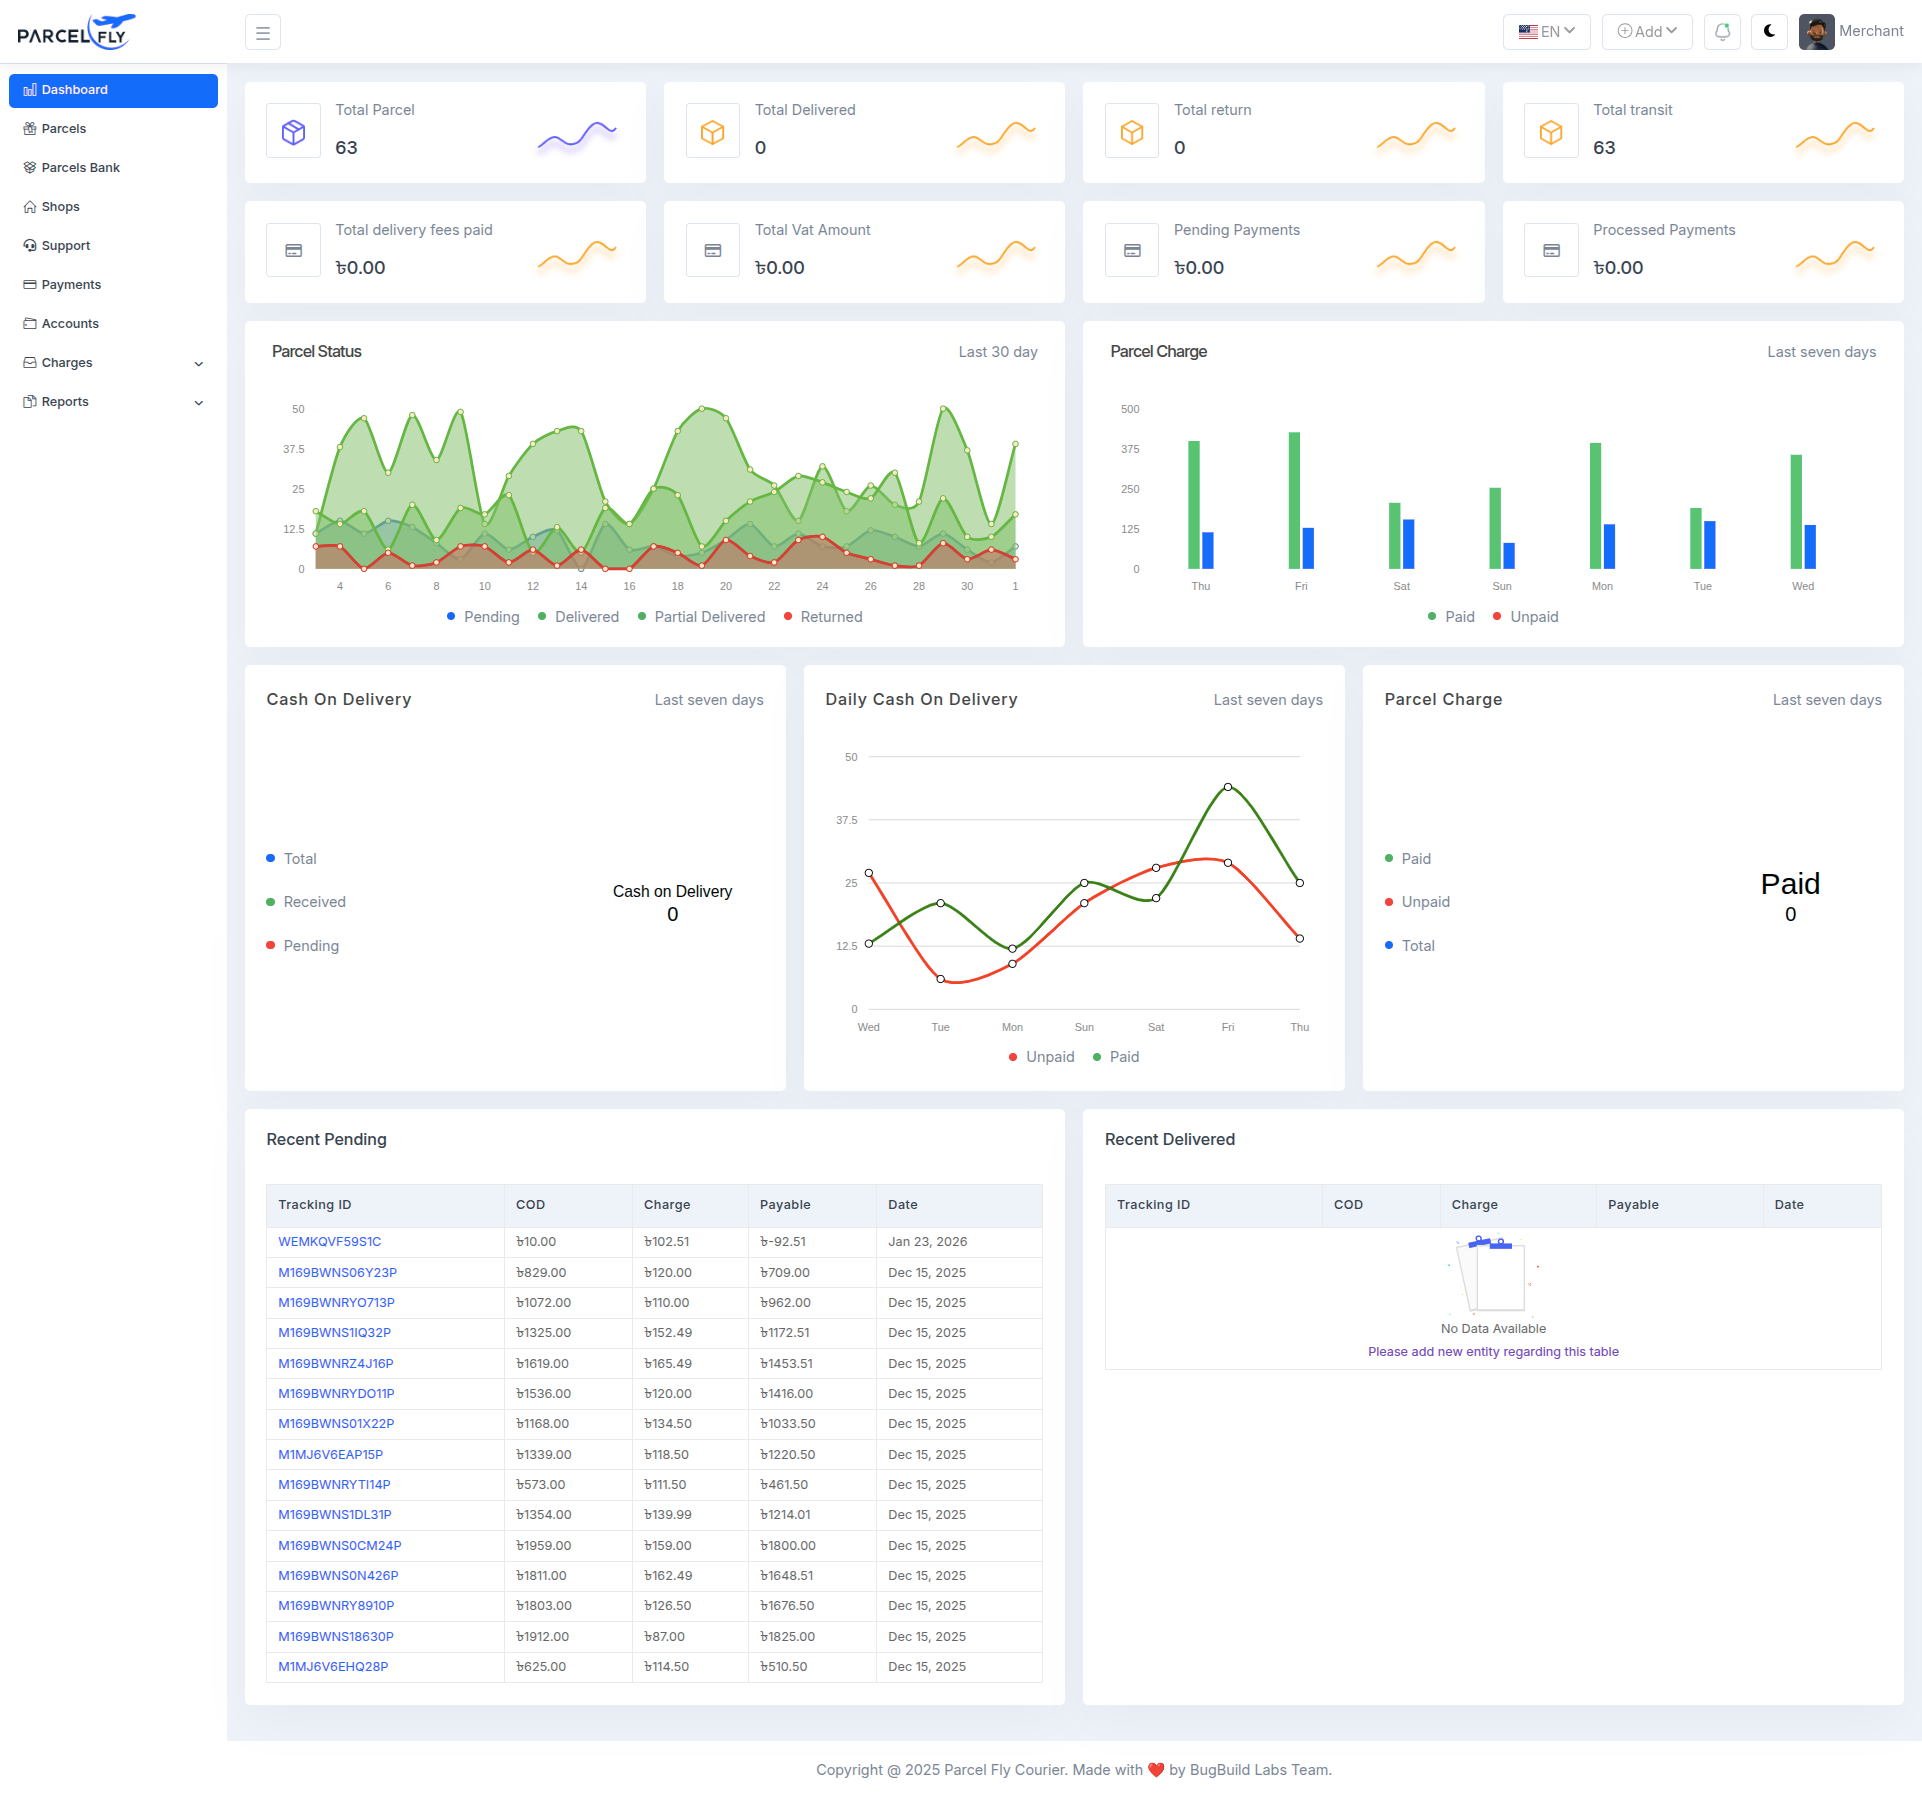
Merchant Panel Dashboard
The merchant dashboard gives merchants a focused workspace for parcel and payment activities.
- Merchant Summary: Shows merchant-side parcel counts and business metrics.
- Quick Access: Supports merchant workflow around parcel creation, parcel monitoring, and account actions.
- Role-specific View: Keeps the interface aligned with merchant responsibilities rather than admin controls.
Deliveryman Panel Dashboard
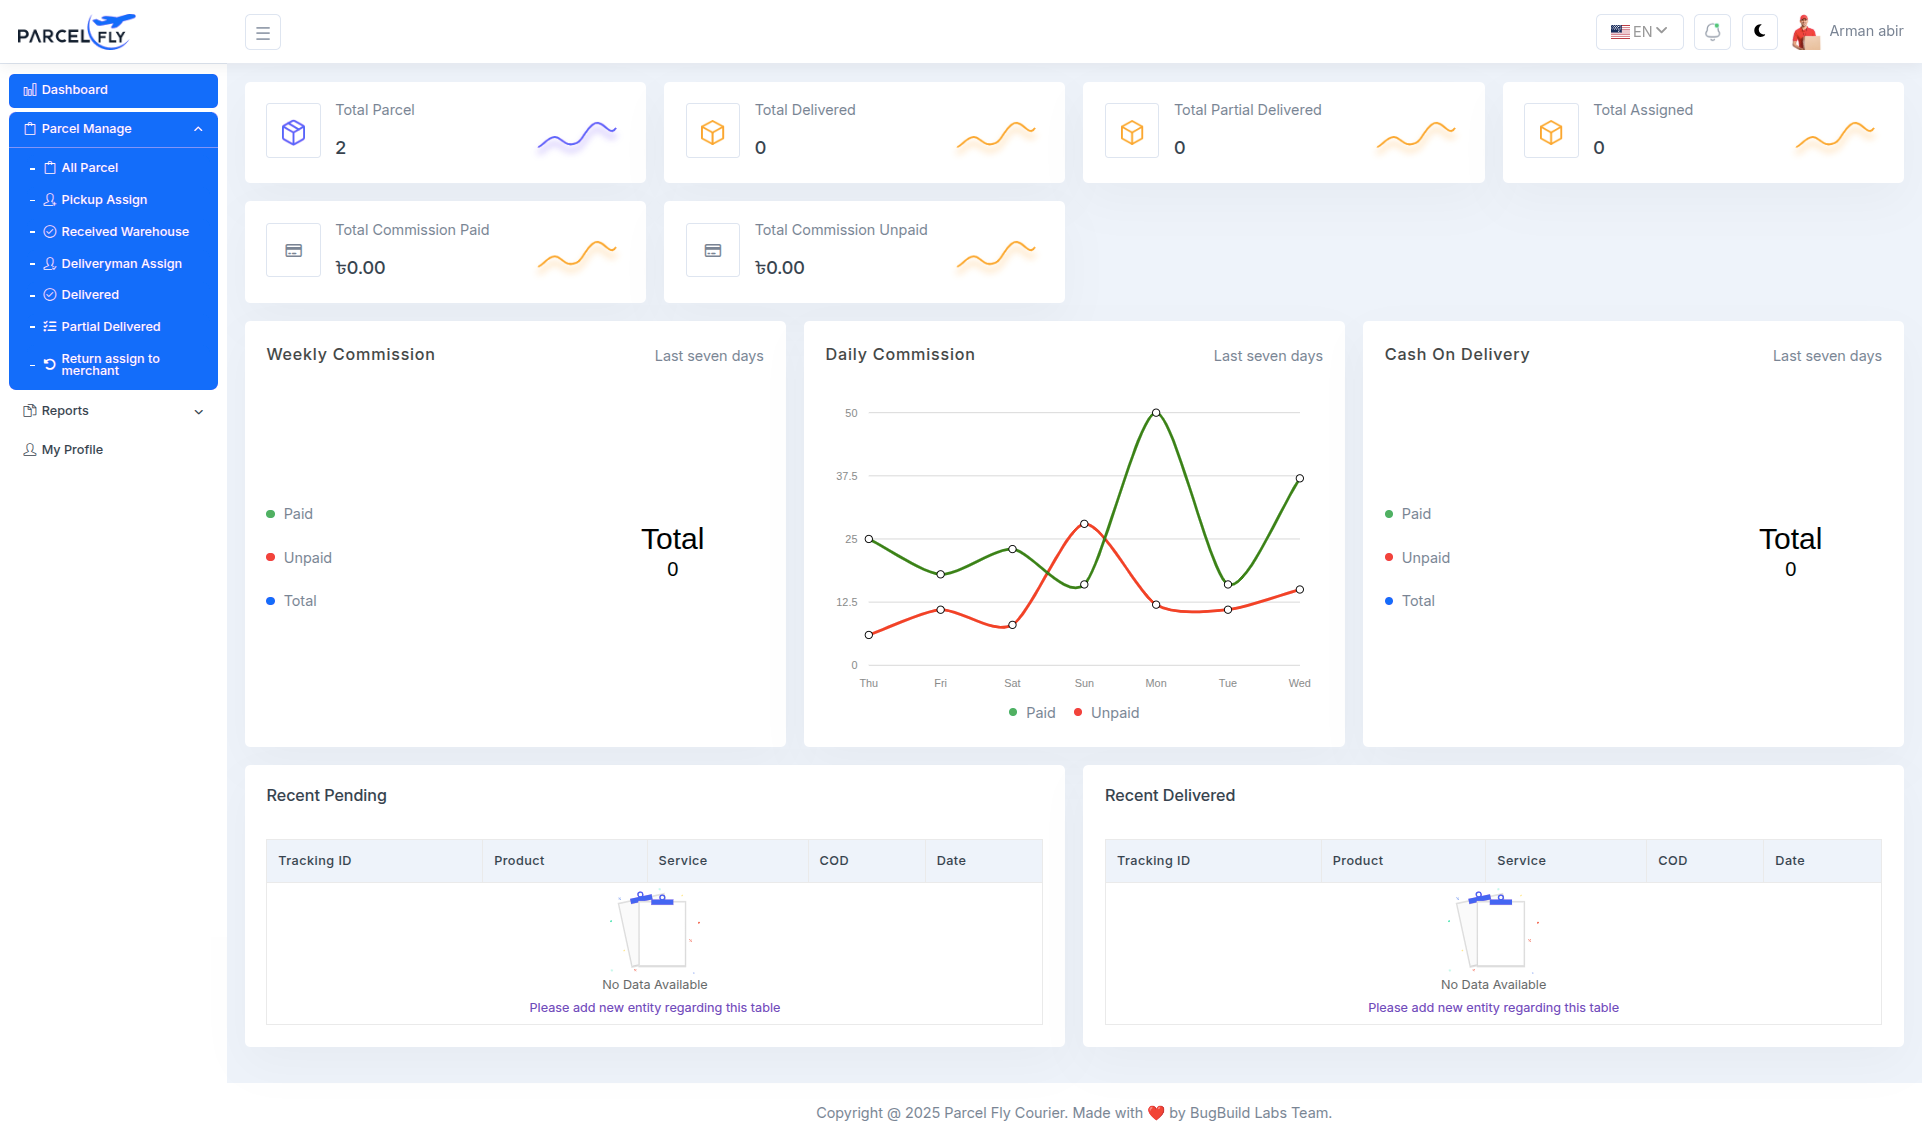
The deliveryman dashboard presents role-specific parcel information for field teams.
- Assigned Work: Delivery personnel can review parcel counts and delivery-related status data.
- Operational Focus: The layout supports parcel handling, assignment awareness, and day-to-day delivery activity.
- Role Separation: The panel keeps delivery operations distinct from merchant and admin responsibilities.
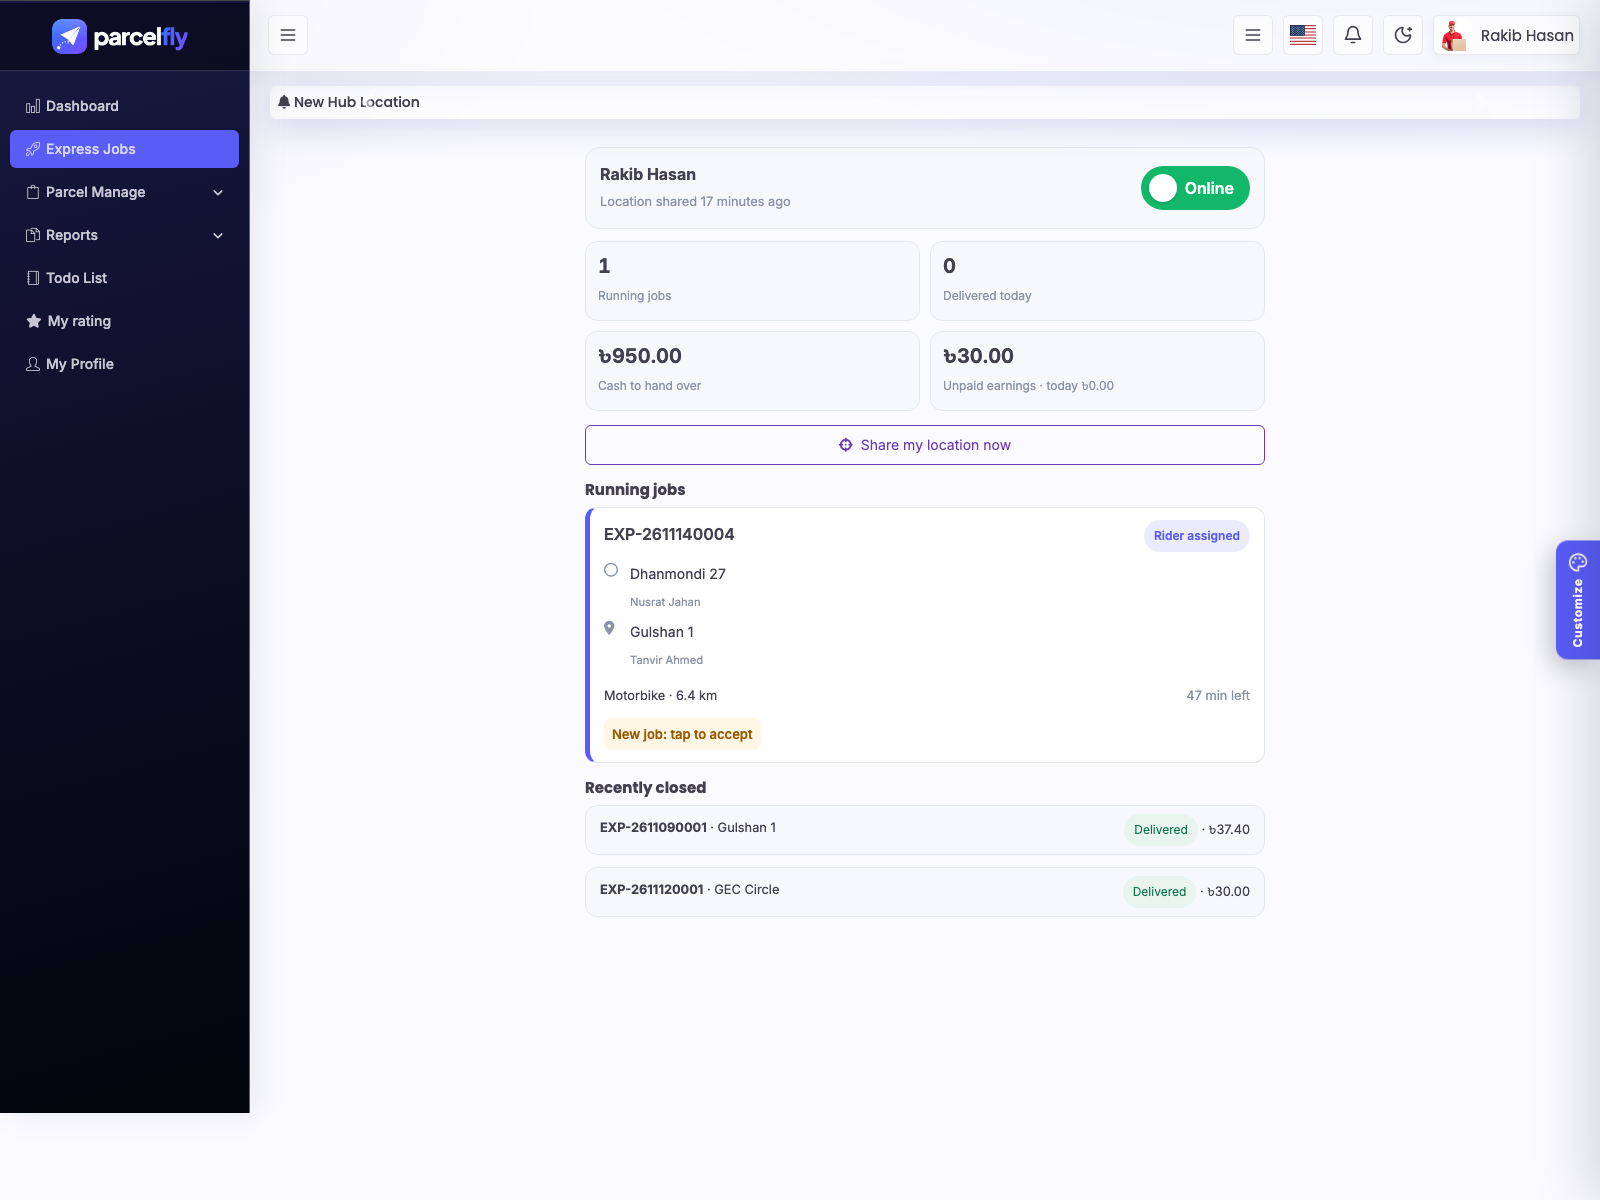
- Express Jobs: when Express Delivery is enabled, delivery men get an Express Jobs page: switch Online/Offline, share the location, accept or decline jobs, mark At pickup and Picked, and complete with the receiver's 4-digit code (photo optional). It also shows cash to hand over and unpaid earnings.
Pending Parcels
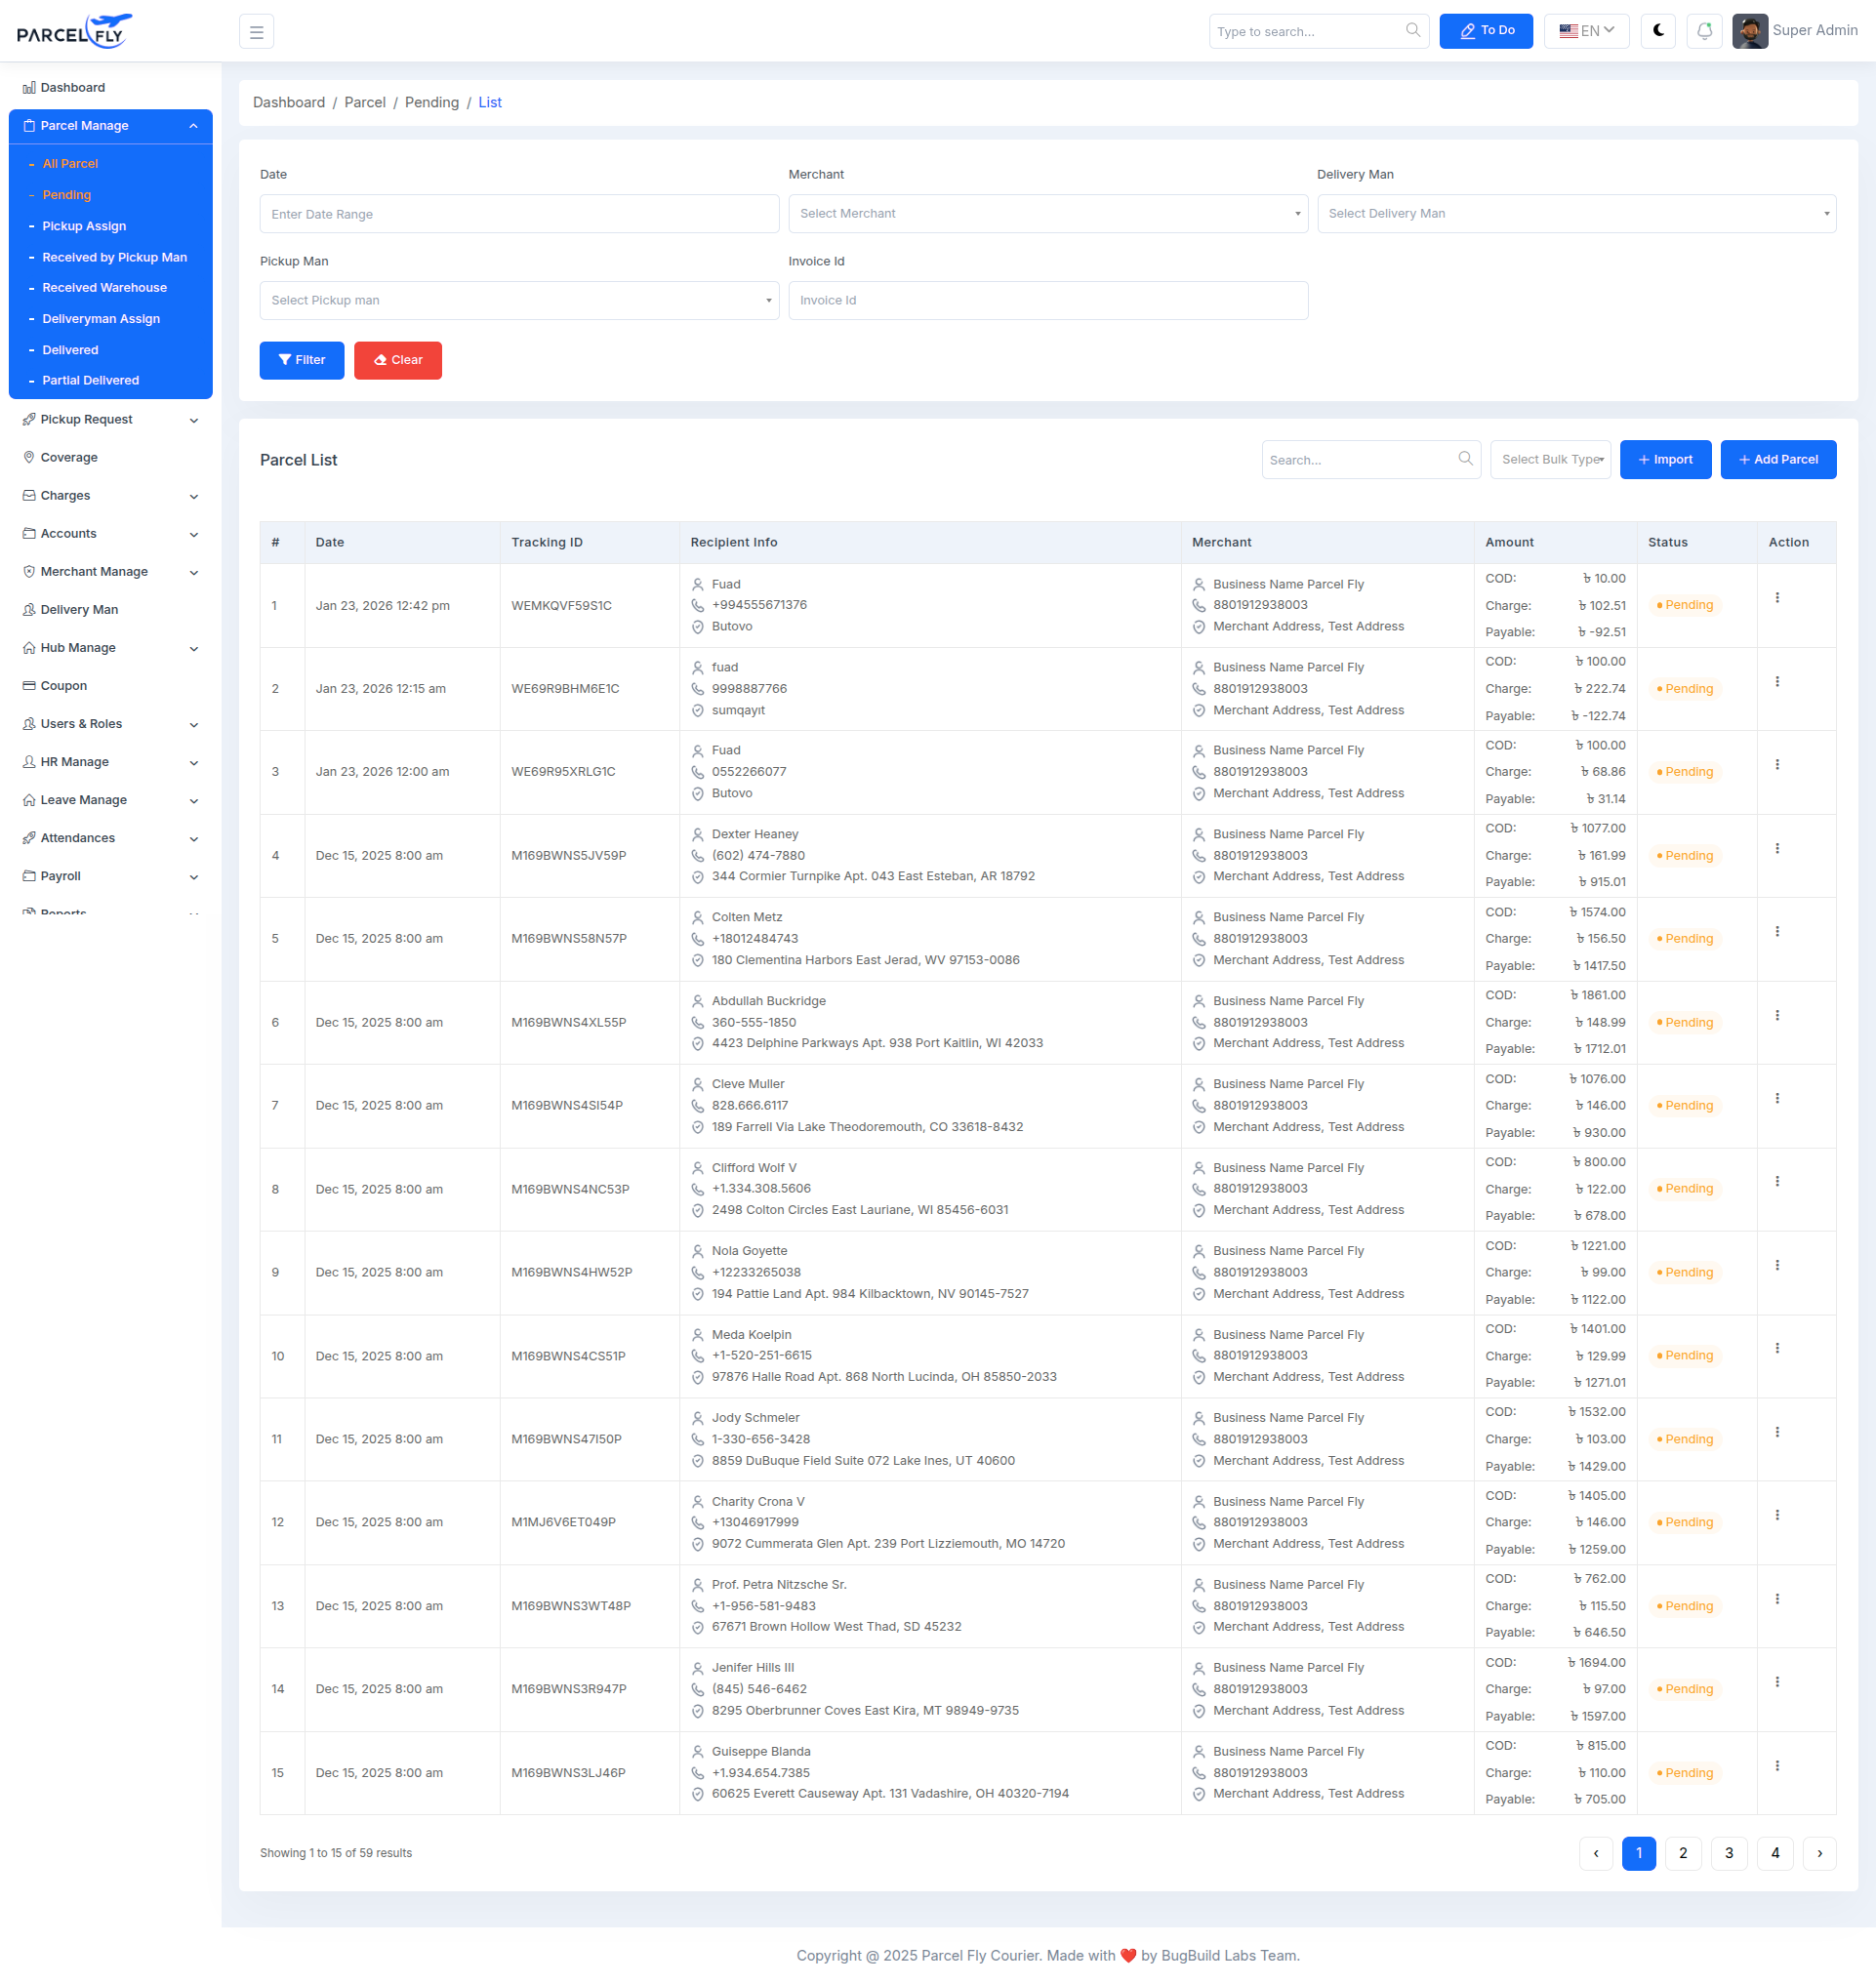
The pending parcels screen helps operations teams review shipments that still need action.
- Status Monitoring: Focus on parcels that are not yet delivered or completed.
- Operational Follow-up: Use this view to identify parcels that need assignment, processing, or delivery action.
- Queue Control: Supports day-to-day parcel management by isolating open work.
Parcel List
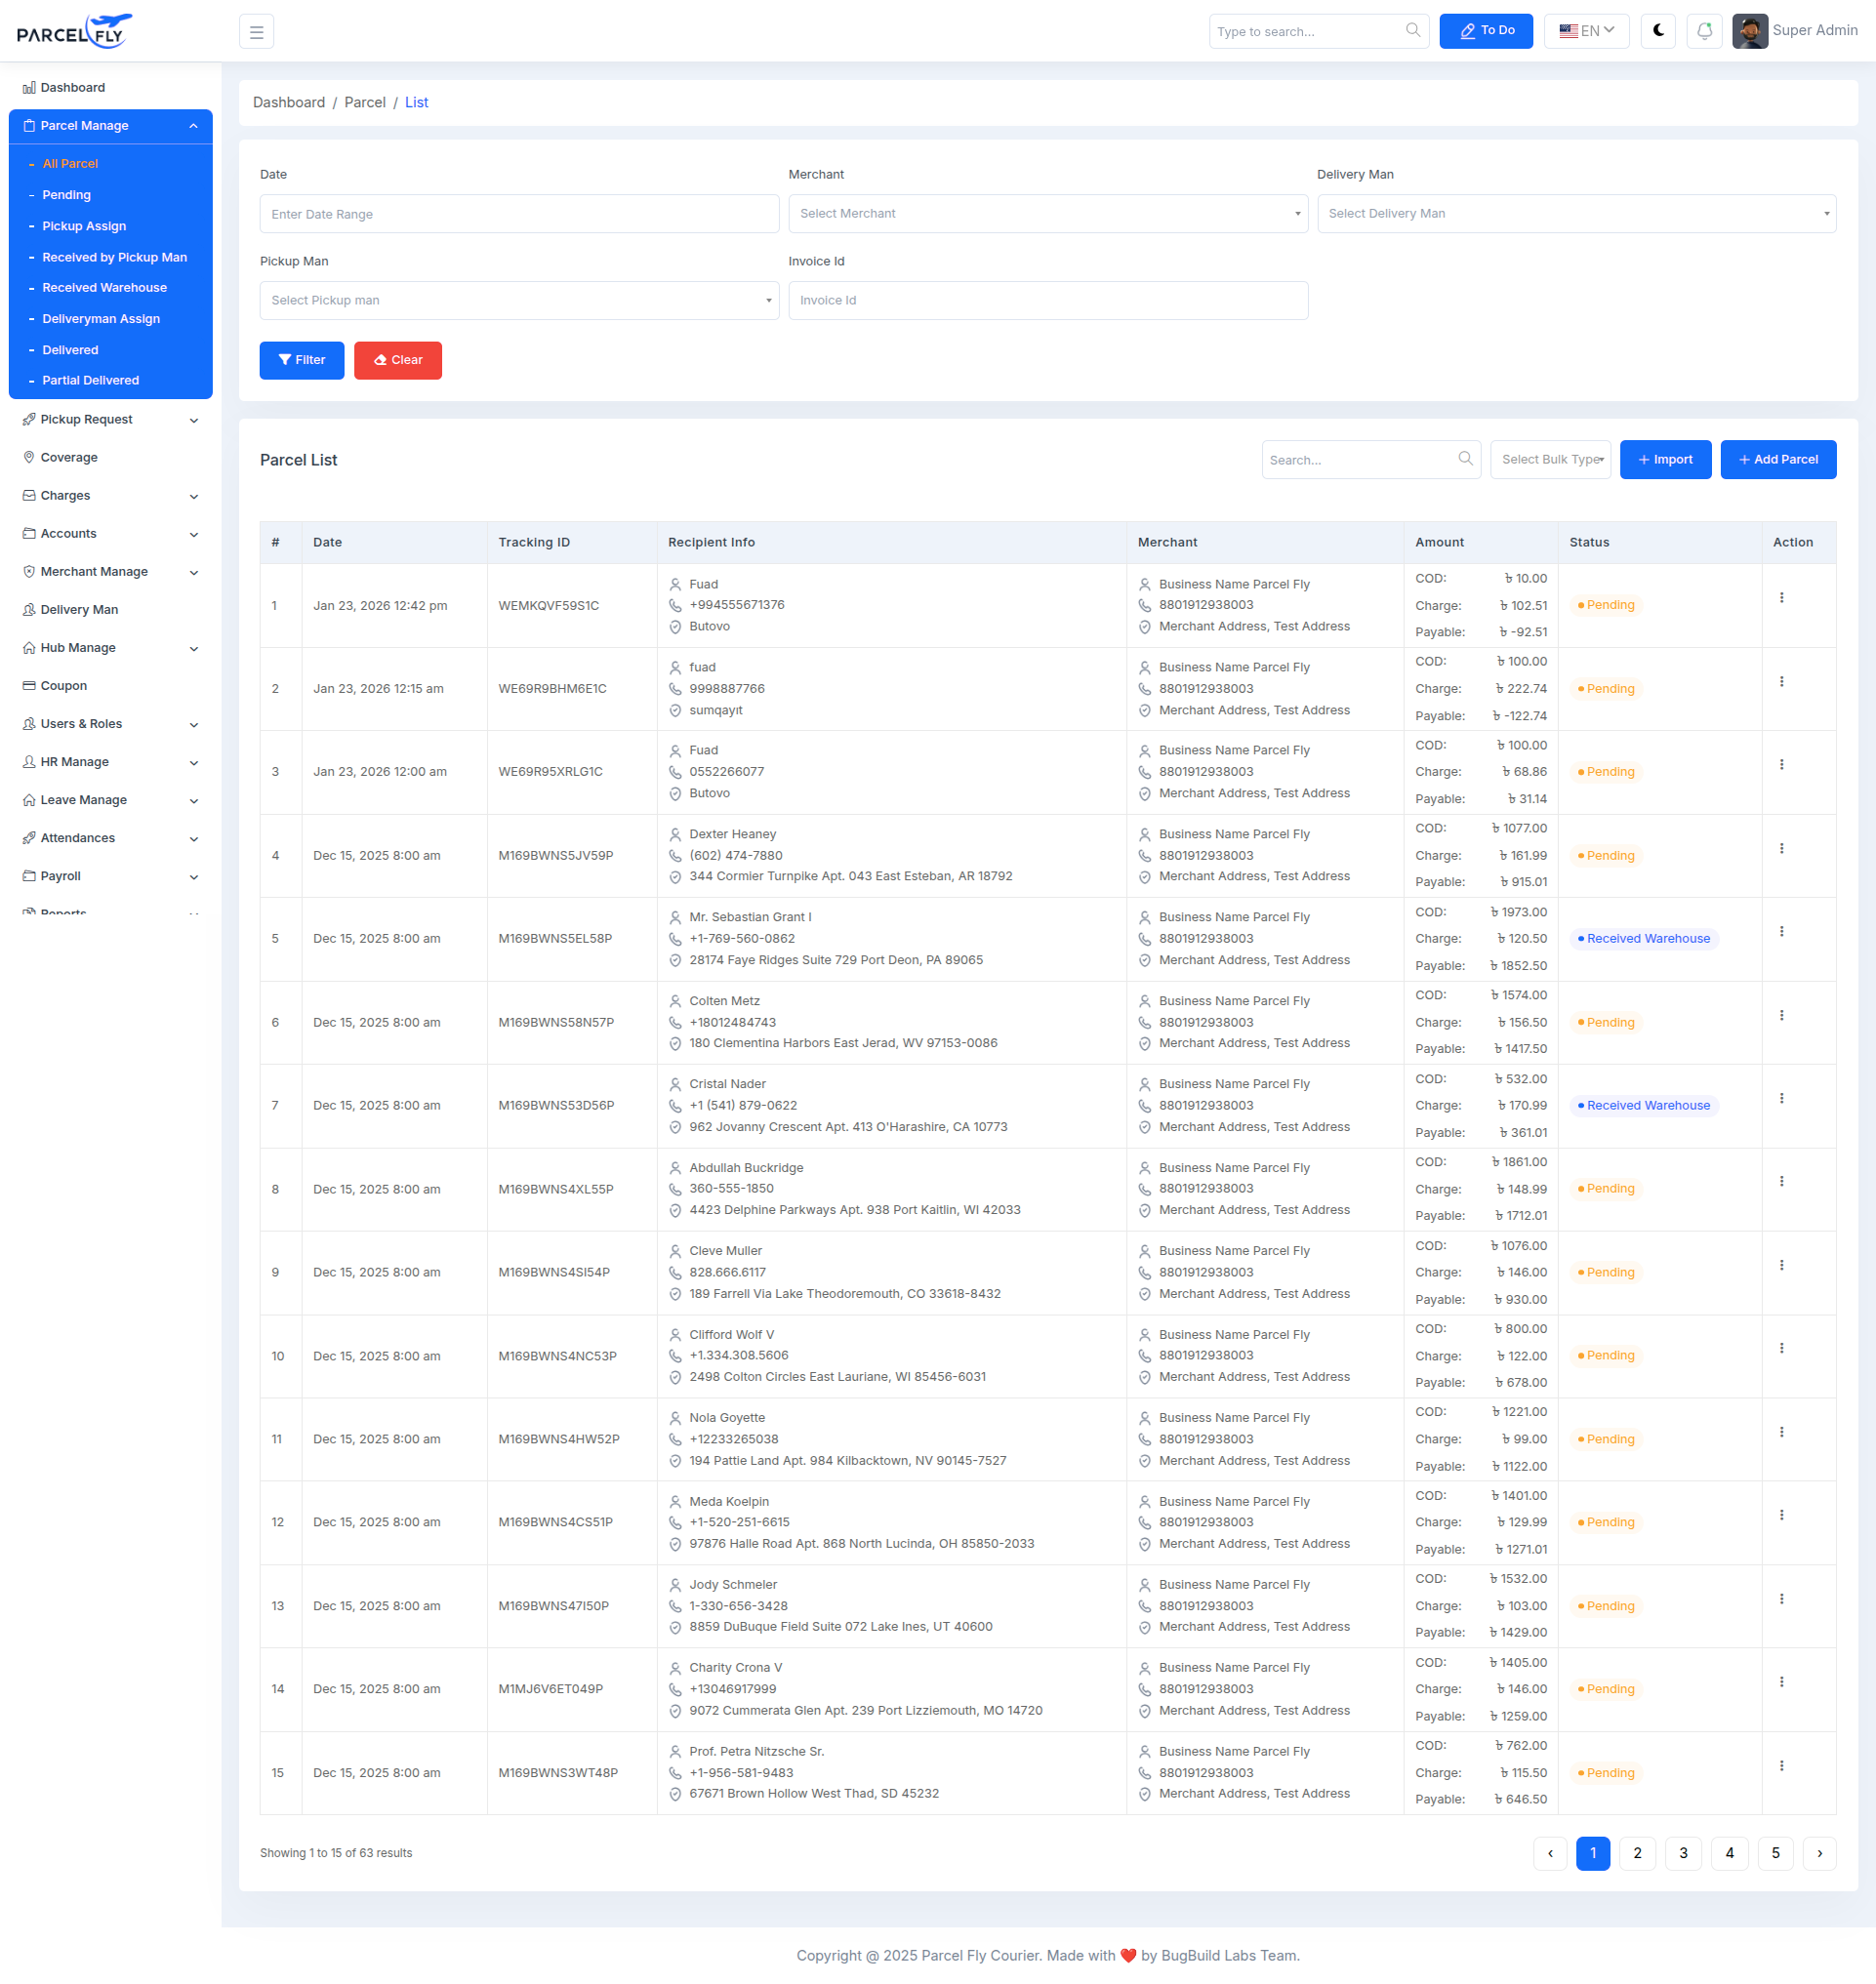
The parcel list is the central operational table for all parcels recorded in the system.
- Filtering: Supports date range, merchant, delivery man, pickup man, and invoice-based filters.
- Parcel Table: Displays tracking ID, recipient information, merchant details, amounts, current status, and actions.
- Workflow Control: Gives quick access to parcel review and downstream actions.
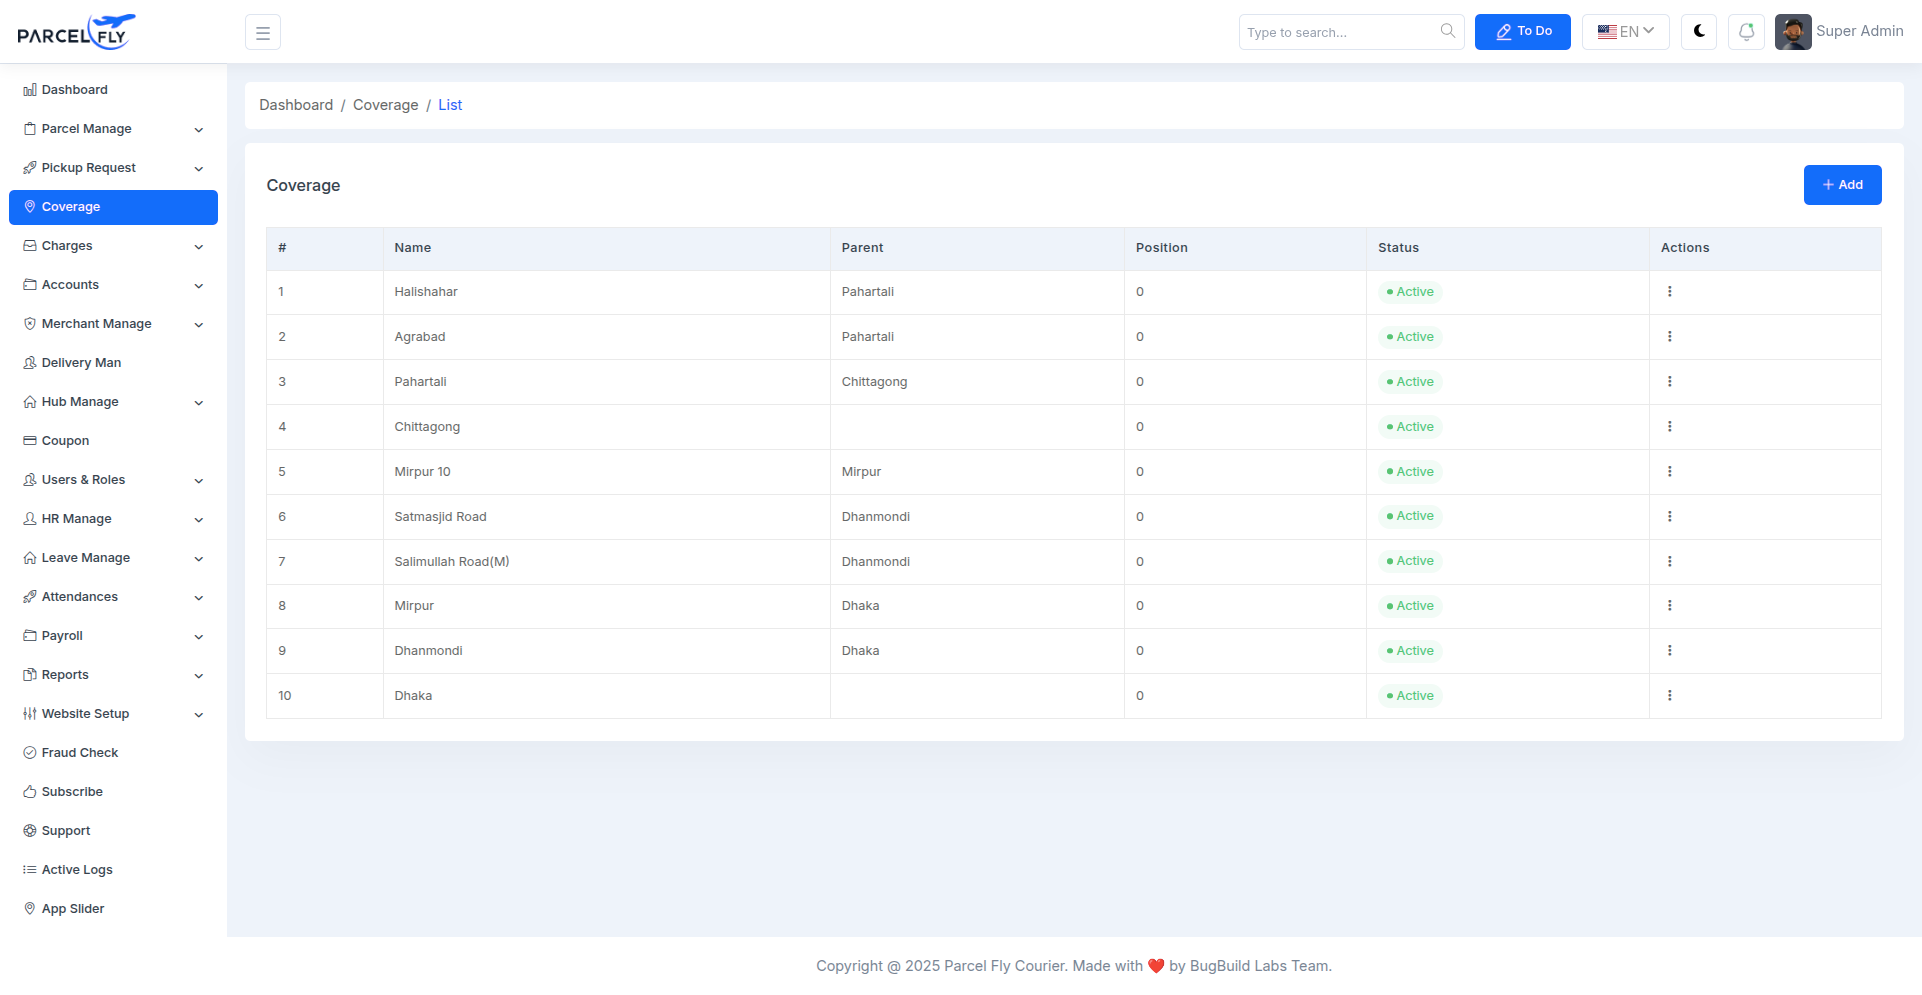
Coverage List
The coverage list allows administrators to manage supported delivery areas from the backend.
- Area Hierarchy: Shows coverage names, parent areas, and position values.
- Status Control: Coverage entries can be kept active or managed from the action menu.
- Location Management: Helps define service availability across cities and sub-areas.
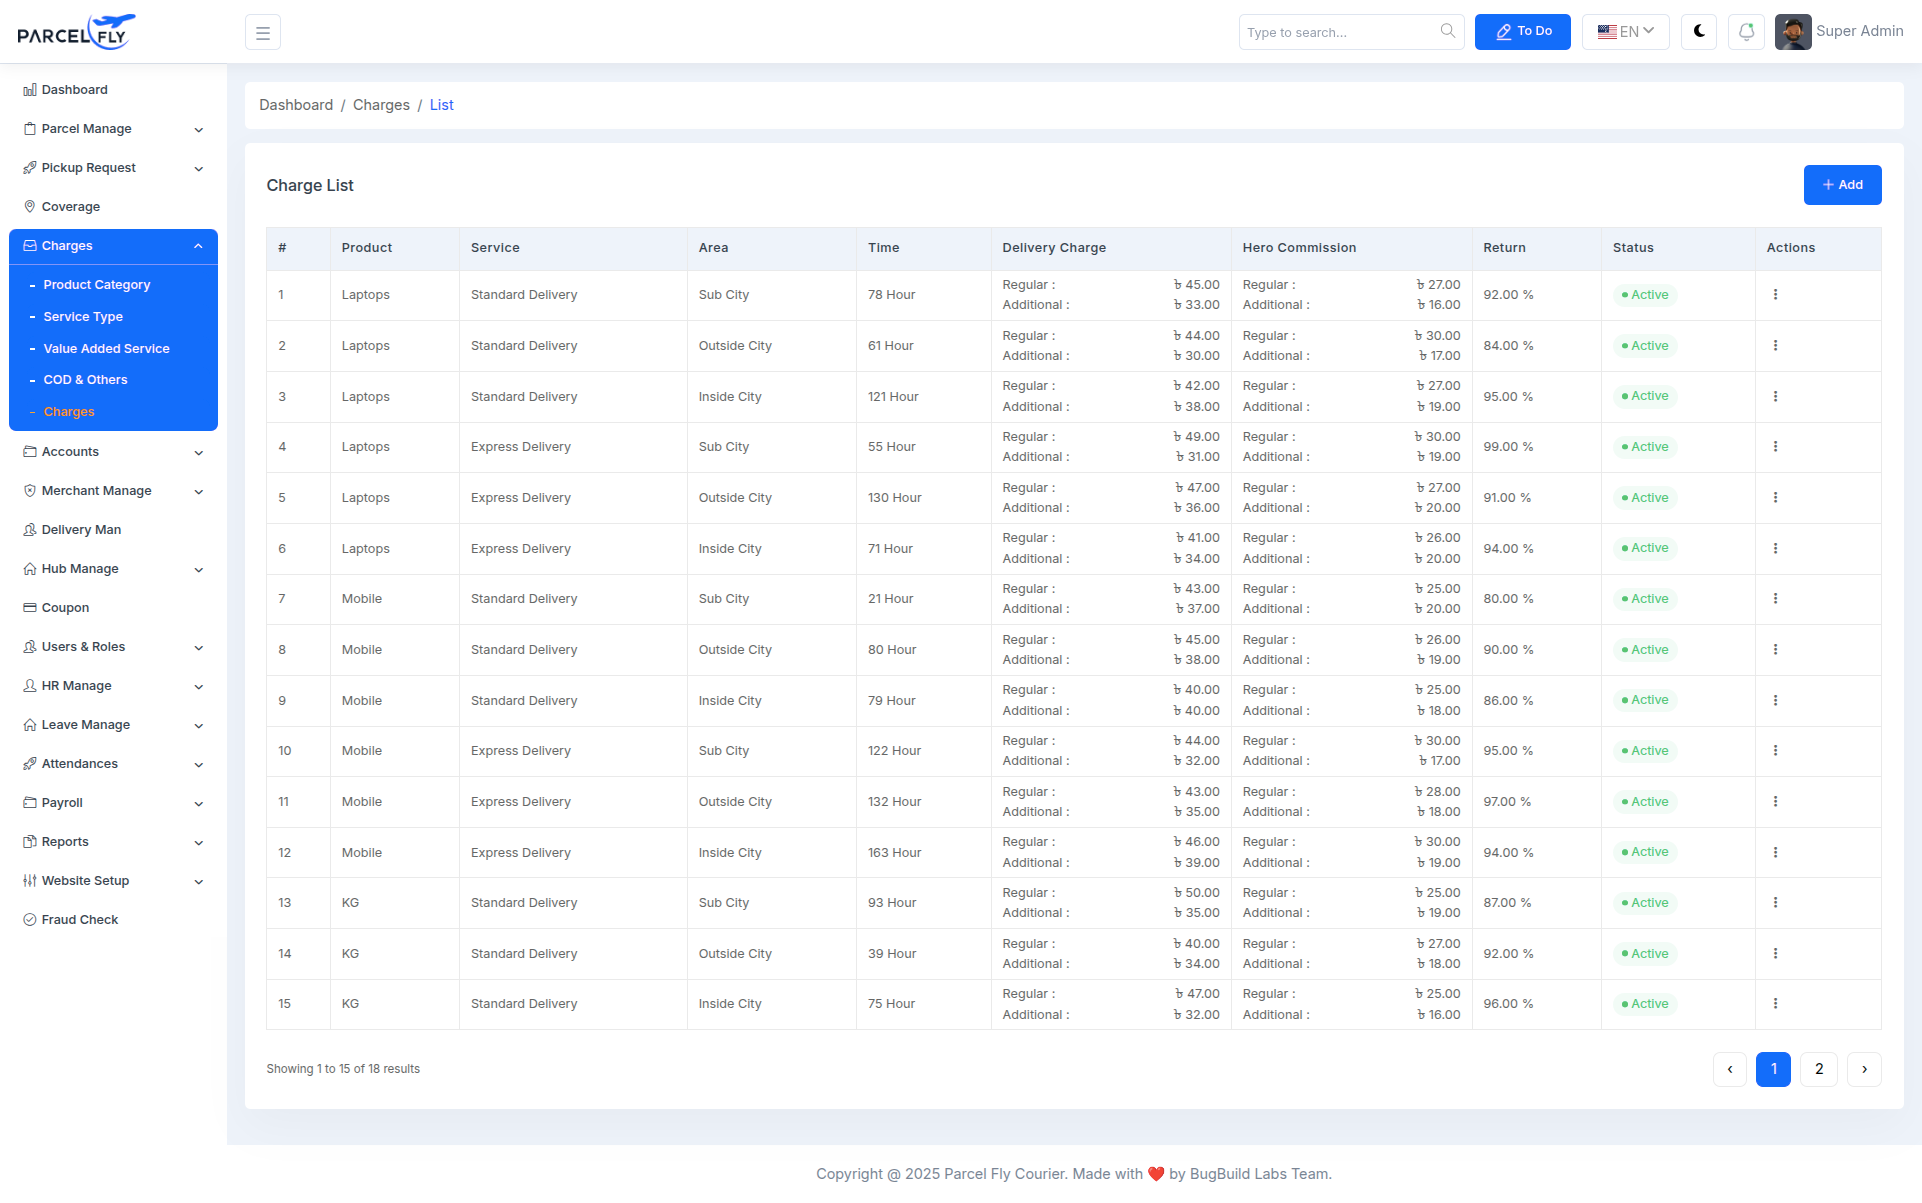
Charges List
The charges list is used to review configured pricing rules across product types, service types, and delivery areas.
- Pricing Table: Shows product, service, area, delivery time, delivery charge, commission, return charge, and status.
- Business Rules: Keeps delivery pricing visible and manageable from one screen.
- Action Menu: Admins can maintain and update charge records as business requirements change.
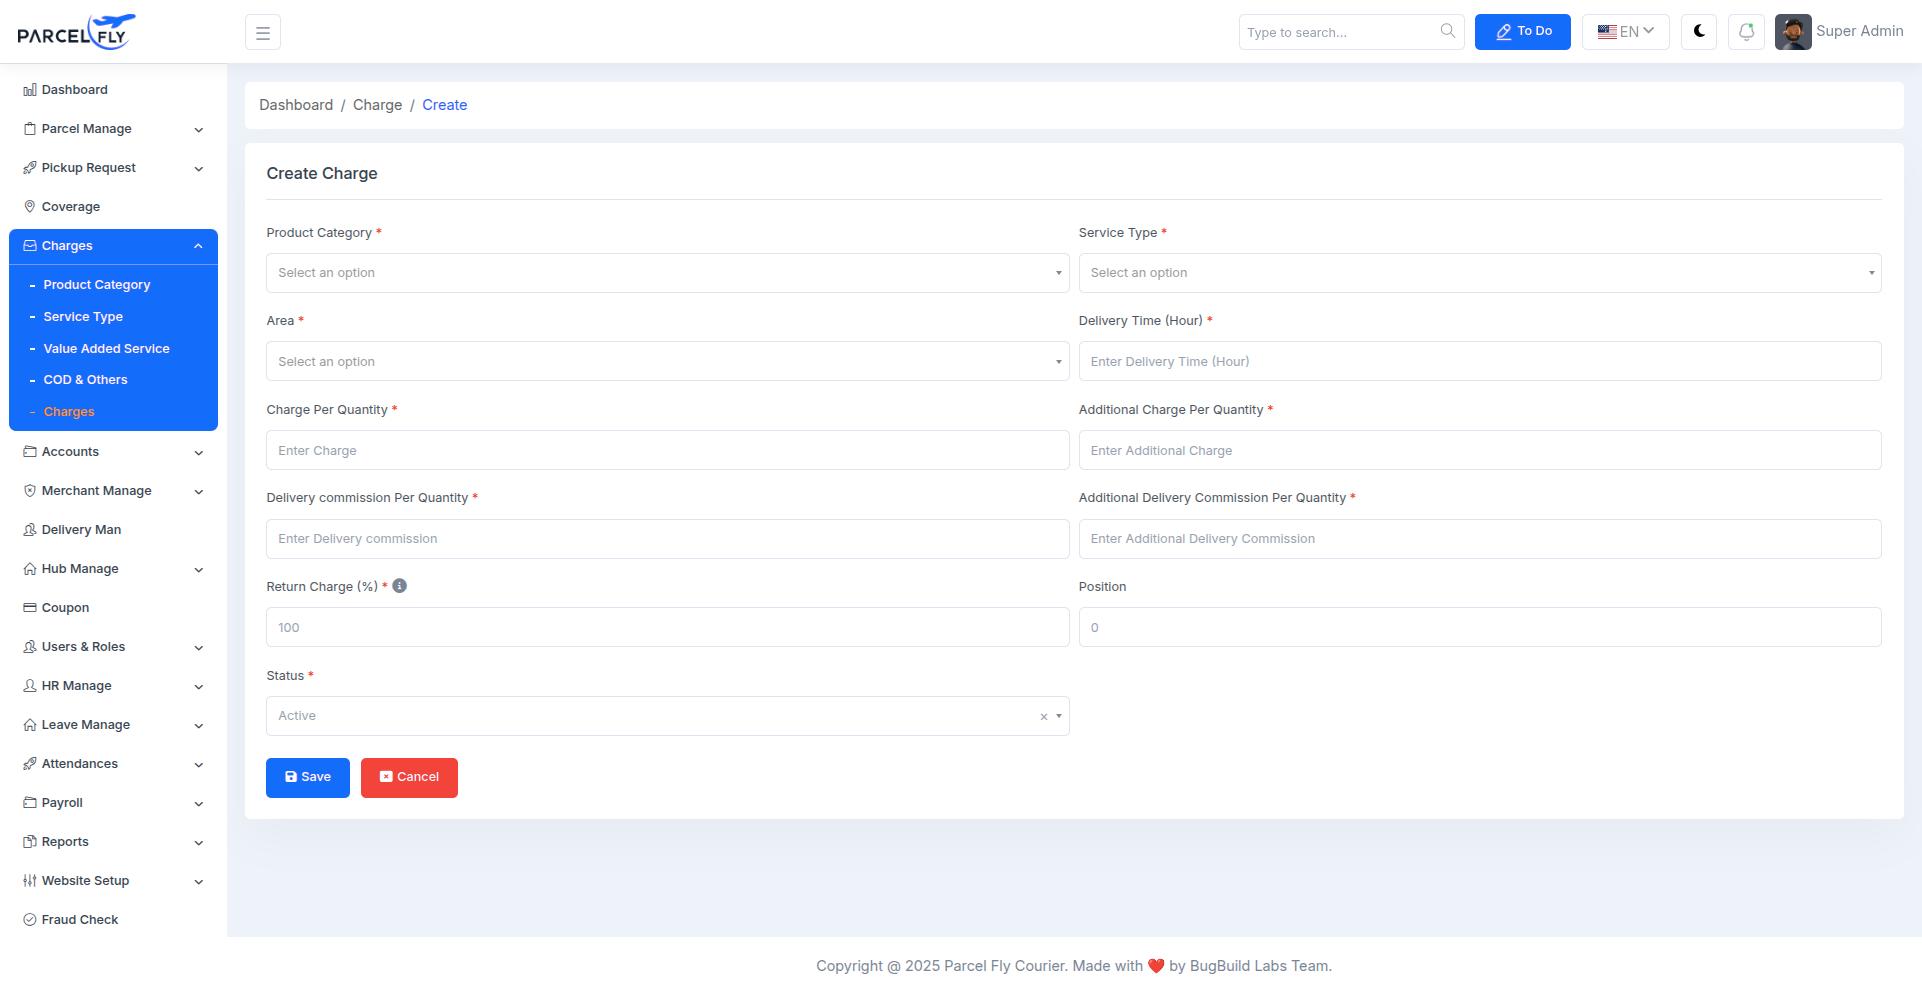
Create Charge
The create charge form allows administrators to define a new pricing rule for deliveries.
- Charge Inputs: Configure product category, service type, area, delivery time, and pricing values.
- Commission Setup: Set delivery commission, additional commission, and return charge percentages.
- Status & Position: Control visibility and ordering of the charge rule.
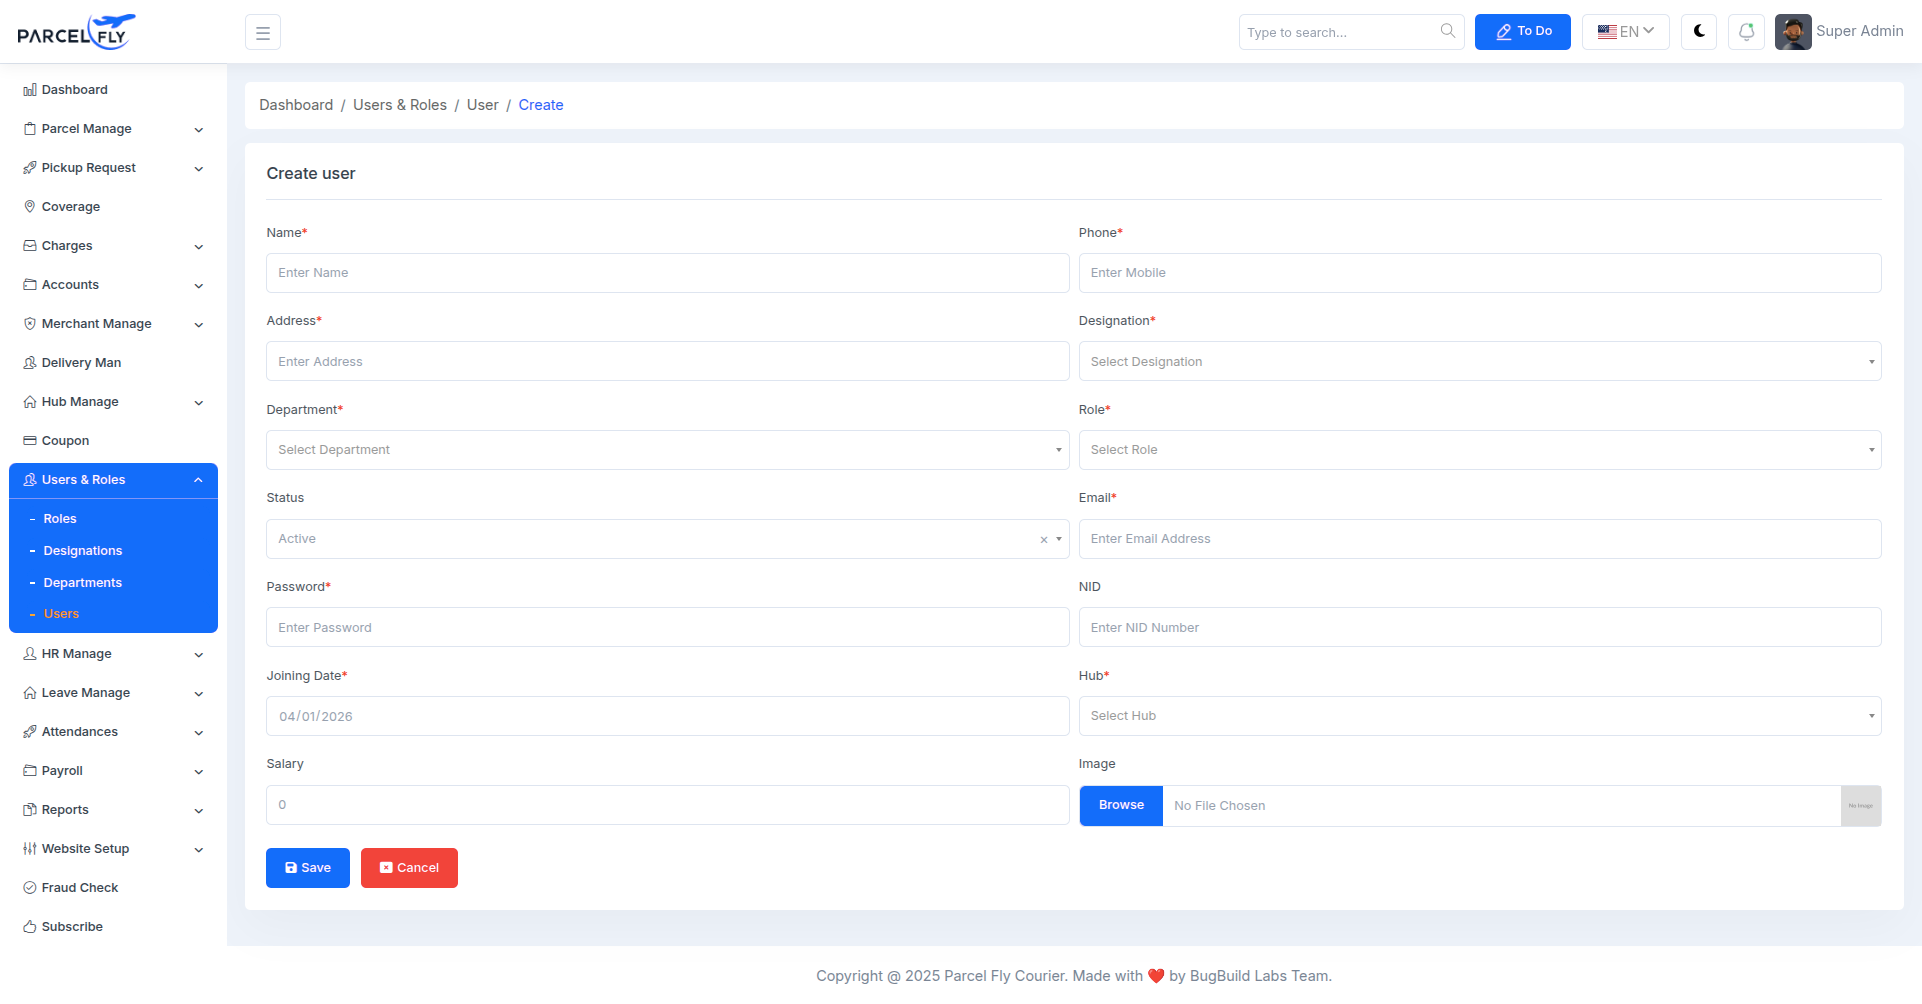
Create User
The create user form is used to onboard internal users into the ParcelFly backend system.
- User Details: Includes name, phone, address, department, designation, role, and email.
- Account Setup: Allows password entry, joining date, hub assignment, salary, and status.
- Profile Media: Supports image upload for the user profile.
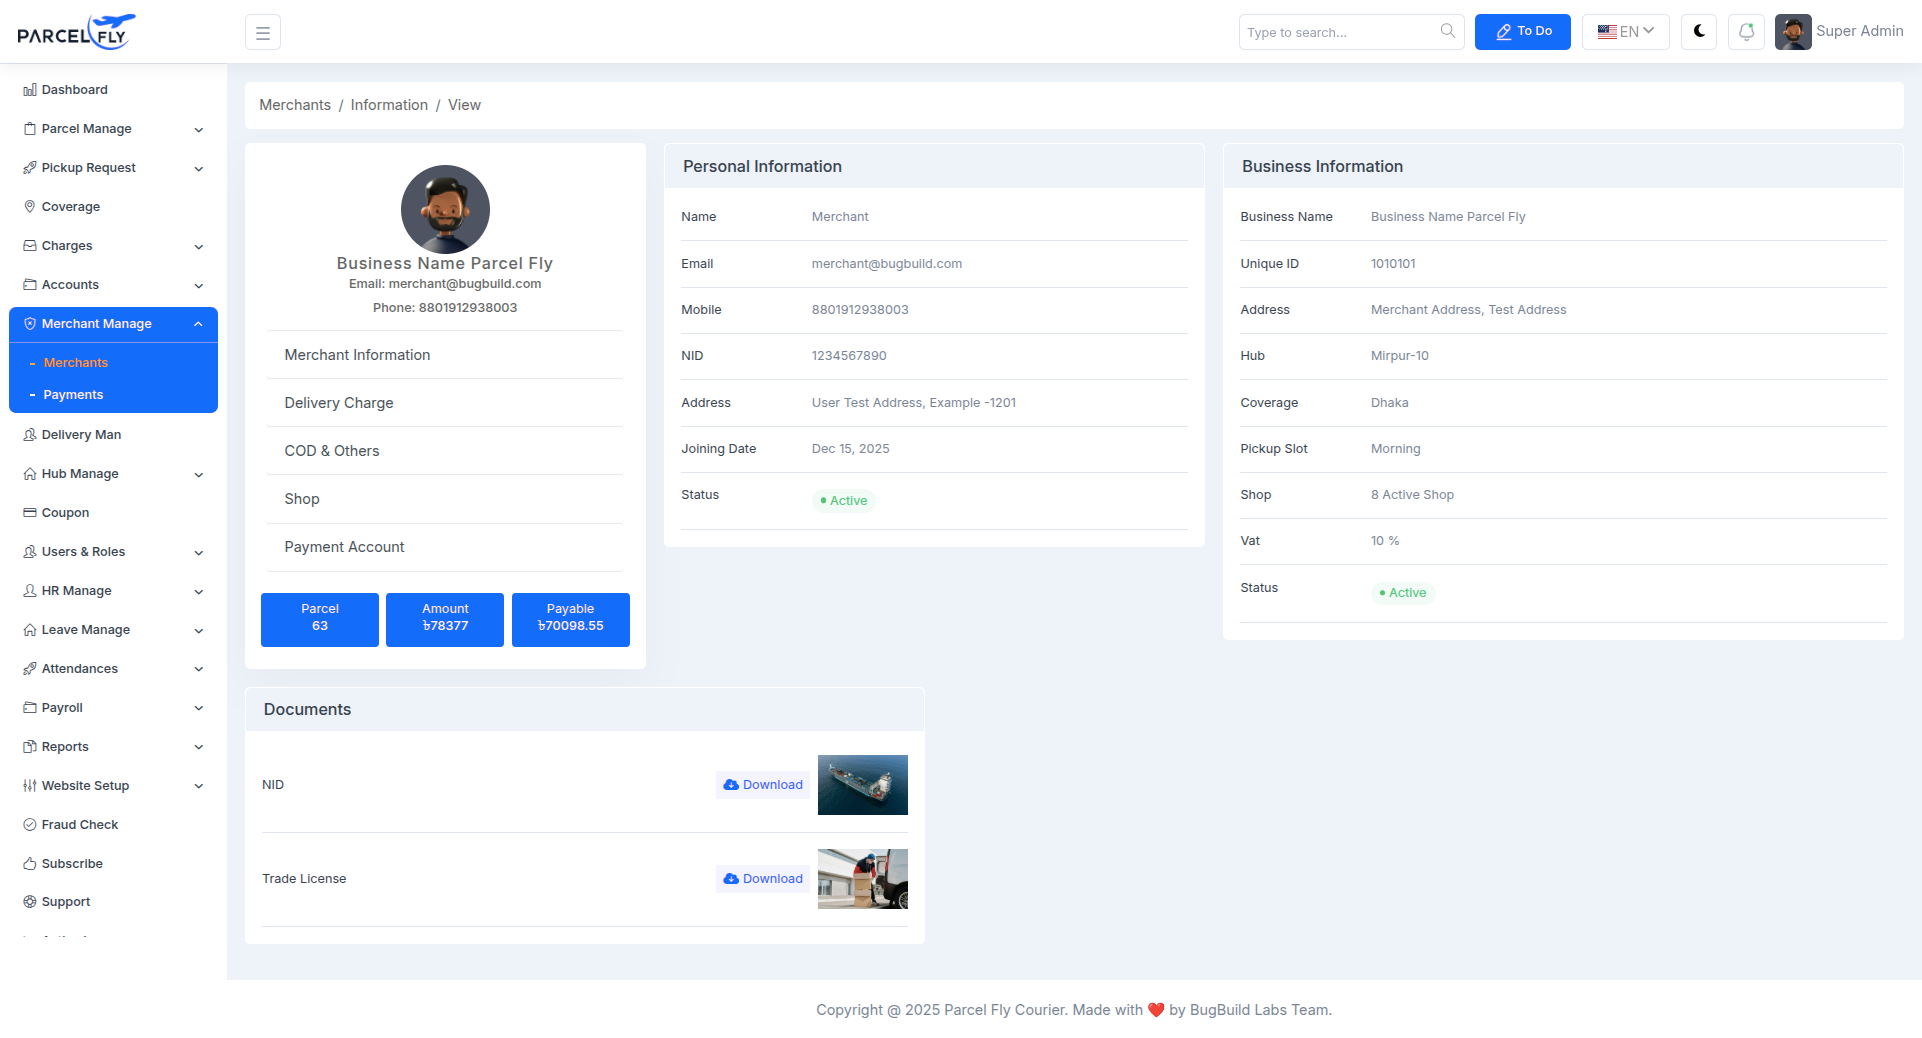
Merchant Details
The merchant details screen presents a complete merchant profile for operational and account review.
- Personal & Business Info: Shows merchant identity, contact details, hub, coverage, shop, and status.
- Financial Summary: Displays parcel count, amount, and payable values.
- Documents: Includes downloadable merchant documents such as NID or trade license files.
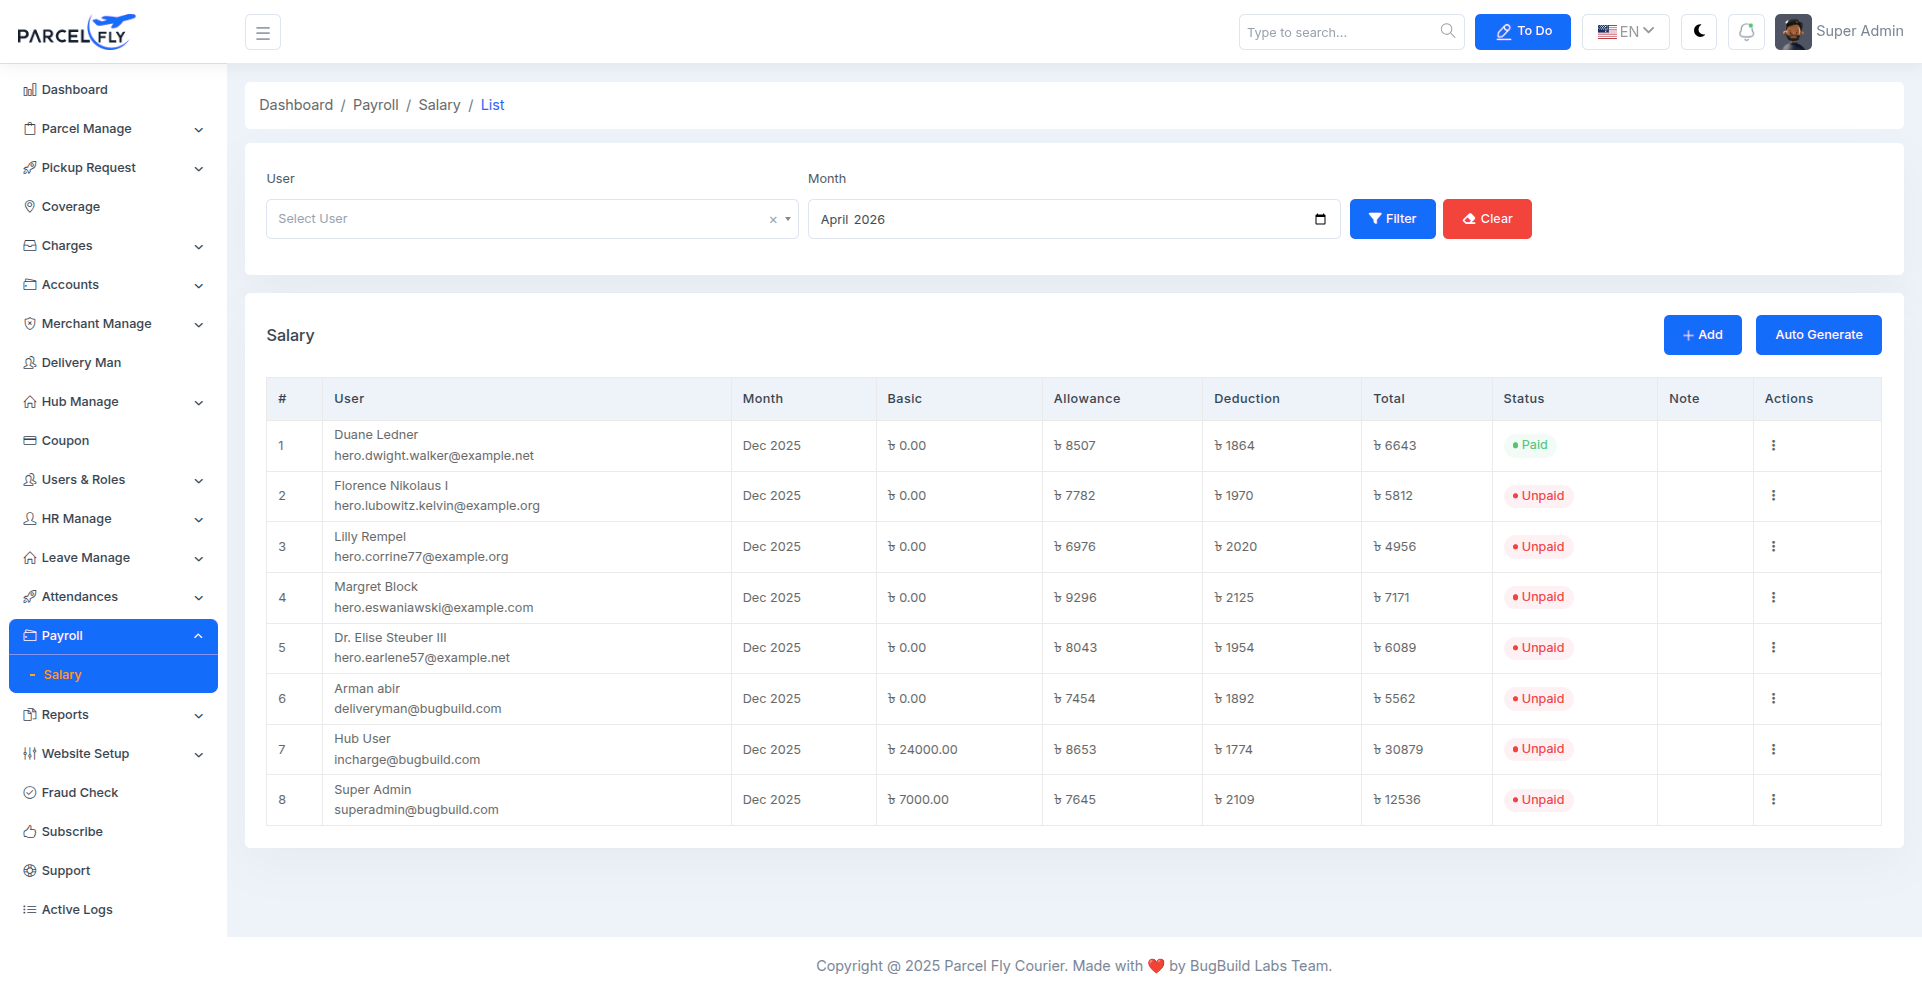
Payroll List
The payroll list helps administrators manage and review salary records for staff members.
- Salary Table: Shows user, month, basic salary, allowance, deduction, total, status, and notes.
- Filtering: Salary records can be filtered by user and month.
- Actions: Supports payroll management with add and auto-generate controls.
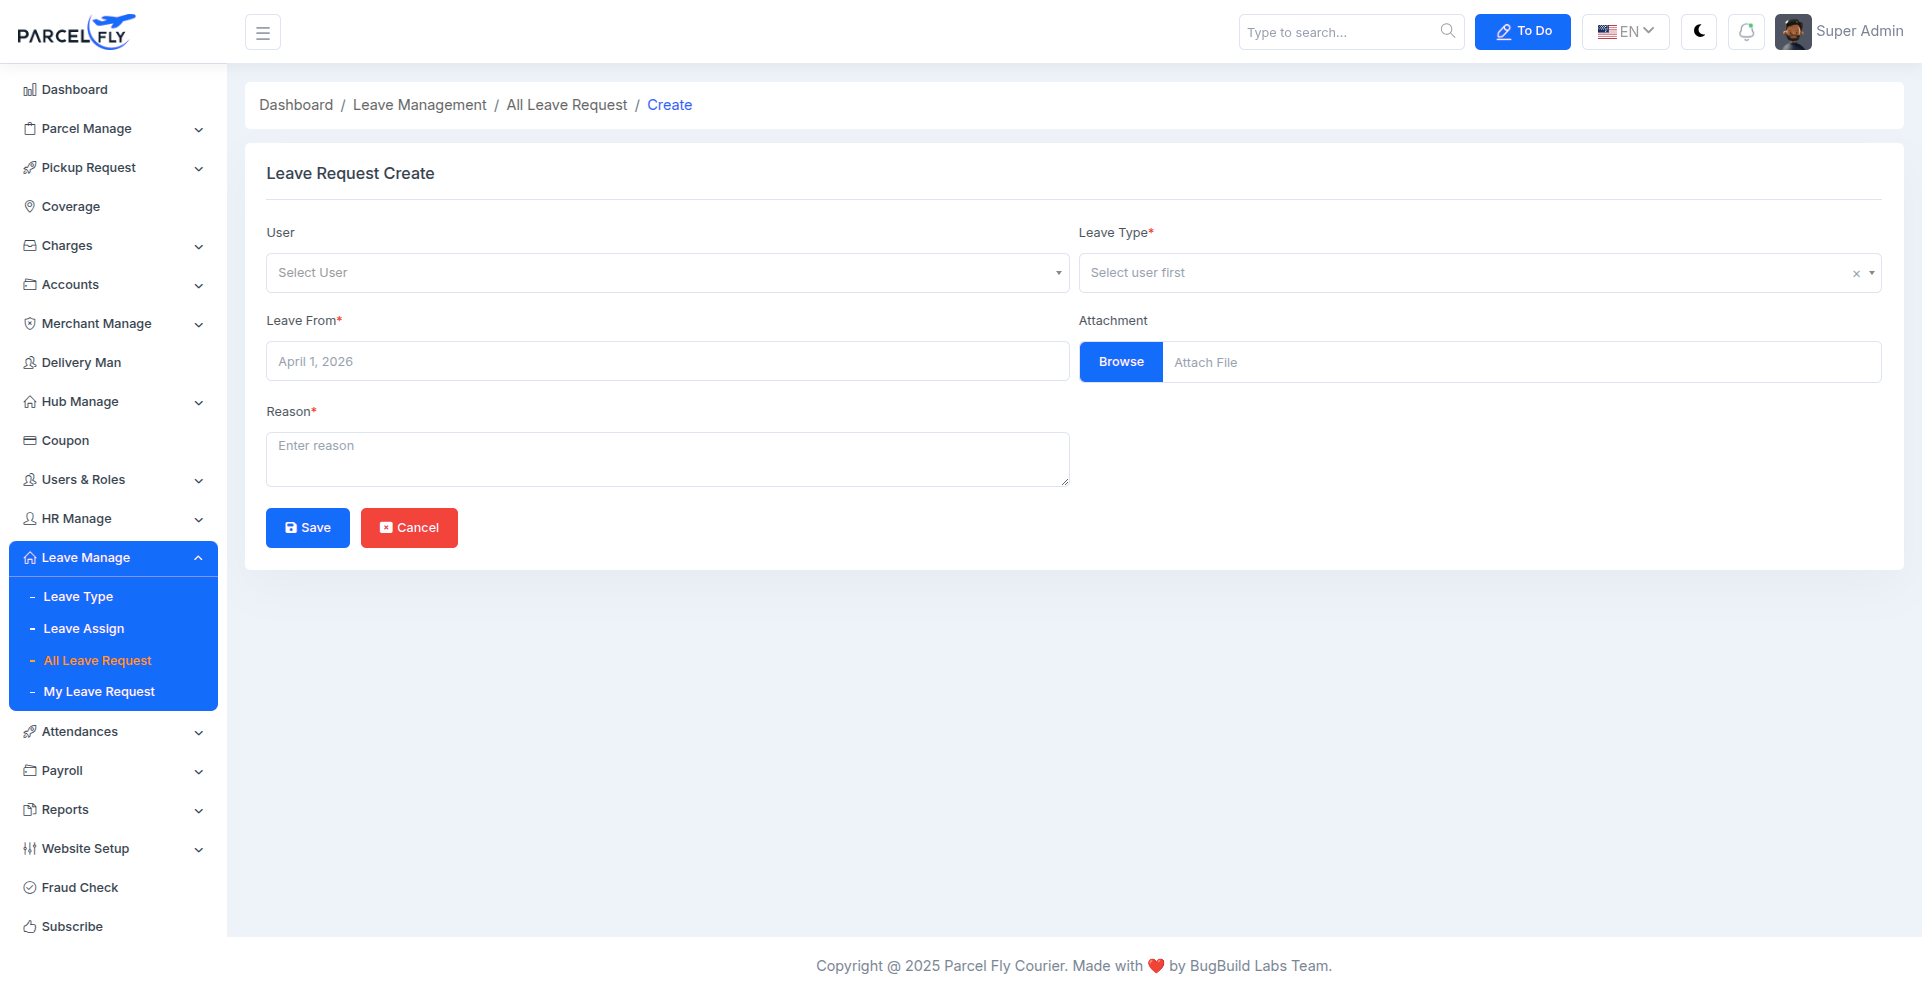
Leave Request Create
The leave request form is used to submit employee leave applications through the HR module.
- Request Form: Enter leave dates, leave type, and supporting details.
- HR Workflow: Supports internal leave approval and attendance-related record keeping.
- Structured Submission: Keeps leave data organized for managers and HR teams.
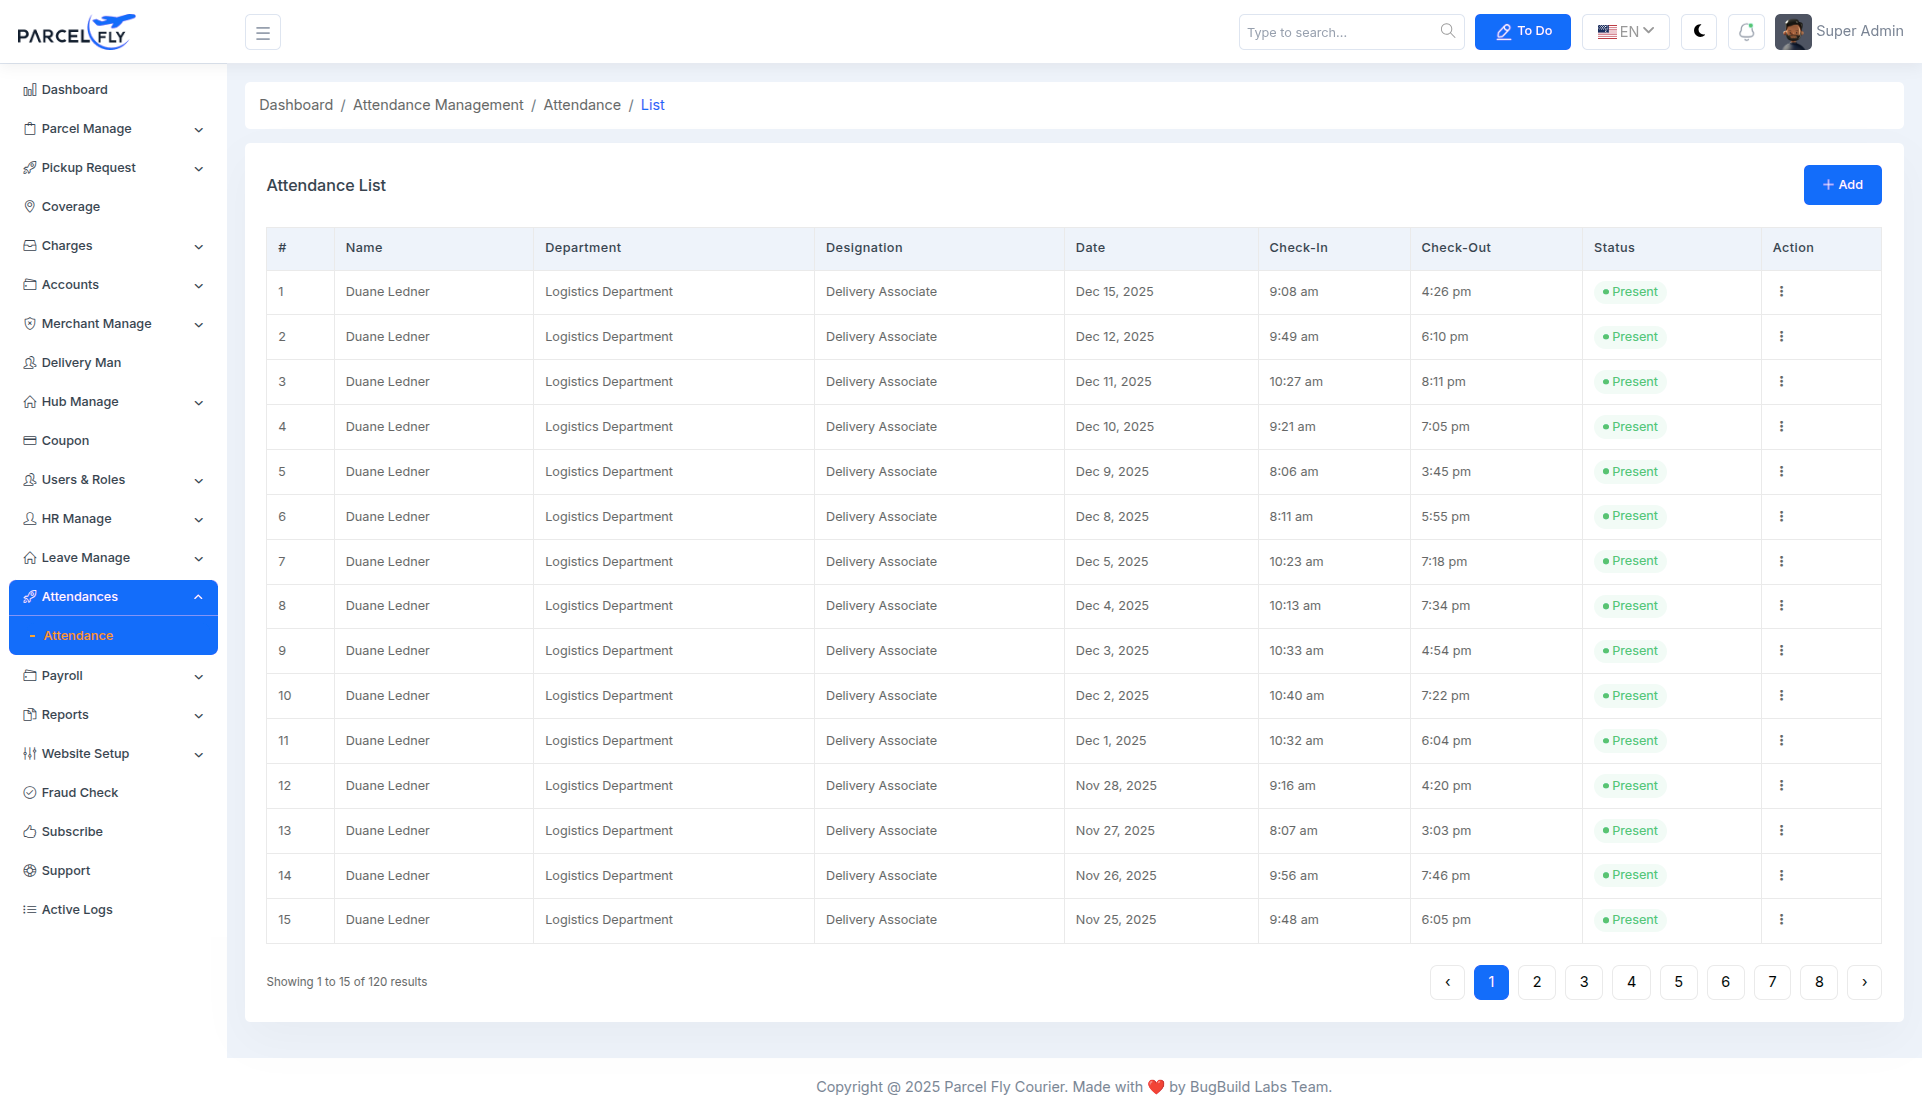
Attendance List
The attendance list helps HR teams monitor staff presence and attendance records.
- Attendance Tracking: View attendance-related records for staff operations.
- HR Monitoring: Supports workforce management and internal attendance review.
- Operational Support: Keeps attendance data accessible for HR and payroll coordination.
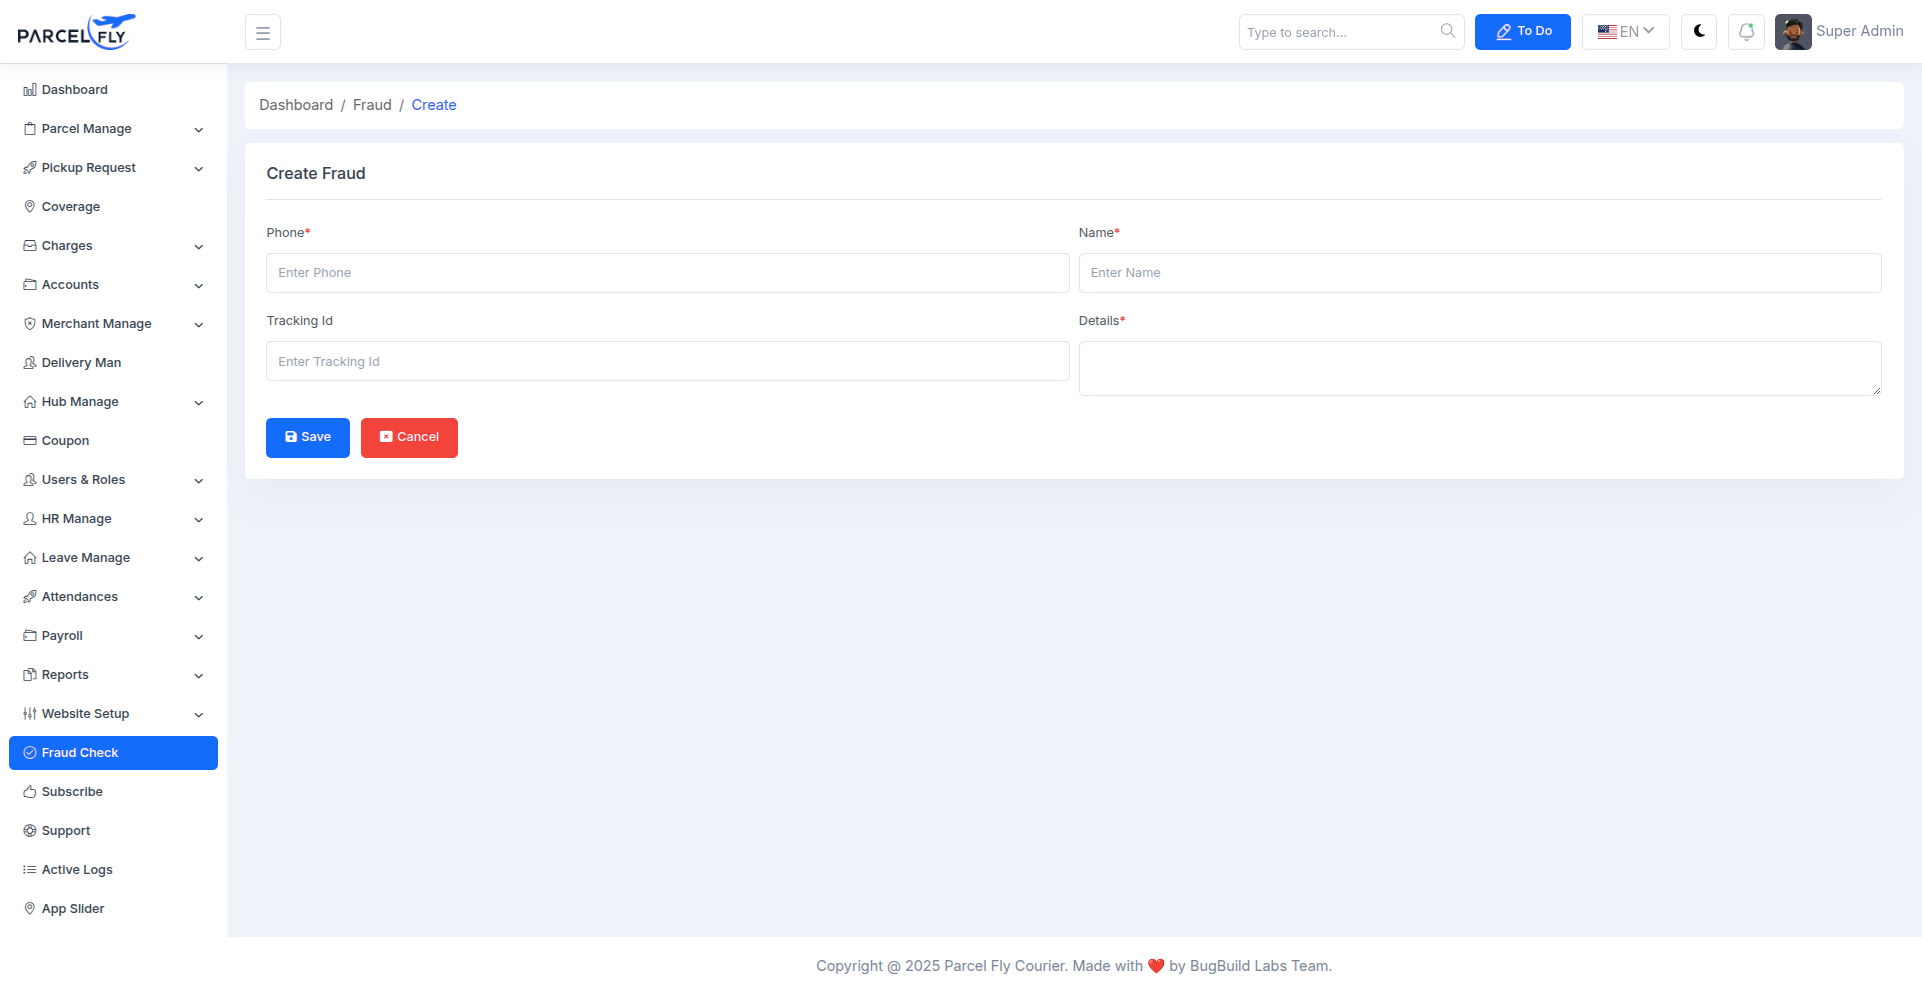
Fraud Check Create
The fraud check form allows administrators to record and review suspicious activity or fraud-related information.
- Case Entry: Create a structured fraud-check record from the backend.
- Risk Documentation: Maintain operational notes or fraud-related evidence in one place.
- Internal Control: Supports compliance and risk-review workflows.
Modules
Modules Overview
Besides local delivery, ParcelFly ships with optional modules. Each is a separate module with its own tables, menus and permissions, so local delivery keeps working exactly the same whether they are on or off. The business lines appear together under Business Lines in the admin sidebar and under Services in the website menu.
- International Parcel: export and import parcels priced by zone, weight and HS code.
- Freight Forwarding: sea, air and road jobs with containers, documents and billing.
- Truck & Cargo Booking: full and part truck loads with fleet, drivers, trip challan, proof of delivery and trip profit.
- Express Delivery: on-demand same-day city delivery with a dispatch board, delivery codes and rider cash.
- Line Haul: hub-to-hub bags and manifests with arrival reconciliation and delay alerts.
- Warehouse & Fulfillment: stock, pick-pack and shipping for merchants, billed monthly.
- House & Office Shifting: leads, surveys, quotations, crews and moving-day checklists.
- Shop & Ship: buy-for-me and ship-for-me imports with batches and final settlement.
- CRM: sales pipeline, quotations, reminders and targets.
- Accounting: double-entry books fed automatically by every other part of the system.
Turn a module on or off: run php artisan module:disable CRM or php artisan module:enable CRM (module names: Accounting, International, Freight, CRM, Haulage, Express, Linehaul, Fulfillment, Relocation, ShopShip). The menus and permissions follow automatically.
Website pages: the public pages are linked from the Services menu: /truck-booking, /express-delivery, /shifting, /shop-and-ship, plus international and freight tracking. A module that is turned off disappears from the menu.
Permissions: each module adds its own permissions to Users & Roles. On a new install they are given to the Super Admin and Admin roles automatically (also after php artisan migrate:fresh --seed).
Scheduled tasks: CRM reminders run from the Laravel scheduler. Add this cron entry on your server: * * * * * cd /path-to-project && php artisan schedule:run >> /dev/null 2>&1
Smart Scan Station
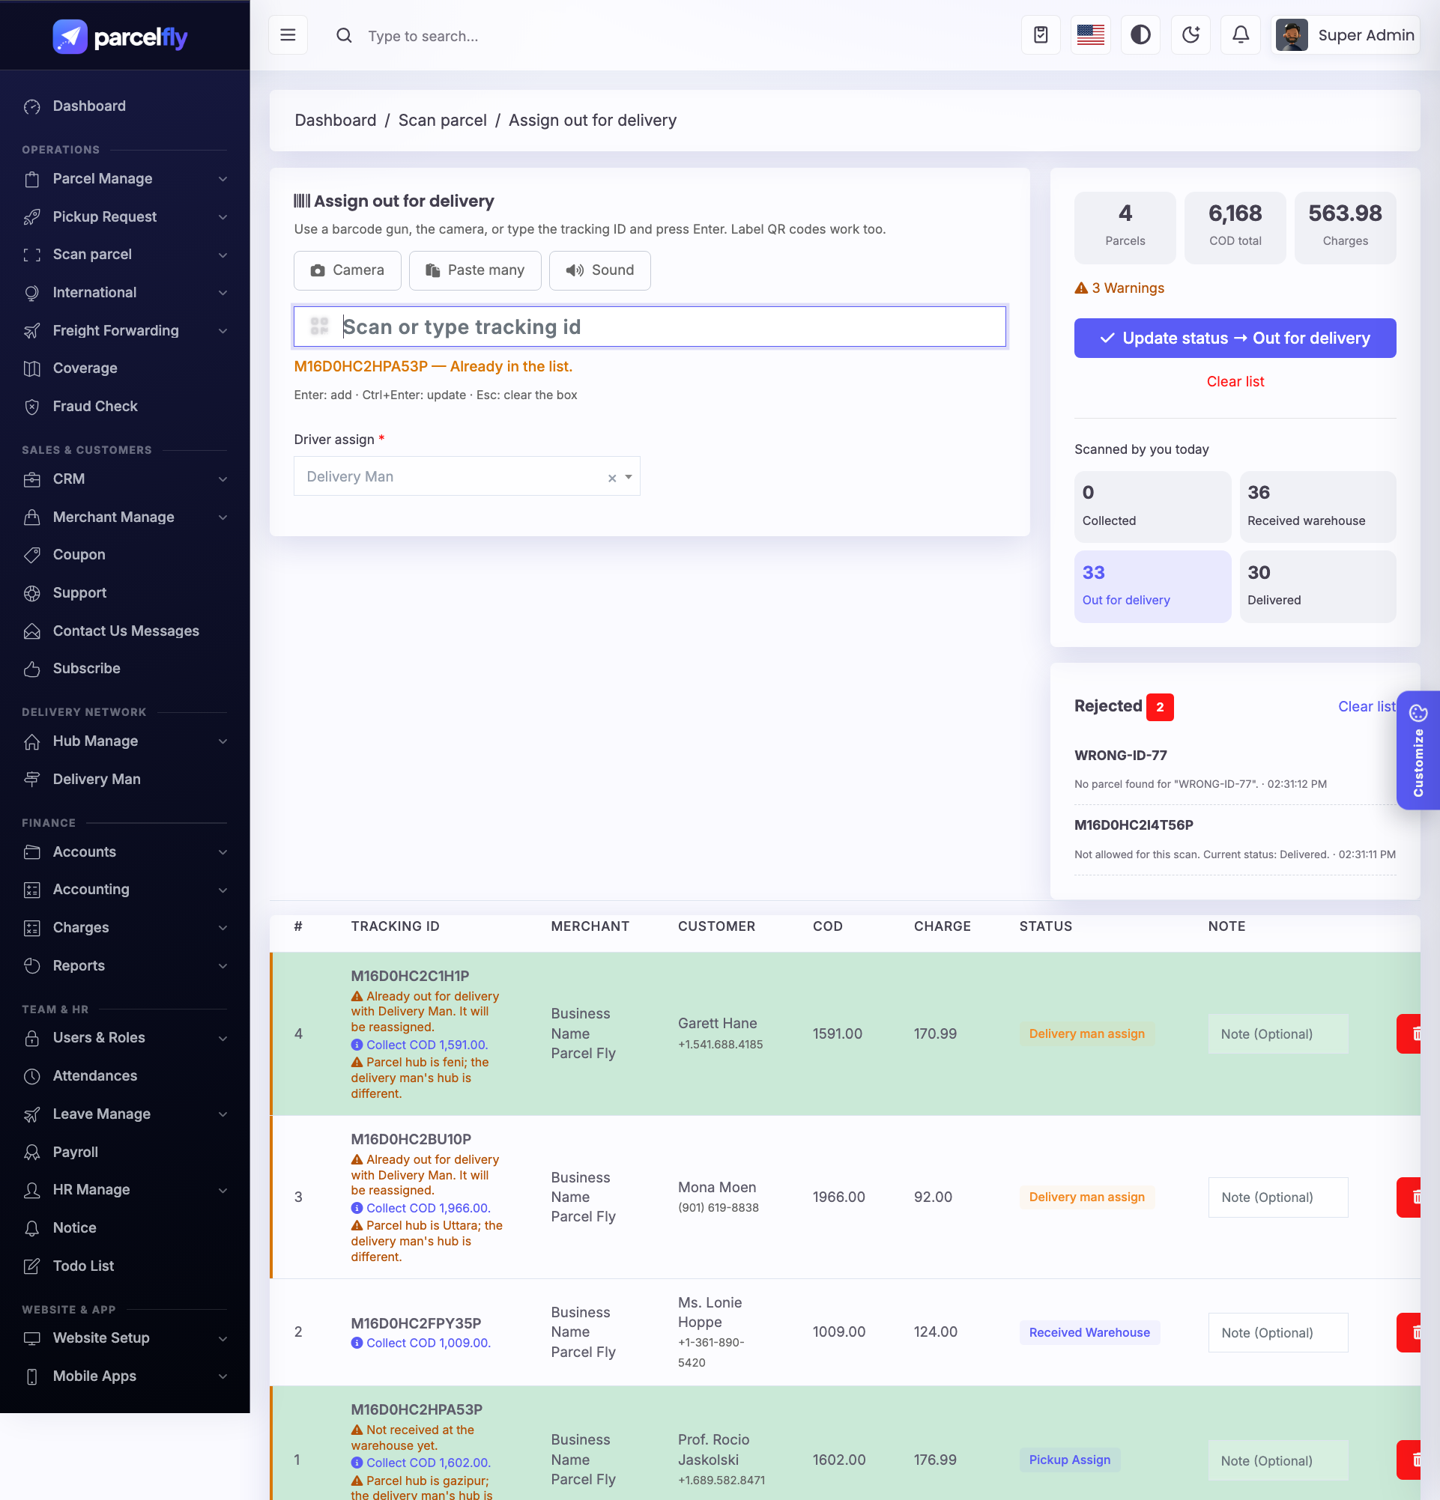
Every scan page (Received warehouse, Delivered, Assign out for delivery and Pickup received) uses the same scan station. Scan parcels one after another, check the list, then update them all with one click.
- Ways to scan: a barcode gun or keyboard (press Enter), the phone or laptop camera, or Paste many for a list of tracking IDs. The QR code on ParcelFly labels works too.
- Instant checks: each scan shows a green, orange or red signal with sound. Orange warnings point out parcels already in the warehouse, already out with another delivery man, coming back from a rider, or belonging to a different hub.
- Totals: parcel count, COD to collect and charges update as you scan. A Rejected list keeps every refused scan with its reason.
- Safe update: before saving, the server checks every parcel again. Parcels whose status changed in the meantime are skipped and stay in the list with the reason.
- Delivery man picker: search by name or phone; each delivery man shows the hub and how many parcels they are holding now.
- Keyboard: Enter adds a parcel, Ctrl+Enter updates the list, Esc clears the box. The list survives a page refresh.
- Permissions:
scan_received_to_warehouse,scan_delivered,assign_out_for_delivery,scan_pickup_received. - Camera note: browsers only allow the camera on HTTPS (or localhost).
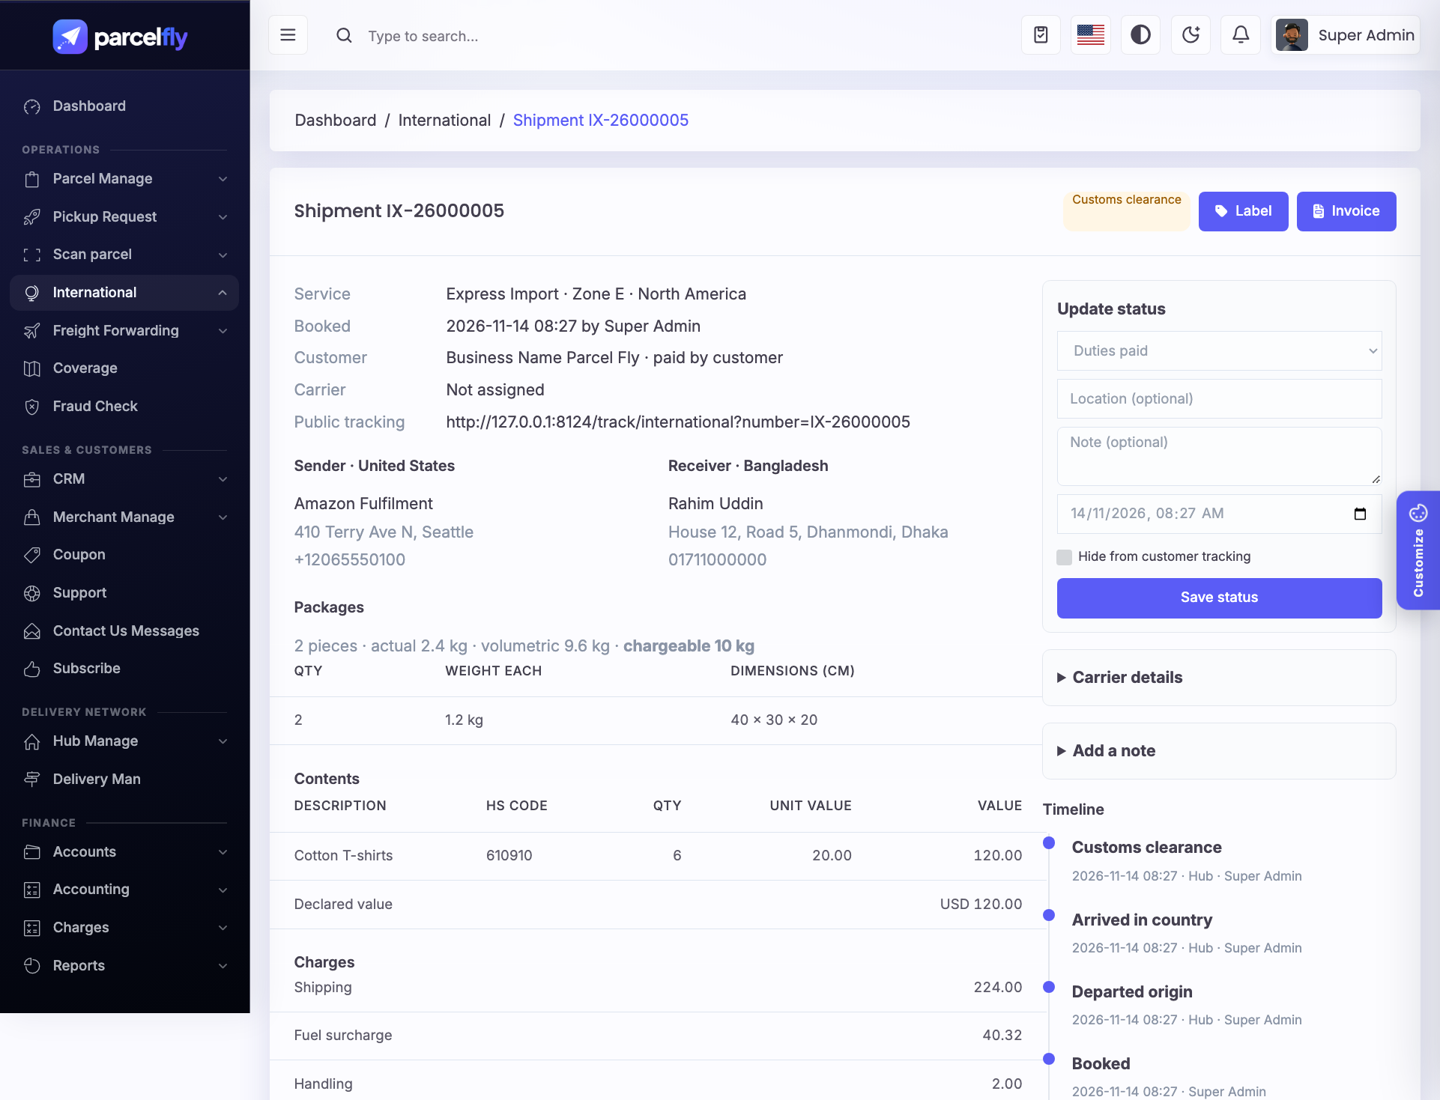
International Parcel
Ship parcels abroad (export) and receive parcels from abroad (import) with prices, duties and taxes worked out before you book.
- Setup first: International → Setup: set the home country and number prefix, then add services (export or import, currency, transit days, cover rate), zones (groups of countries), rate cards with weight bands, surcharges, tariff codes, tax rules and exchange rates.
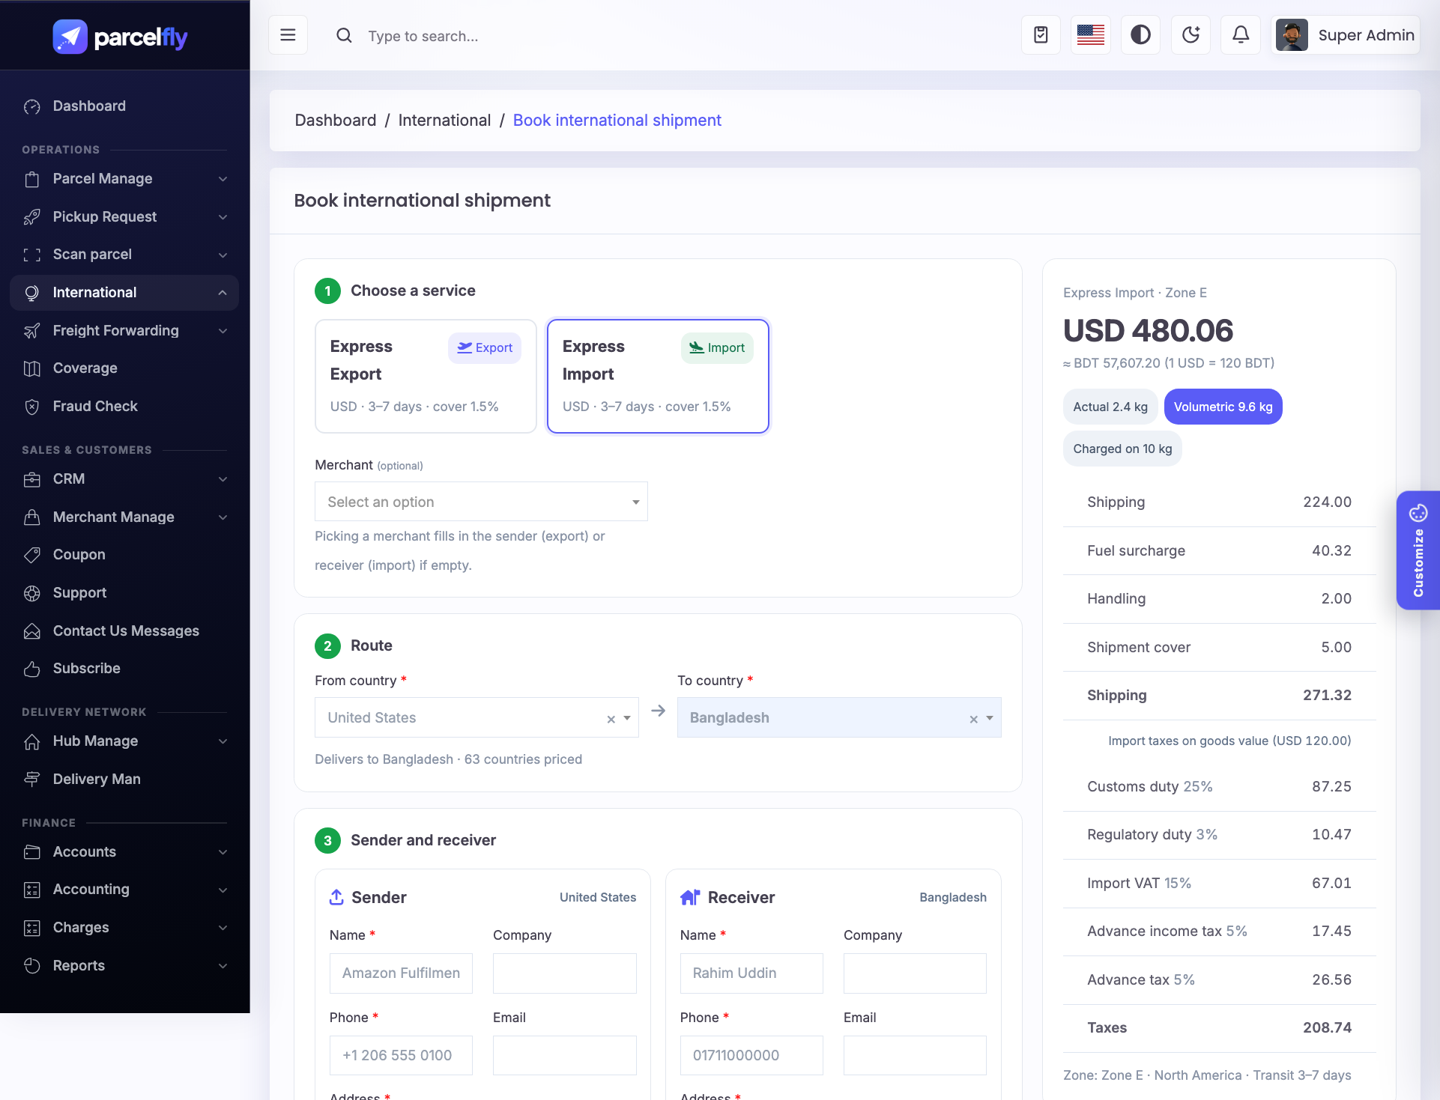
- Book a shipment: International → Book shipment: choose a service and route, fill in sender and receiver, packages and contents. The price panel shows shipping, cover and import taxes live, and a checklist shows what is still missing.
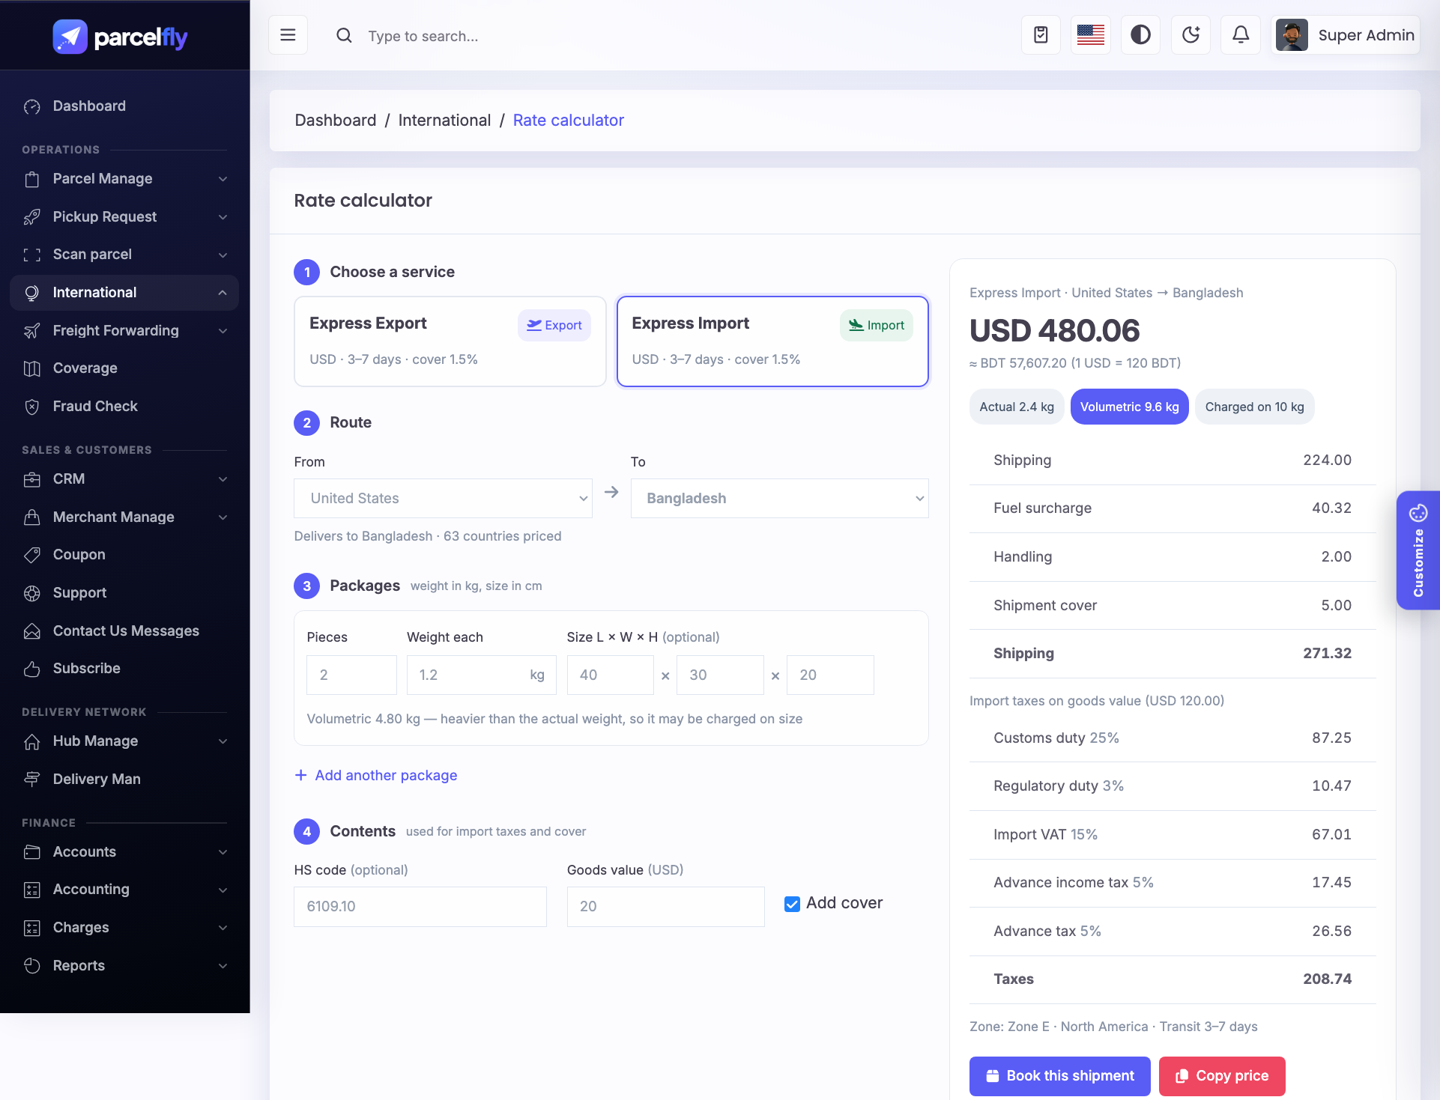
- Rate calculator: quote a customer without booking. Countries without a rate card are marked “no rates”. Book this shipment opens the booking form already filled in.
- Shipment desk: move a shipment through your workflow steps, add carrier and AWB details, record payments, print the label and commercial invoice.
- Inbound notices: merchants announce parcels arriving from abroad; staff book them from the notice.
- Merchant portal: merchants with the
international.merchant.portalpermission see International in their panel to book and follow shipments. - Public tracking:
/track/internationalshows the public milestones to customers.
Freight Forwarding
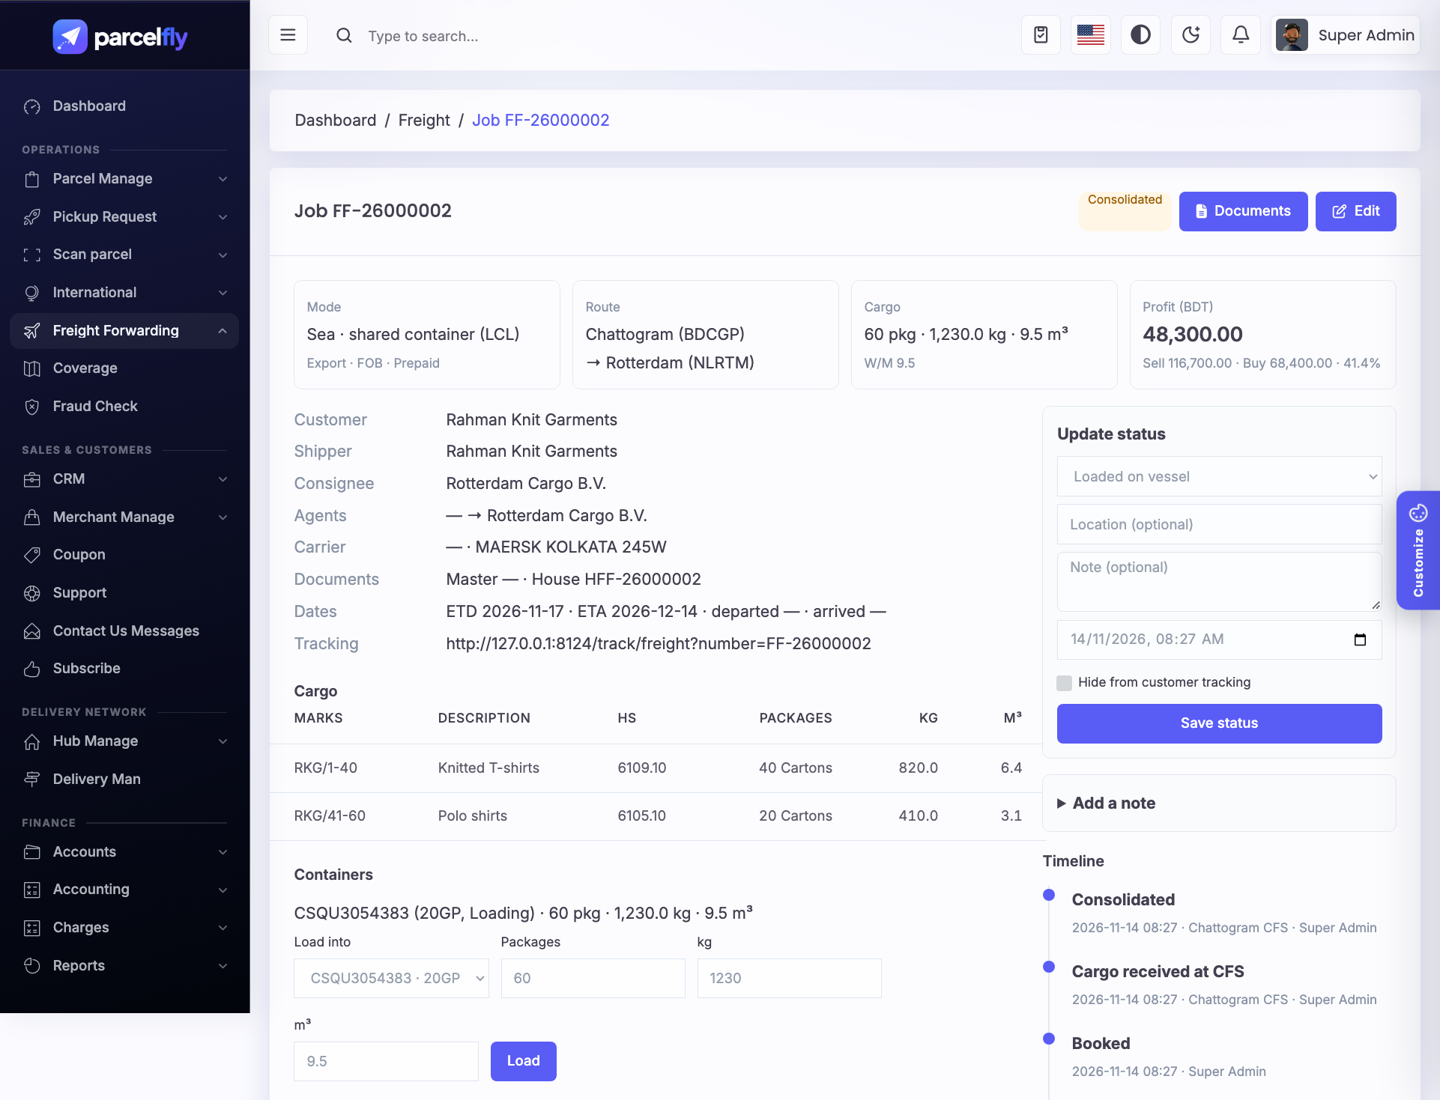
Manage forwarding jobs for full and shared container loads, air freight and road freight.
- Setup: Freight Forwarding → Setup: parties (customers, shippers, consignees, agents, carriers, vendors), ports, charge types, status steps per mode, and the job number prefix.
- Jobs: create a job with mode, direction, parties, ports, incoterm and cargo lines. Chargeable weight and volume are calculated from the cargo.
- Containers: add containers (the ISO 6346 check digit is validated), load jobs into them and print the manifest.
- Documents: print the house bill (HBL/HAWB), booking confirmation and arrival notice.
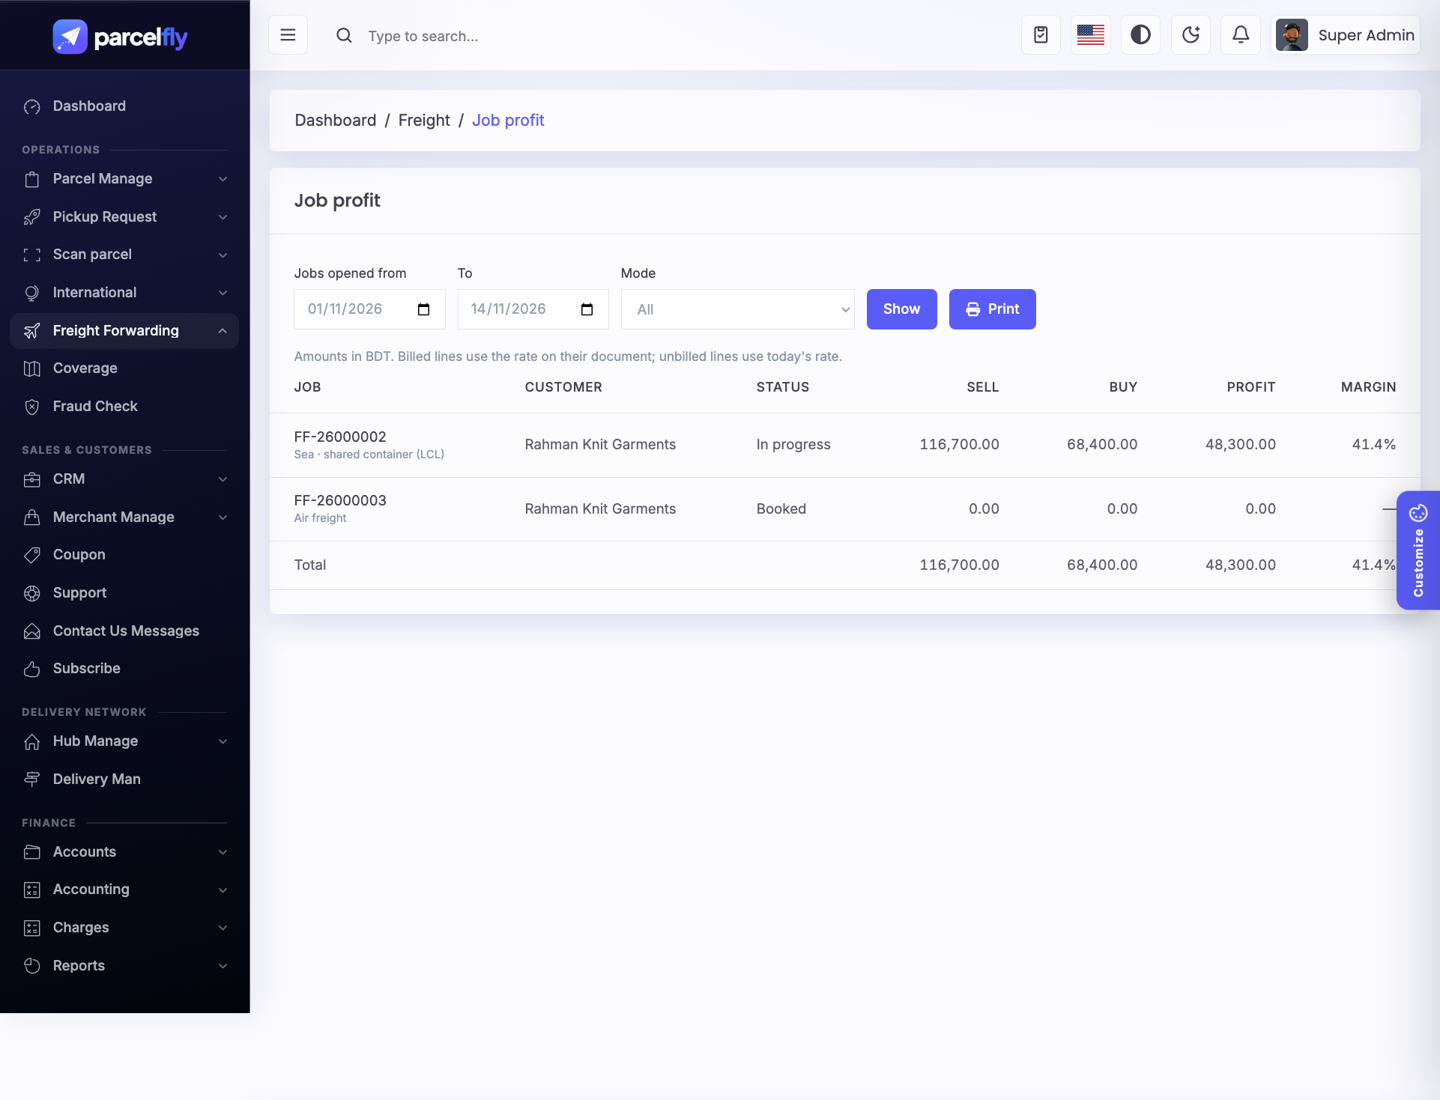
- Billing: add buy and sell charges per job, turn sell charges into an invoice, record settlements, and follow job profit and invoice ageing.
- Public tracking:
/track/freightfinds a job or a container number.
Truck & Cargo Booking
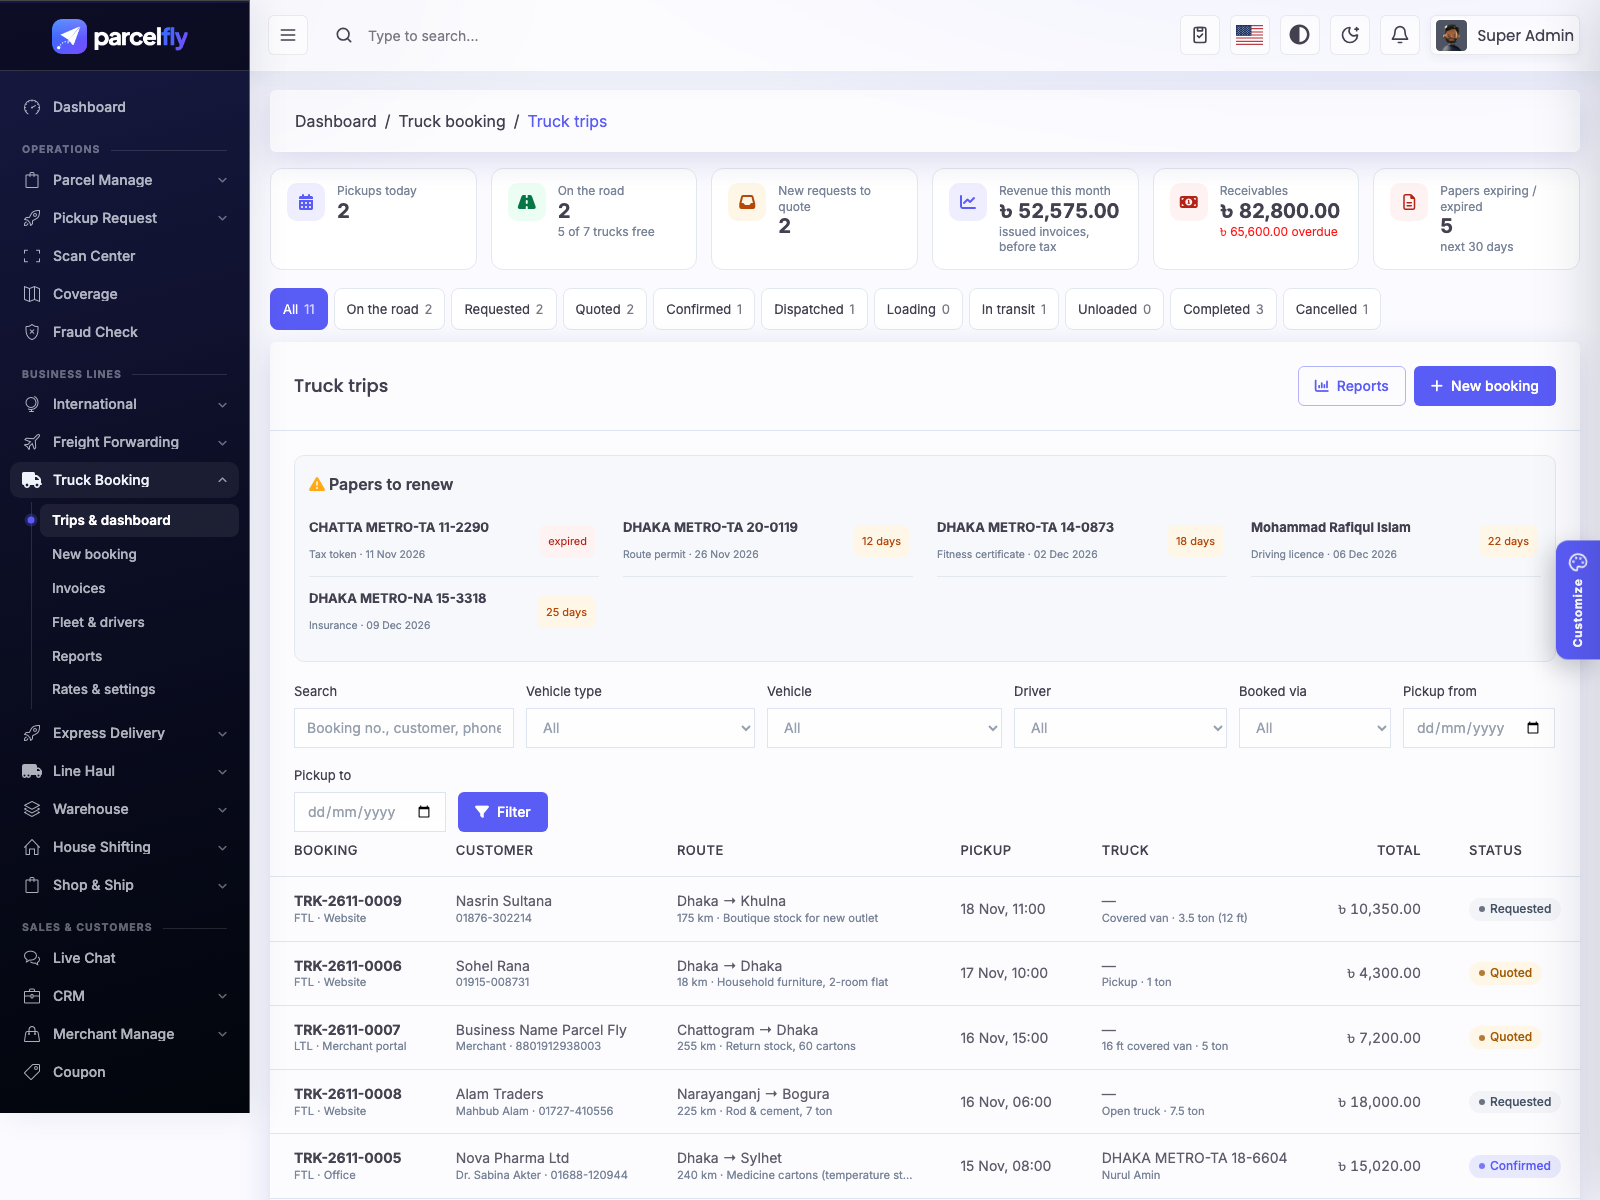
Rent out trucks for full loads (FTL) and part loads (LTL) — line-haul trips for factories, wholesalers and e-commerce sellers.
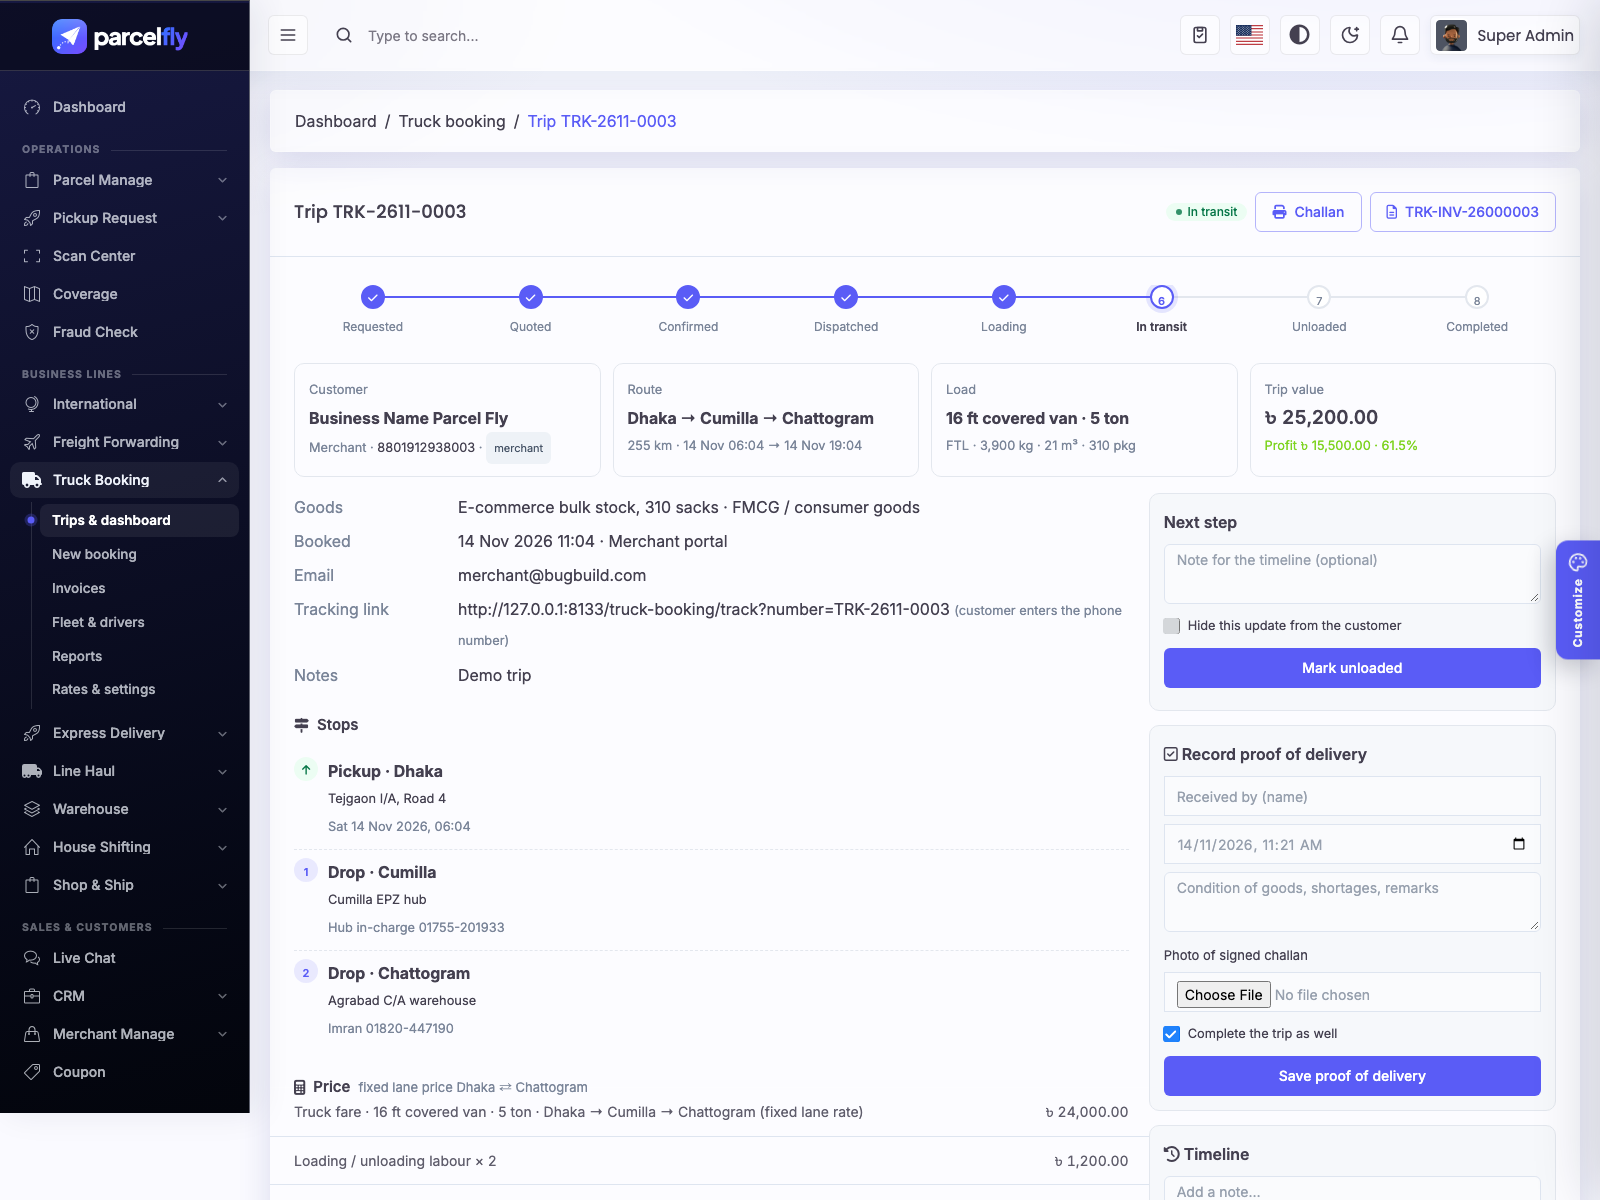
- Setup: Truck Booking → Fleet & drivers: vehicle types (capacity, base fare, per-km rate, minimum fare), your own and hired vehicles with fitness, tax-token, insurance and route-permit expiry dates, and drivers with licence expiry. Rates & settings: fixed lane prices (e.g. Dhaka → Chattogram), labour rate, night charge, tax and document terms.
- Quote: a new booking is priced automatically: a matching lane price, otherwise base fare + km × rate (never below the minimum), plus labour, night charge, toll, waiting hours, discount and tax. Part loads pay their share of the truck.
- Trip flow: Requested → Quoted → Confirmed → Dispatched → Loading → In transit → Unloaded → Completed (or Cancelled with a reason). Every step is logged in the timeline.
- Assign: choose a vehicle and driver; the system blocks a truck or driver that is already on another active trip.
- Proof & profit: record proof of delivery with the receiver name and a photo of the signed challan; add trip expenses (fuel, toll, driver allowance, hired rent) to see the trip profit.
- Billing: turn the trip into an invoice, issue it and record advance/balance payments by hand (cash, bank or mobile banking with a reference).
- Documents: print the consignment note (trip challan) and the invoice.
- Dashboard & reports: pickups today, trucks on the road, papers expiring, receivables; reports for trips, profit per trip and vehicle, driver trips and receivables ageing.
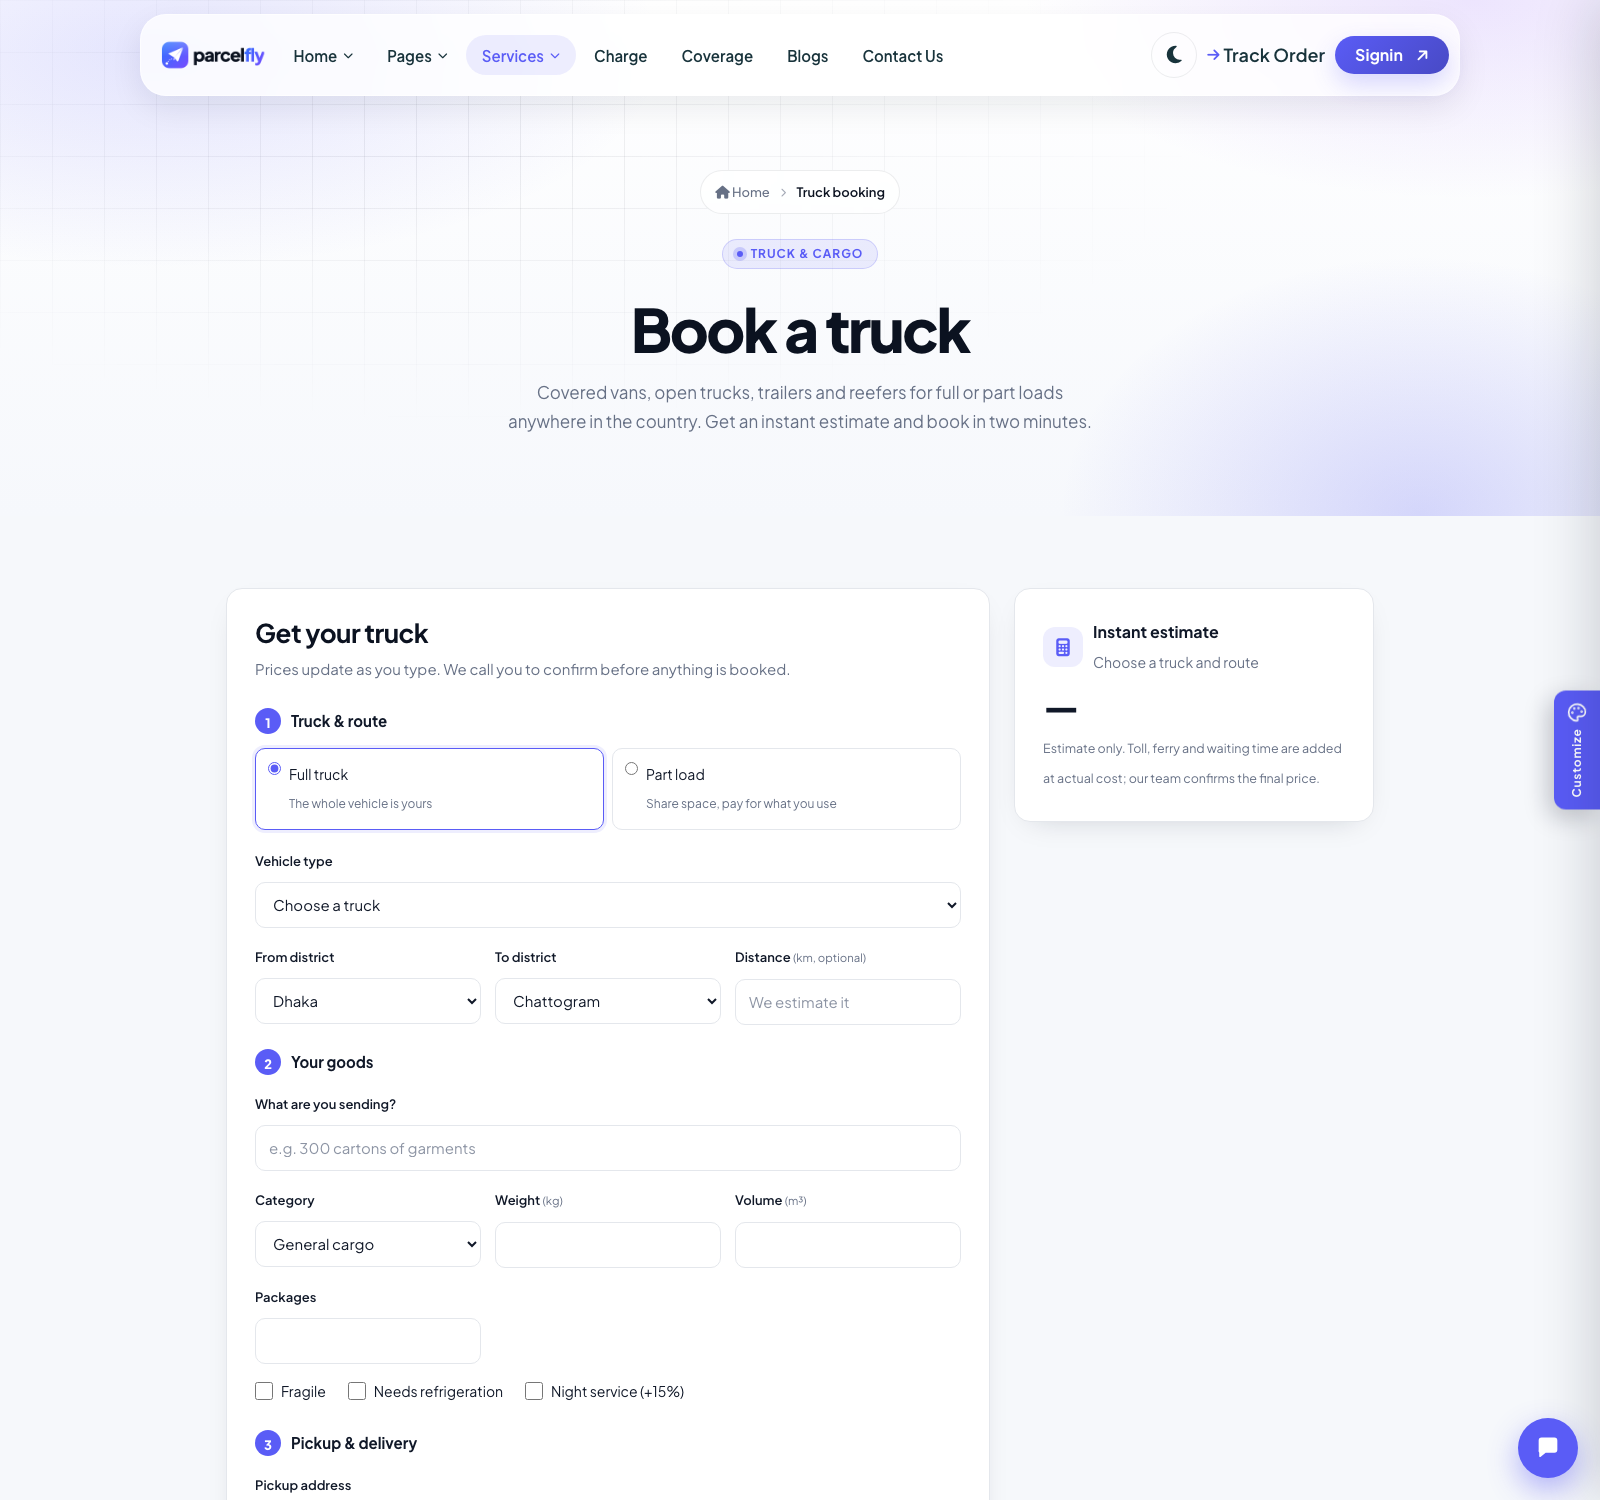
- Merchant portal: merchants request a truck with a live estimate, accept or decline the quote, follow the trip and print invoices.
- Website:
/truck-bookingbooks a truck with an instant estimate;/truck-booking/tracktracks it by booking number + phone.
How to use it, step by step:
- Open Truck Booking → Fleet & drivers and check the vehicle types and prices; add your trucks (registration, own or hired, paper expiry dates) and drivers.
- Under Rates & settings add fixed lane prices for routes you run often and set the labour rate, night charge and tax.
- Click New booking: choose the customer (merchant or walk-in), full or part load, vehicle type, pickup and drop stops and the goods. The price is calculated as you type.
- Send the quote (Mark quoted); when the customer agrees, Confirm it.
- Assign a vehicle and driver, then move the trip through Dispatched → Loading → In transit → Unloaded. Print the challan for the driver.
- Record the proof of delivery (receiver name and a photo of the signed challan) and add the trip expenses.
- Click Create invoice, issue it and record the payments. The trip shows its profit; see more under Reports.
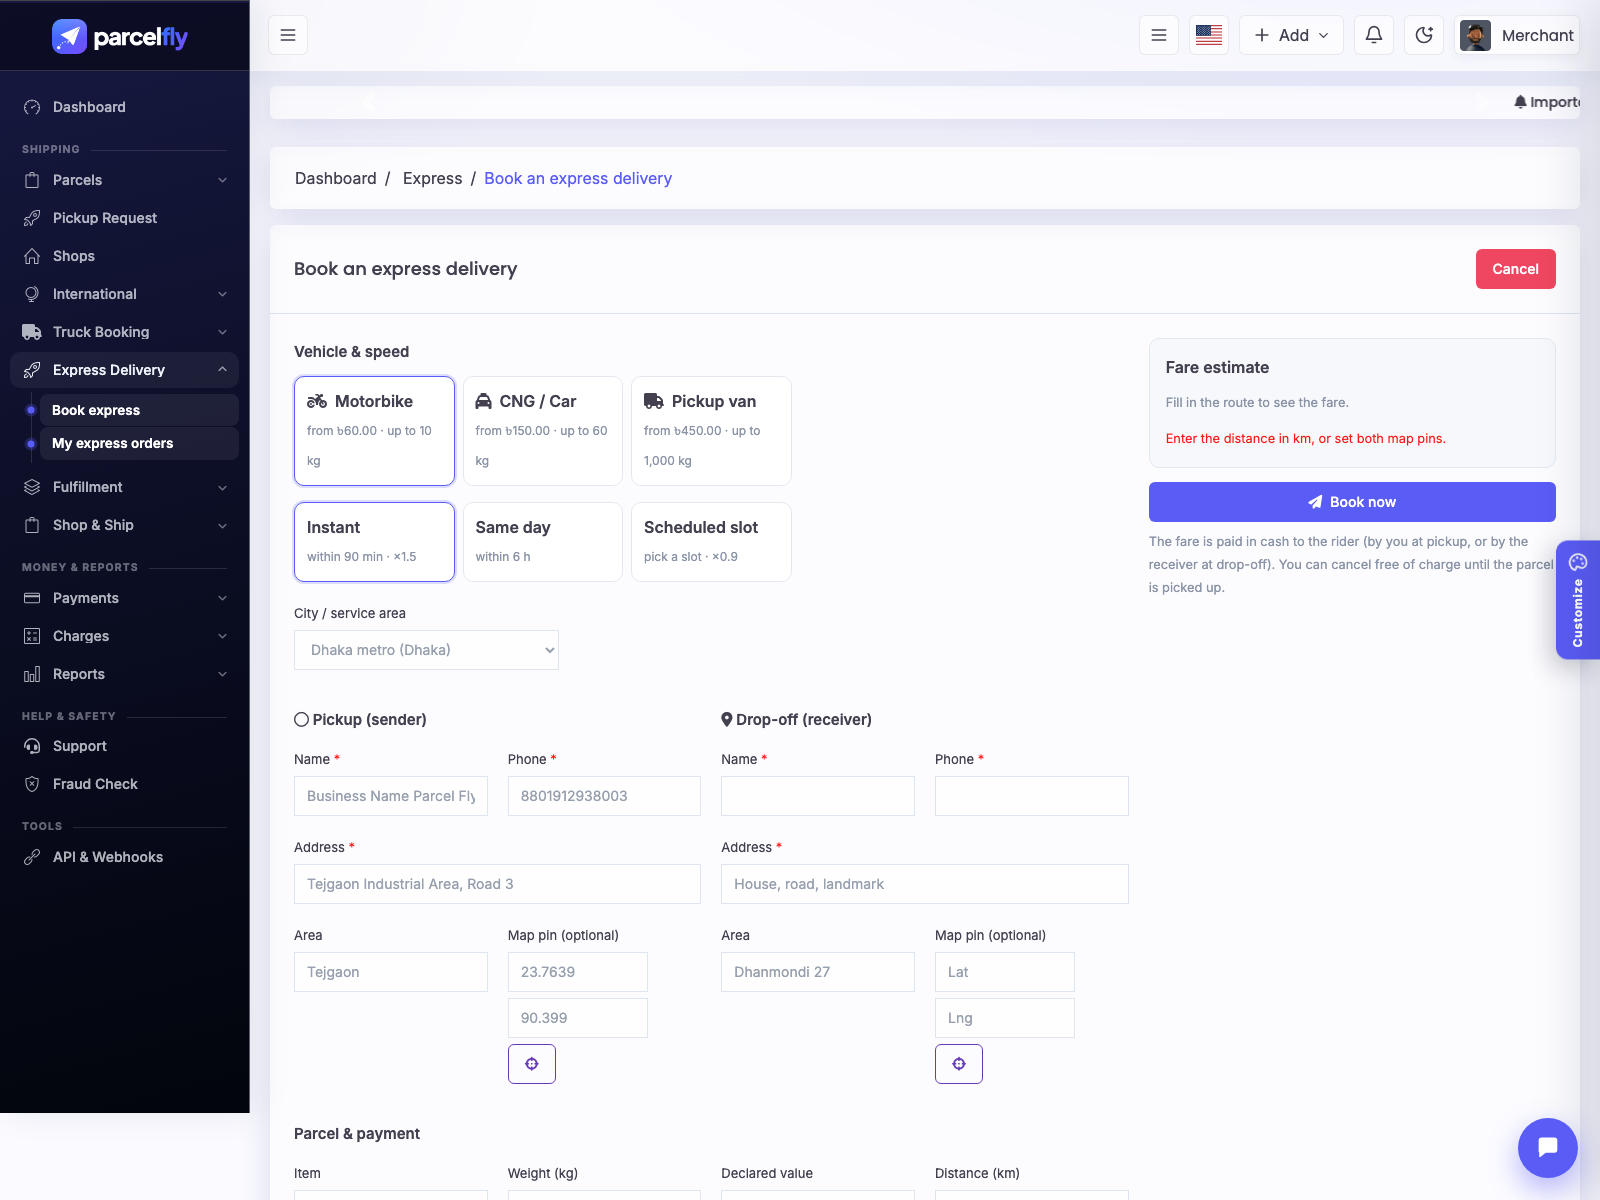
Express Delivery
On-demand same-day city delivery by bike, CNG/car or pickup van, with live dispatch, delivery codes and rider cash control.
- Setup: Express Delivery → Setup: vehicle classes (base fare, included km, per-km, waiting per minute, max weight), service levels (Instant, Same day, Scheduled — each with a fare multiplier and a delivery promise), rush-hour surcharges, service zones (city centre + radius) and settings (COD fee, rider commission, auto-assign, road factor).
- Fare: base + extra km + waiting, × service level × rush hour, topped up to the minimum, + COD fee − discount. The distance comes from the map pins / browser location (× road factor) or the km typed in.
- Order flow: Placed → Assigned → At pickup → Picked → Delivered, or Failed / Returned / Cancelled with a reason. Each order shows its promise time and turns red when late.
- Delivery code: the receiver gets a 4-digit code; the rider must enter it to finish the delivery (admins can override with a reason).
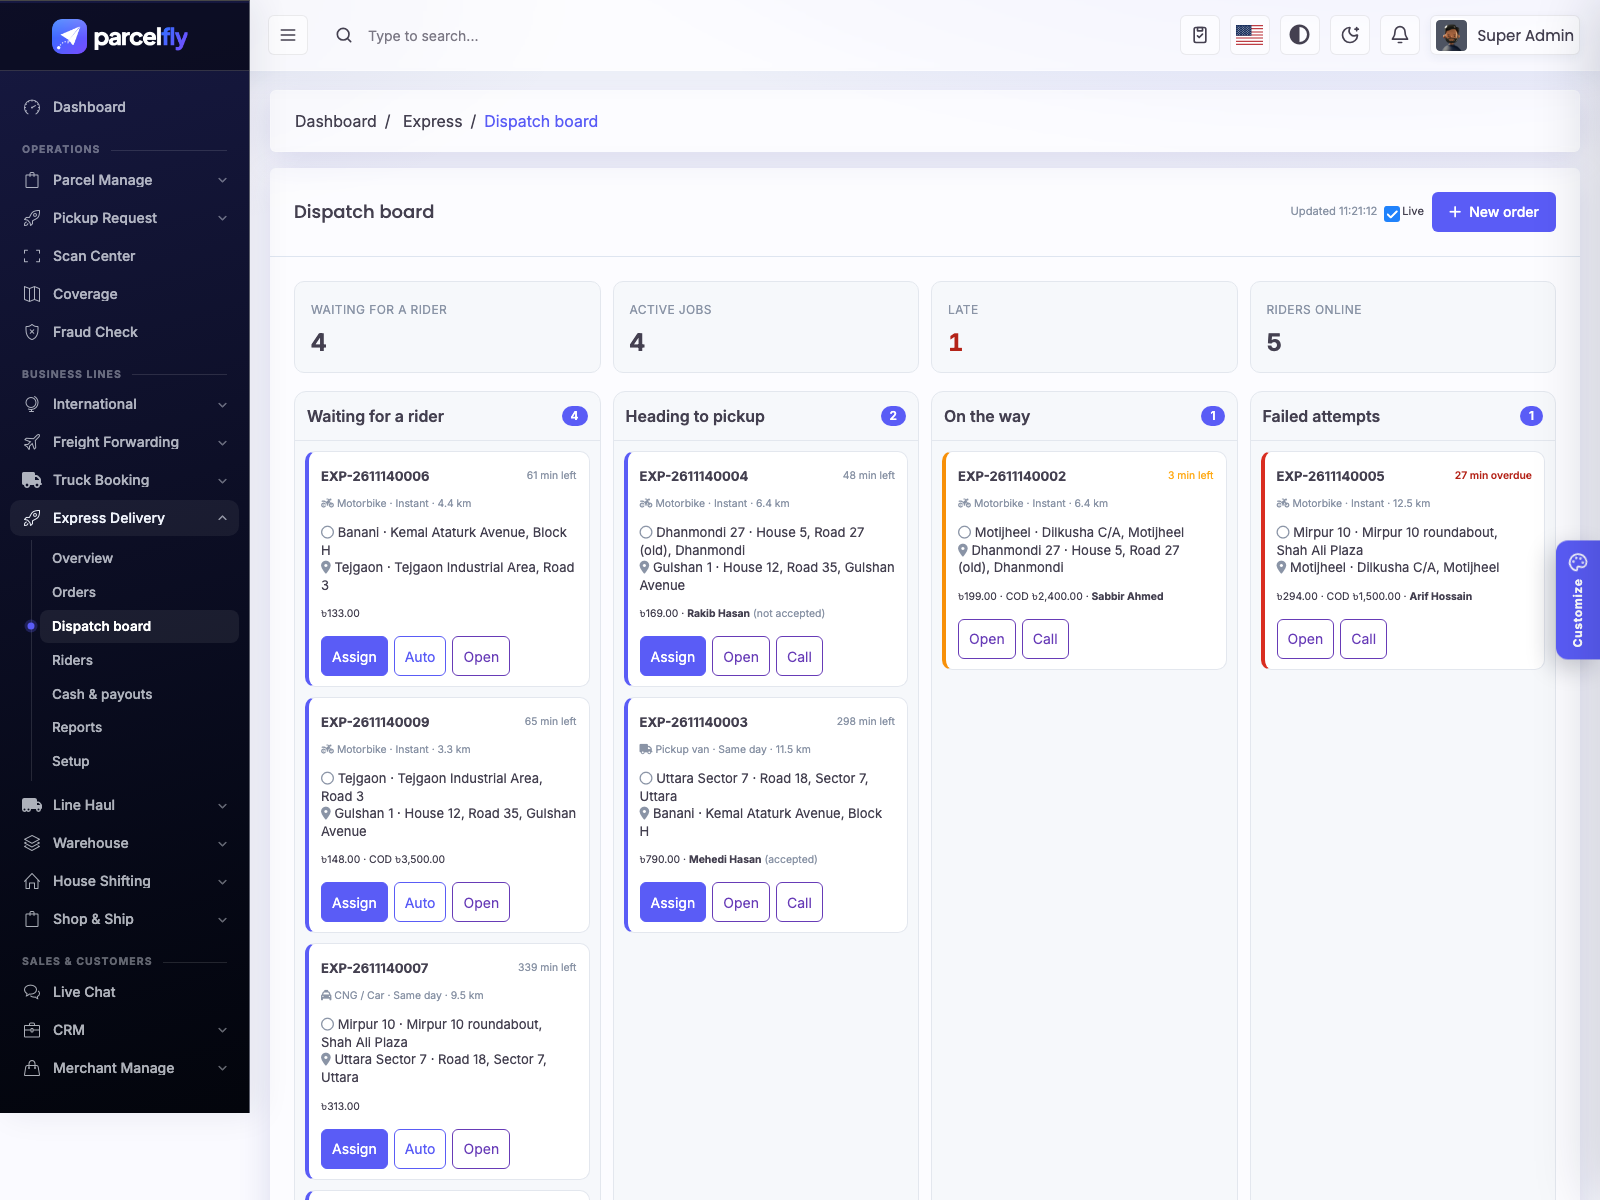
- Dispatch board: a live board (refreshes every 10 seconds) with orders waiting for a rider, heading to pickup, on the way and failed attempts. Suggested riders are sorted by distance; assign with one click or let the system auto-assign the nearest free rider.
- Riders: delivery men get an Express Jobs page in their panel: go online/offline, share location, accept jobs, update the status and complete with the code and an optional photo. The same actions are available as a JSON API for the rider app (
/api/express/rider/*, same login token as the delivery man app). - Cash & payouts: COD collected by riders is handed over to the office and settled; rider earnings are paid out from the Cash & payouts page.
- Merchant portal & website: merchants create express orders with a live fare; guests book from
/express-deliveryand track at/express-delivery/track.
How to use it, step by step:
- Open Express Delivery → Setup: check the vehicle classes, service levels, rush-hour rules and zones, and set the COD fee, rider commission and auto-assign in Settings.
- Create an order with Orders → New order (or let merchants and website visitors book). The fare is shown before saving.
- Open the Dispatch board: orders waiting for a rider are on the left. Click Assign to pick from the suggested riders (nearest first) or Auto for the nearest free rider.
- The rider opens Express Jobs in the delivery man panel (or the app), accepts the job and updates it: At pickup → Picked.
- At the door the receiver gives the 4-digit delivery code; the rider enters it to complete the delivery.
- Under Cash & payouts record the cash each rider hands over and pay out rider earnings.
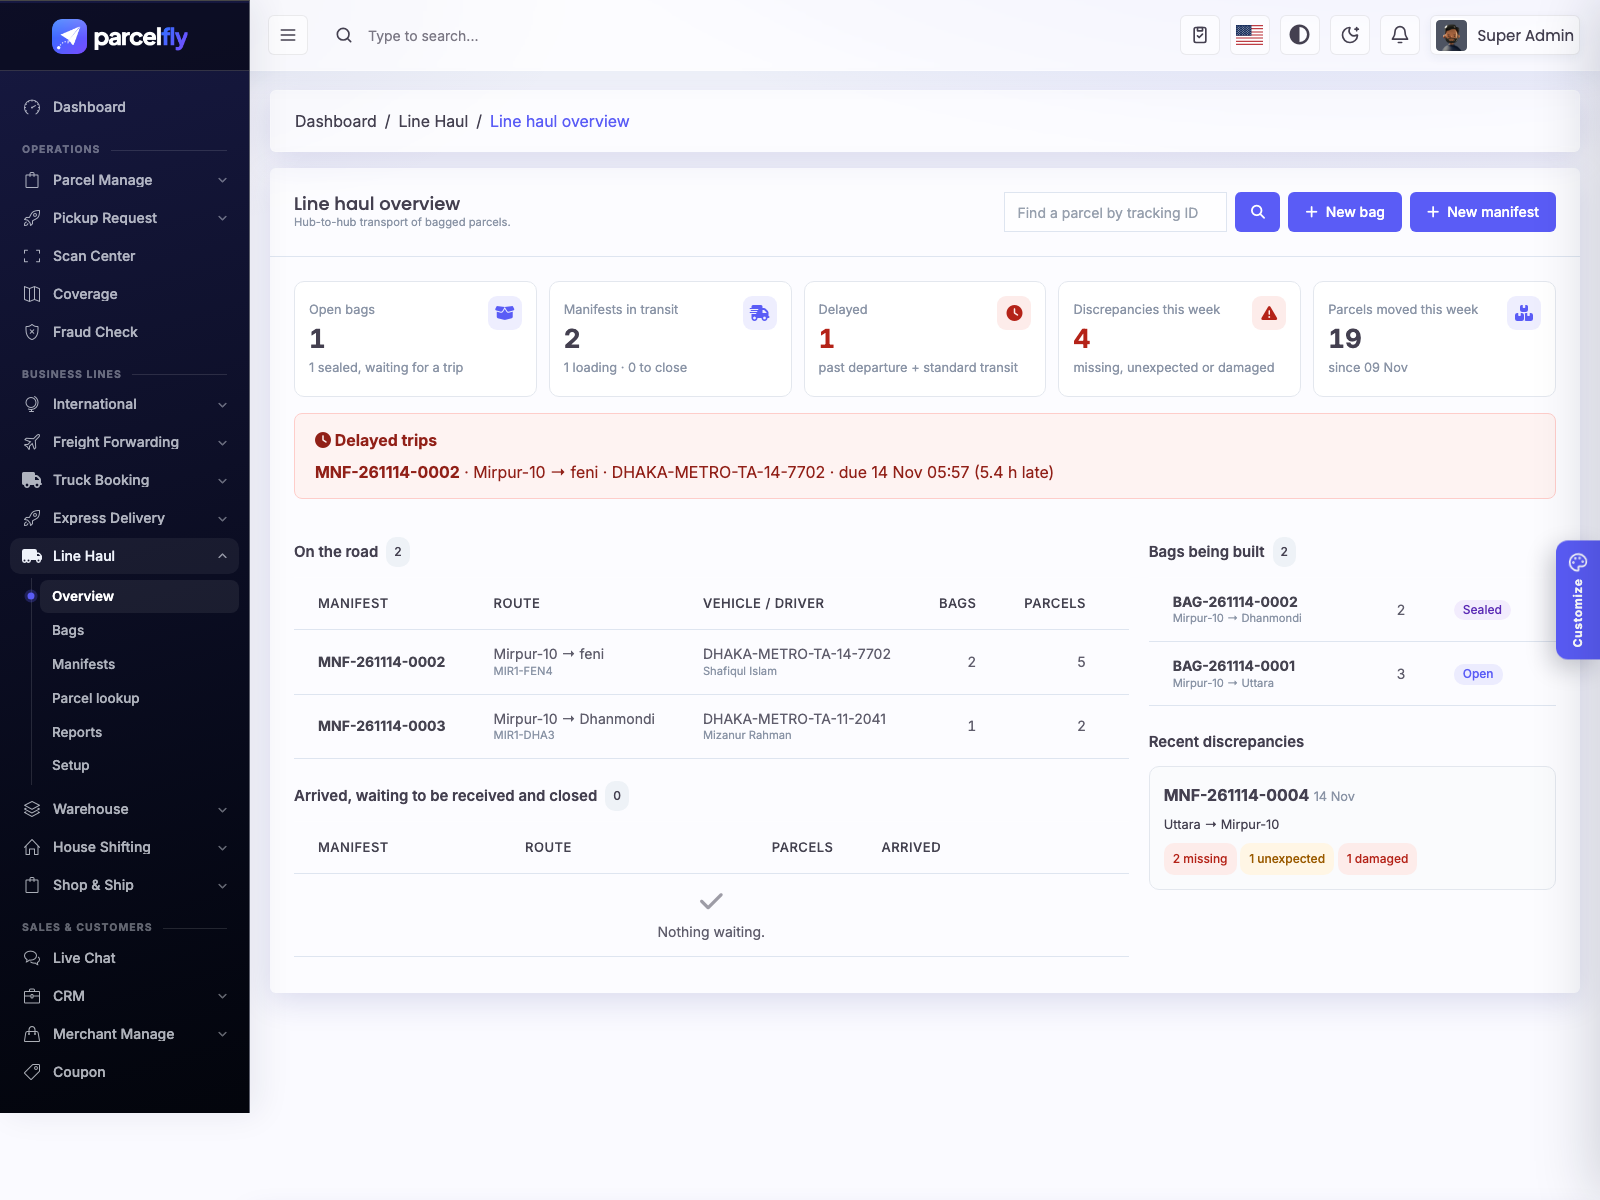
Line Haul
Move parcels between hubs in sealed bags on scheduled trips, and see straight away what arrived, what is missing and what is late.
- Setup: Line Haul → Setup: lanes (origin hub → destination hub, standard transit hours, departure times), vehicles and drivers.
- Bags: create a bag for a destination hub and scan parcels into it (barcode gun, camera or typing; the QR on labels works). Each scan is checked — a parcel can only be in one active bag. Seal the bag and print its label with a barcode.
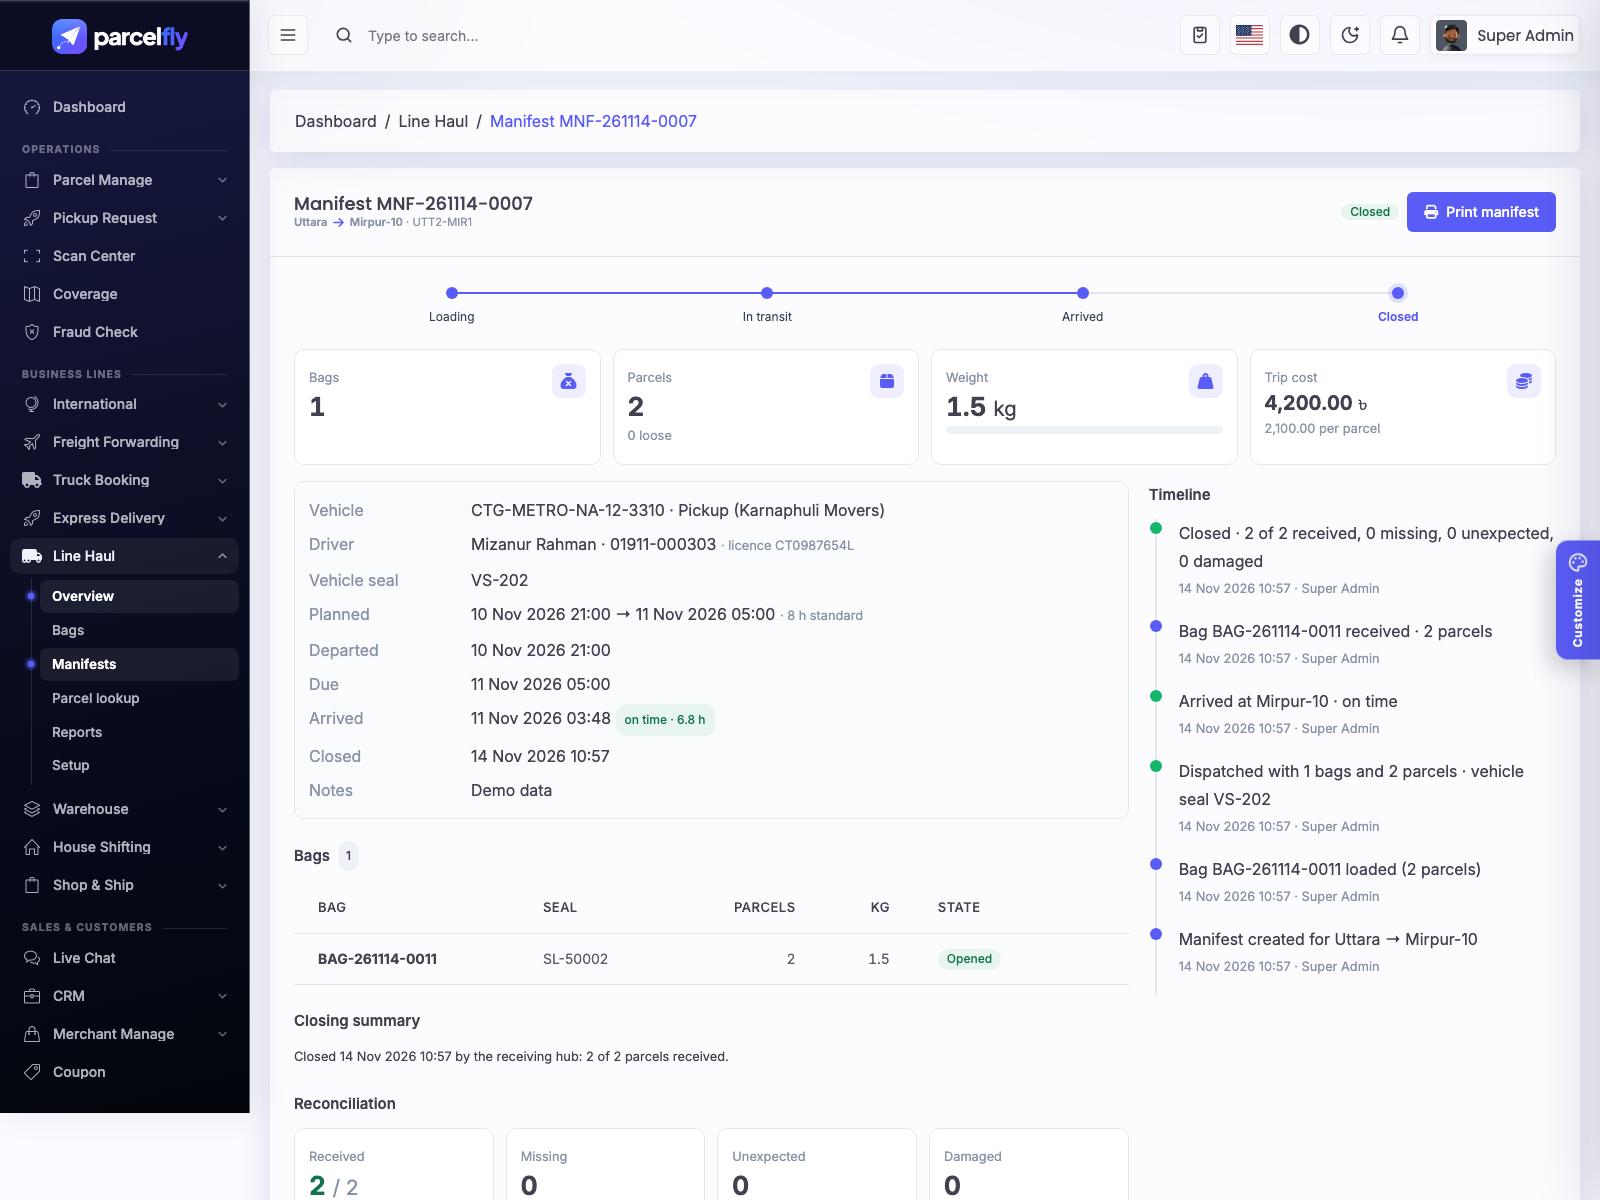
- Manifests: put sealed bags (and loose parcels if allowed) on a manifest with a vehicle and driver, then dispatch it. Print the manifest for signatures.
- Receiving: at the destination hub scan the bags or the parcels. The page shows received, missing, unexpected and damaged items live; closing the trip saves the discrepancy summary.
- Delays: a trip is late when departure + the lane's standard transit hours has passed; late trips are highlighted on the overview.
- Parcel lookup: search a tracking ID to see every bag and trip it travelled in.
- Reports: on-time performance per lane, discrepancies, cost per manifest and per parcel, and volume by lane.
- Hub staff: hub users only see trips from or to their own hub. Line Haul never changes the parcel status — moving parcels into the warehouse is still done in the Scan Center.
How to use it, step by step:
- Open Line Haul → Setup: check the lanes between your hubs (they are created from your hubs) and add vehicles and drivers.
- At the sending hub click New bag, choose the destination hub and scan the parcels into the bag.
- Click Seal, enter the seal number and print the bag label.
- Click New manifest, choose the lane, vehicle and driver, scan the sealed bags onto it and click Dispatch. Print the manifest for signatures.
- At the receiving hub open the manifest and click Receive; scan the bags (or the parcels one by one). Missing, unexpected and damaged items show up live.
- Click Close to save the result. Then receive the parcels into the warehouse in the Scan Center as usual.
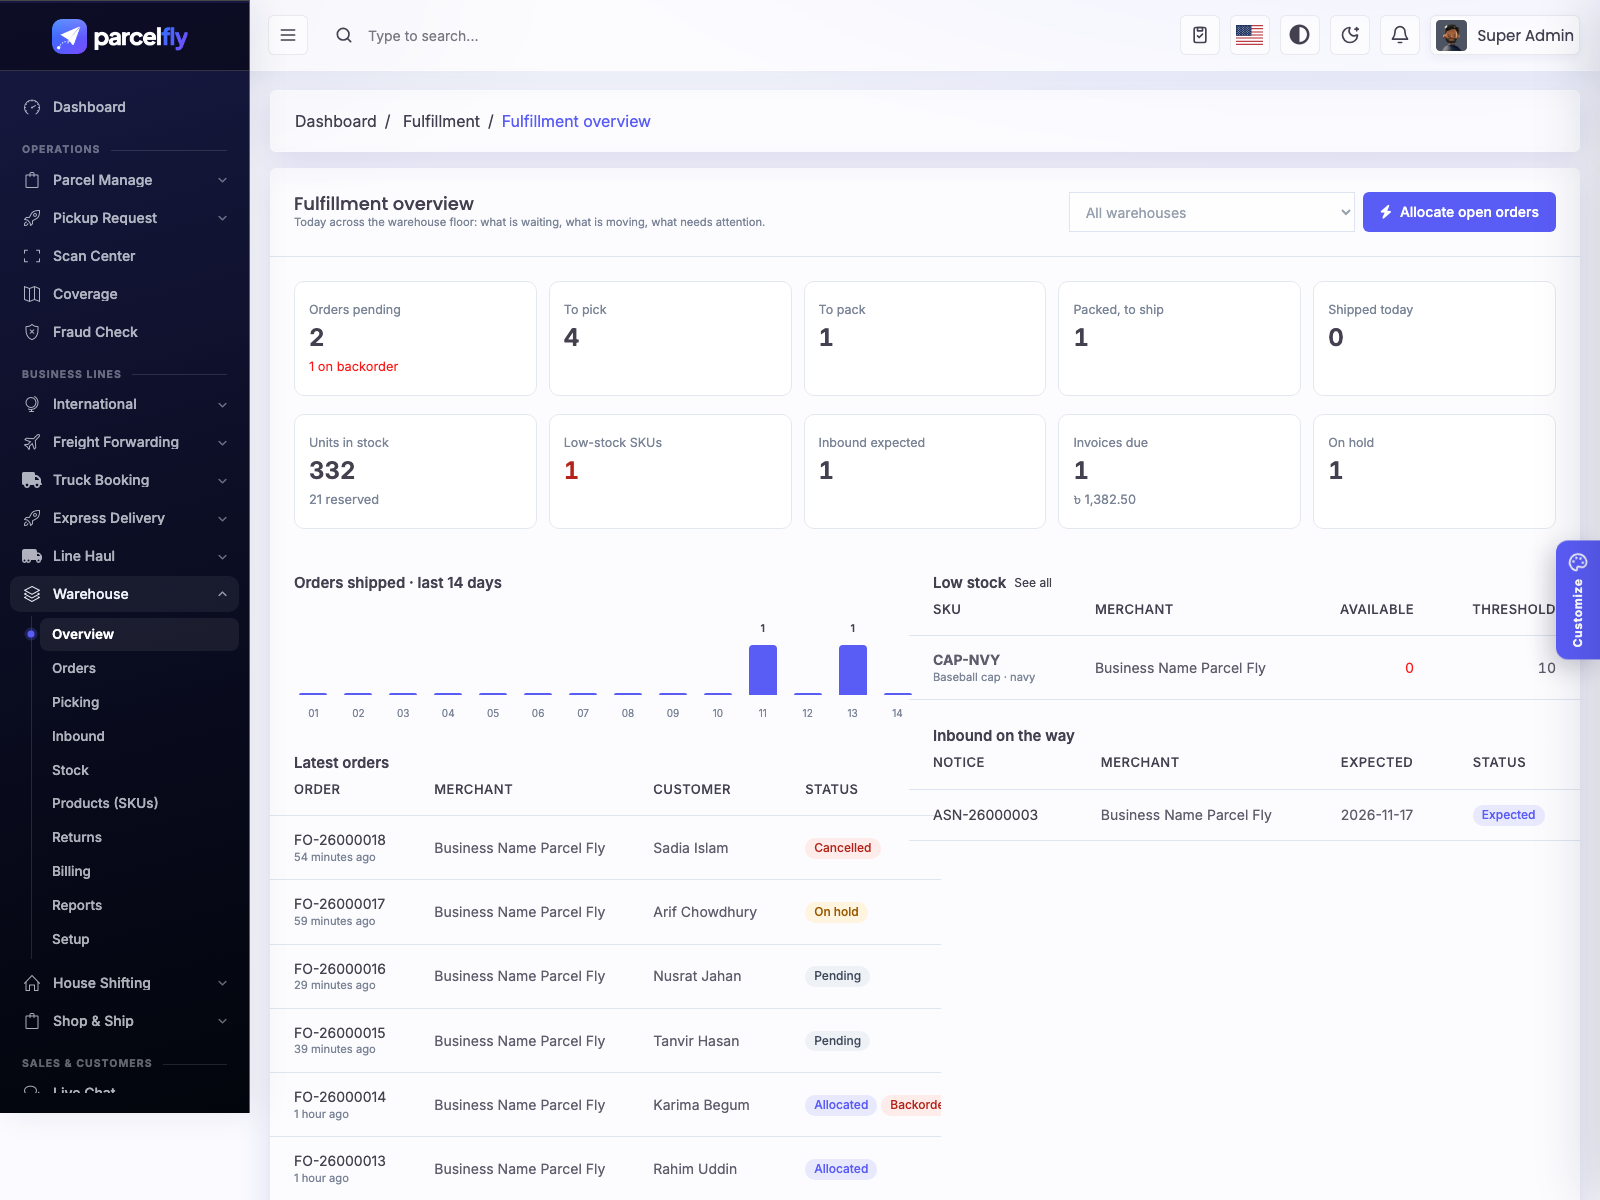
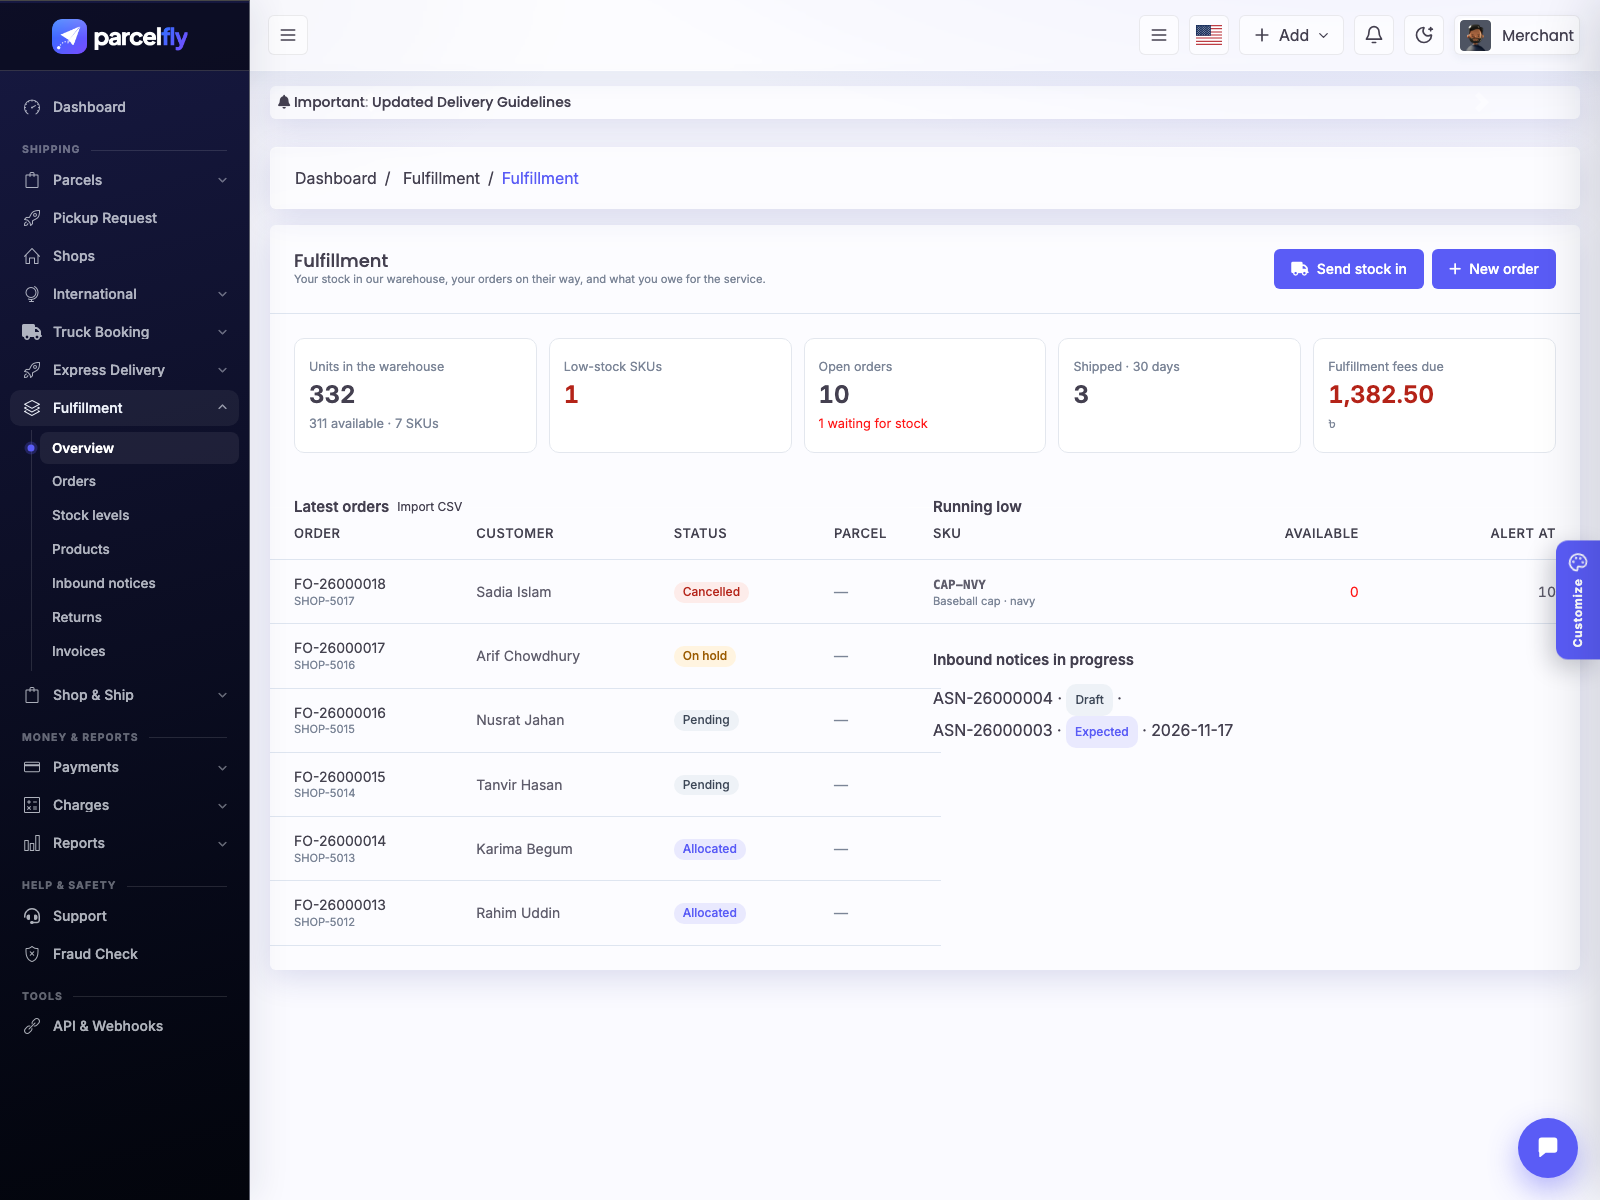
Warehouse & Fulfillment
Store your merchants' stock, pick and pack their orders, and hand them straight to local delivery — a full 3PL service.
- Setup: Warehouse → Setup: warehouses, bin locations (bulk create and print bin labels), the fee tariff (inbound per unit, storage, pick, pack, packaging, returns) with per-merchant overrides, and settings.
- Products: each merchant's SKUs with barcode, size, weight, value and low-stock level.
- Inbound: the merchant announces stock (inbound notice); the warehouse receives it, notes damaged units and puts it away into bins. Print a receiving sheet.
- Stock: on-hand, reserved and available stock per bin, an unchangeable stock ledger, bin-to-bin transfers, cycle counts and low-stock alerts.
- Orders: merchants create orders one by one or by CSV upload. Stock is reserved first-in-first-out across bins (back-orders are flagged), then pick lists are printed, items are scan-verified while packing, and Ship creates a normal local-delivery parcel with the merchant's own charges and COD.
- Returns: receive returned items back to a bin or mark them damaged.
- Billing: a monthly invoice per merchant built from the recorded activity (inbound, storage, picks, packs, materials, returns); record payments by hand.
- Merchant portal: products, stock levels, inbound notices, orders (with CSV import and parcel tracking link), returns and invoices.
How to use it, step by step:
- Open Warehouse → Setup: add a warehouse and its bin locations (bulk create), print bin labels and set the fee tariff.
- Add the merchant's products (SKUs) — or the merchant adds them in their panel.
- The merchant sends an inbound notice; when the goods arrive click Receive, enter the quantities and put them away into bins.
- Merchants create orders (one by one or by CSV). Click Allocate open orders to reserve the stock.
- Create a pick list, print it, pick the items and confirm. On the Pack page scan each item to verify it and mark the order packed.
- Click Ship: a normal local-delivery parcel is created with the merchant's charges and COD, and the tracking ID is saved on the order.
- At month end open Billing, generate each merchant's invoice from the recorded activity, issue it and record payments.
House & Office Shifting
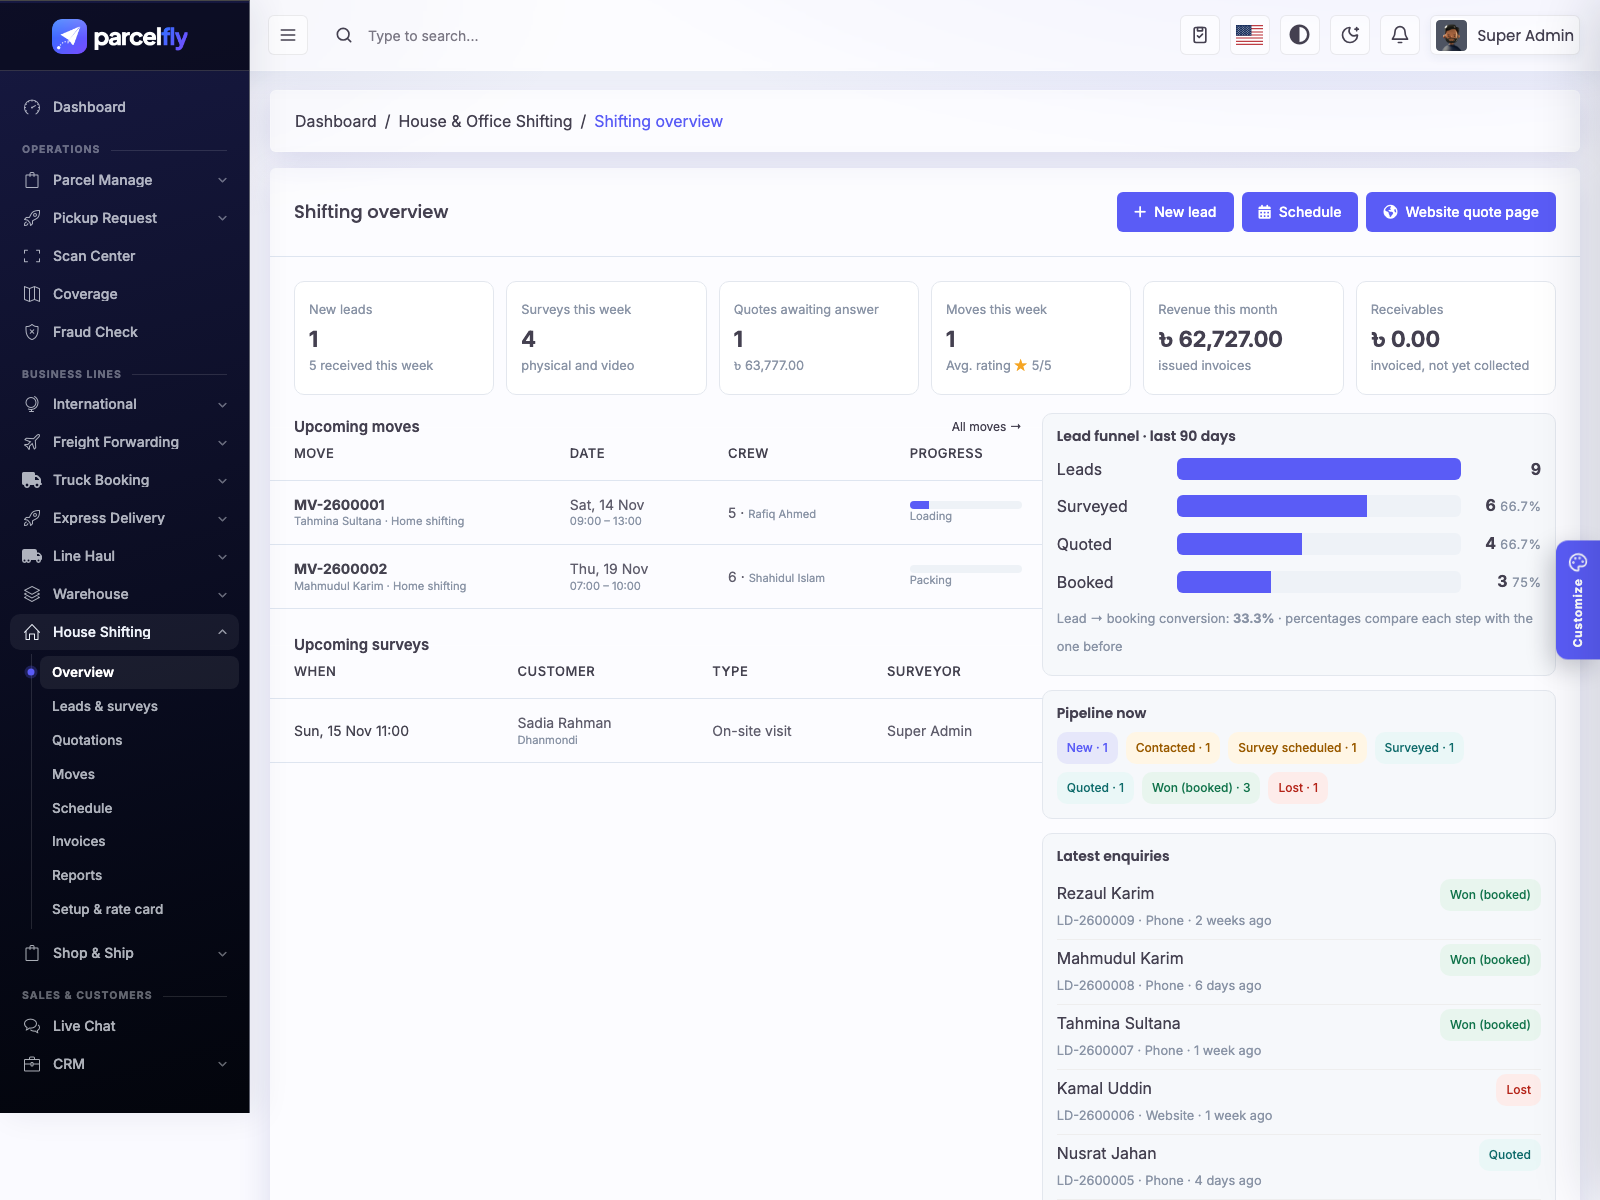
Packers and movers: from the first enquiry to a survey, a priced quotation the customer accepts online, the moving day and the final invoice.
- Setup: House Shifting → Setup & rate card: an item catalogue with volumes (sofa, fridge, bed, AC, office desk, boxes…), packing materials, trucks by size, labour per shift, floor charges without a lift, dismantling/assembly, insurance %, tax and crew members.
- Leads: enquiries from the website, phone or walk-in move through New → Contacted → Survey scheduled → Surveyed → Quoted → Won / Lost.
- Survey: book a physical or video survey and build the inventory room by room. The system suggests the truck size, number of trips, crew size and materials.
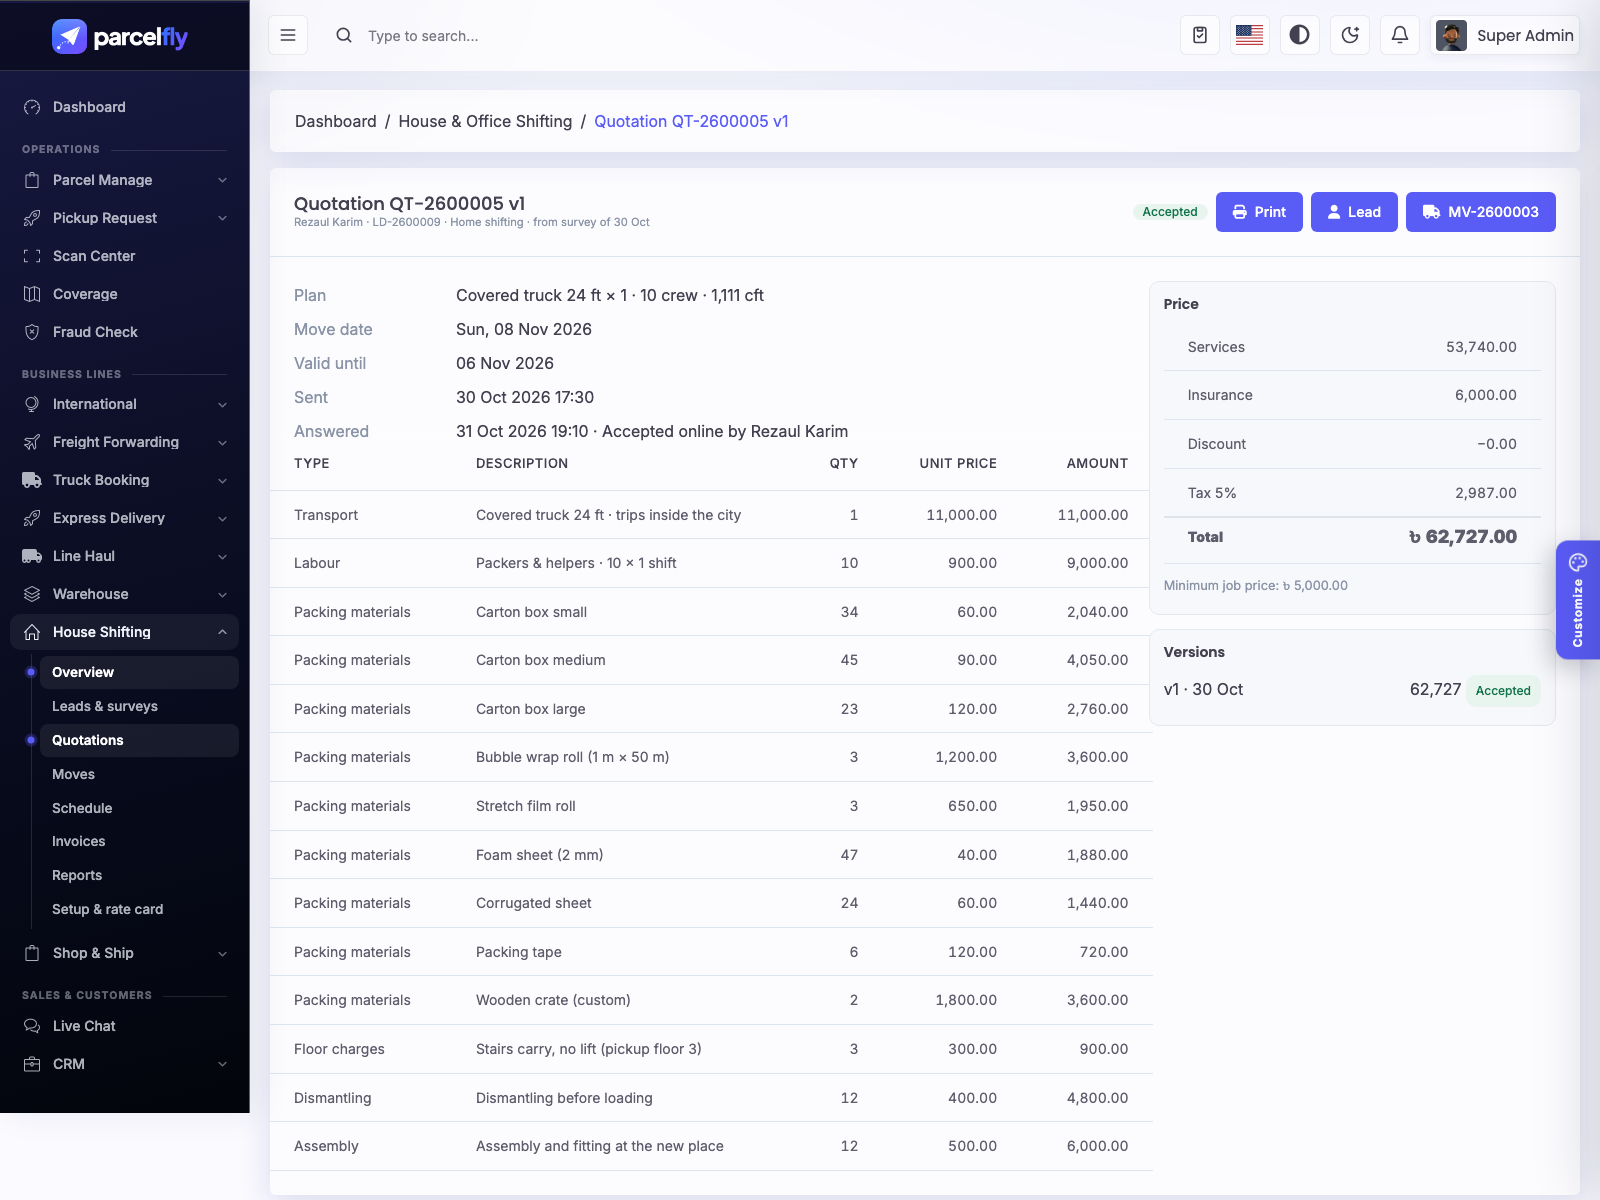
- Quotation: lines are worked out from the survey (transport, labour, materials, floors, dismantling, insurance, discount, tax) and can be edited. Revisions keep every version. The customer opens a private link to accept or decline; accepting creates the booking.
- Moving day: assign the crew (double booking on the same day is blocked), follow the checklist (packing, loading, transit, unloading, unpacking, assembly), note damages and take the customer sign-off.
- Billing & feedback: invoice, advance and balance payments; after the move the customer rates the job from a feedback link.
- Schedule: a week/month view of surveys and moves to plan crews.
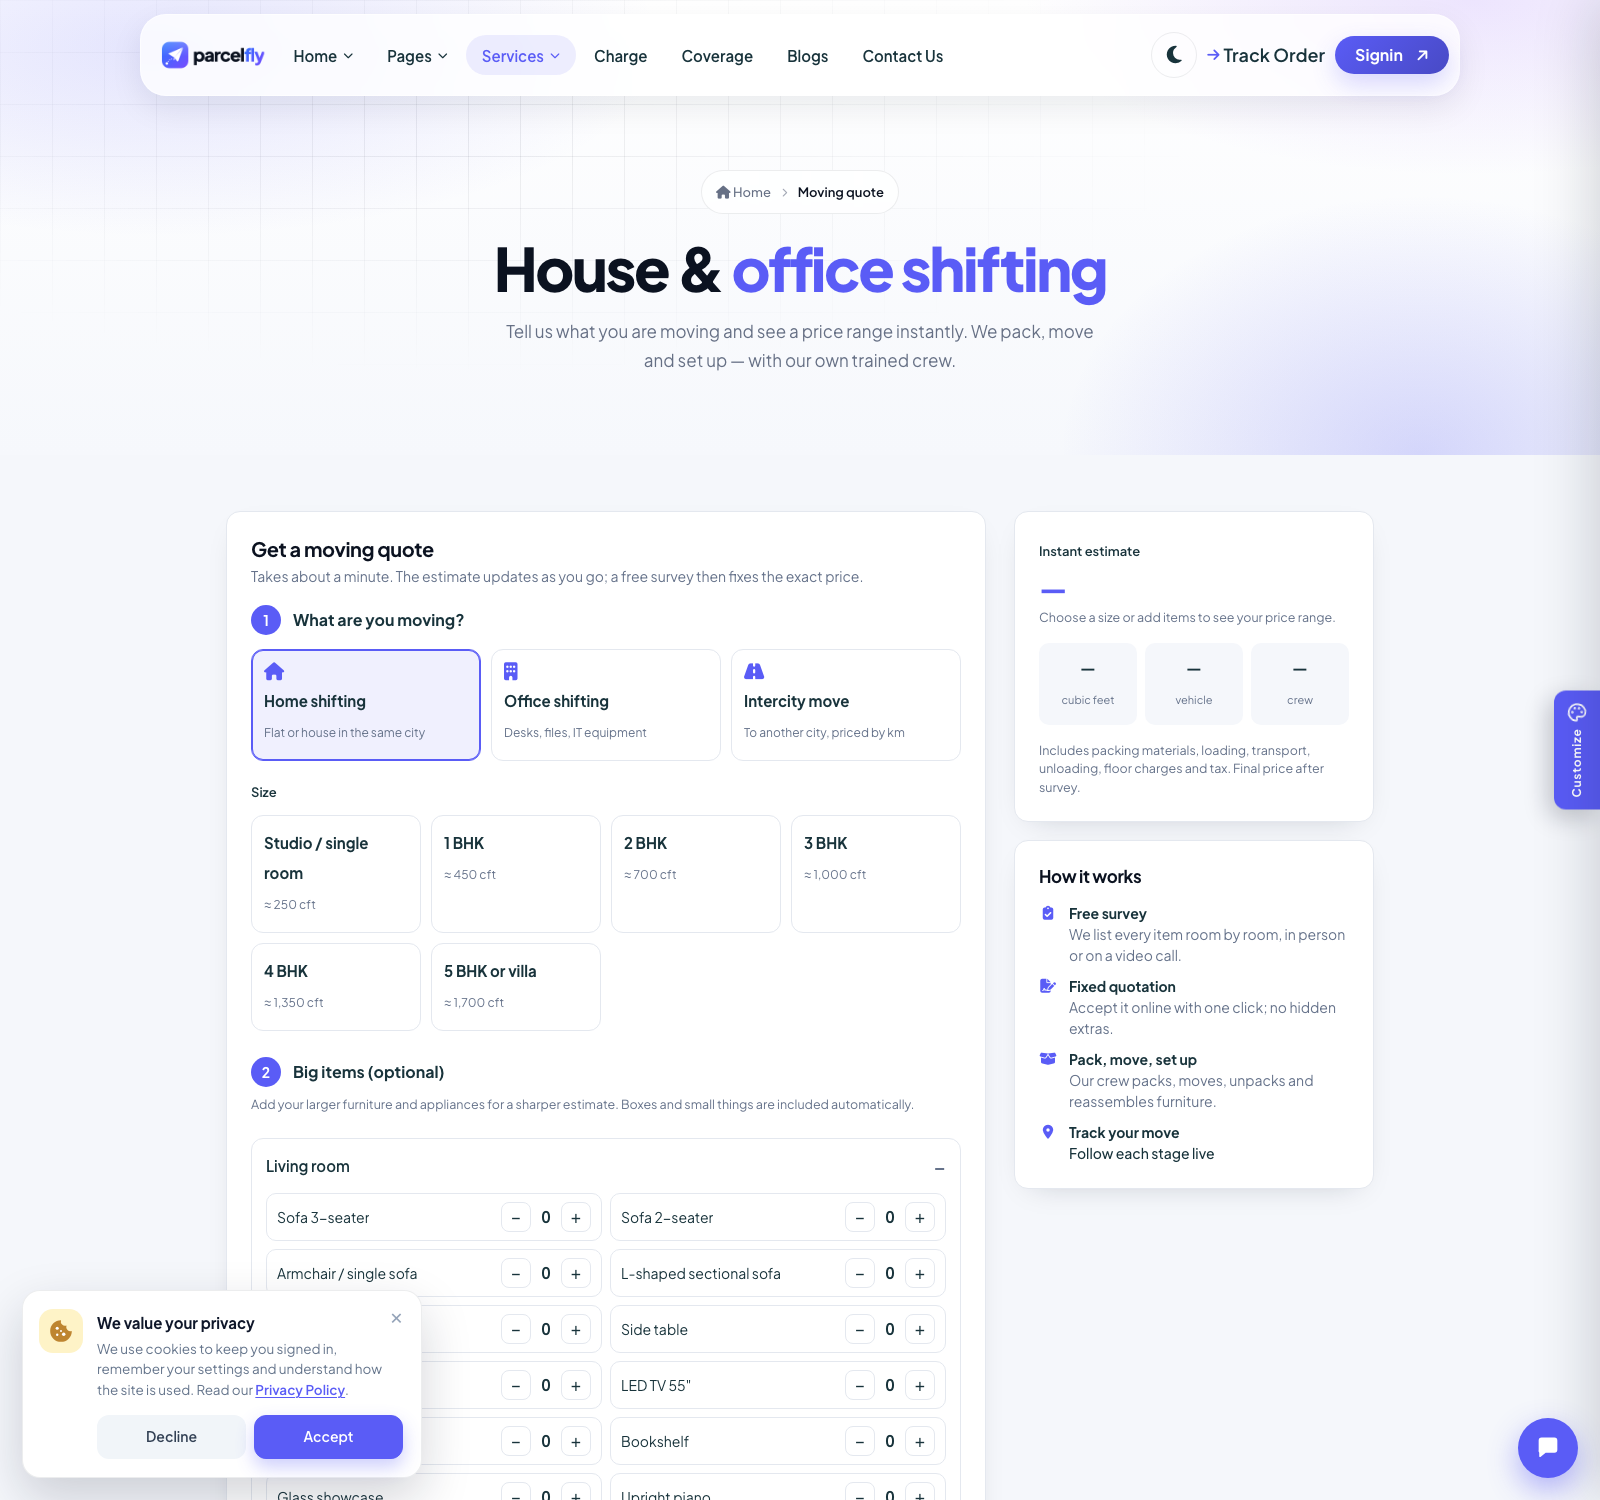
- Website:
/shiftinggives an instant price range and sends the enquiry;/shifting/tracktracks a booked move.
How to use it, step by step:
- Open House Shifting → Setup & rate card: check the item list, materials, truck sizes, labour, floor and dismantling prices, and add your crew.
- New enquiries arrive from the website or are added with New lead. Call the customer and mark them Contacted.
- Click Schedule survey (on-site or video). During the survey add the items room by room and click Complete — the truck, trips, crew and materials are suggested.
- Click Create quotation, adjust the lines if needed and Send. Share the customer link (WhatsApp button included); the customer accepts or declines online.
- The accepted quote becomes a move. Assign the crew and follow the checklist on the moving day.
- Take the customer sign-off, issue the invoice, record payments and share the feedback link.
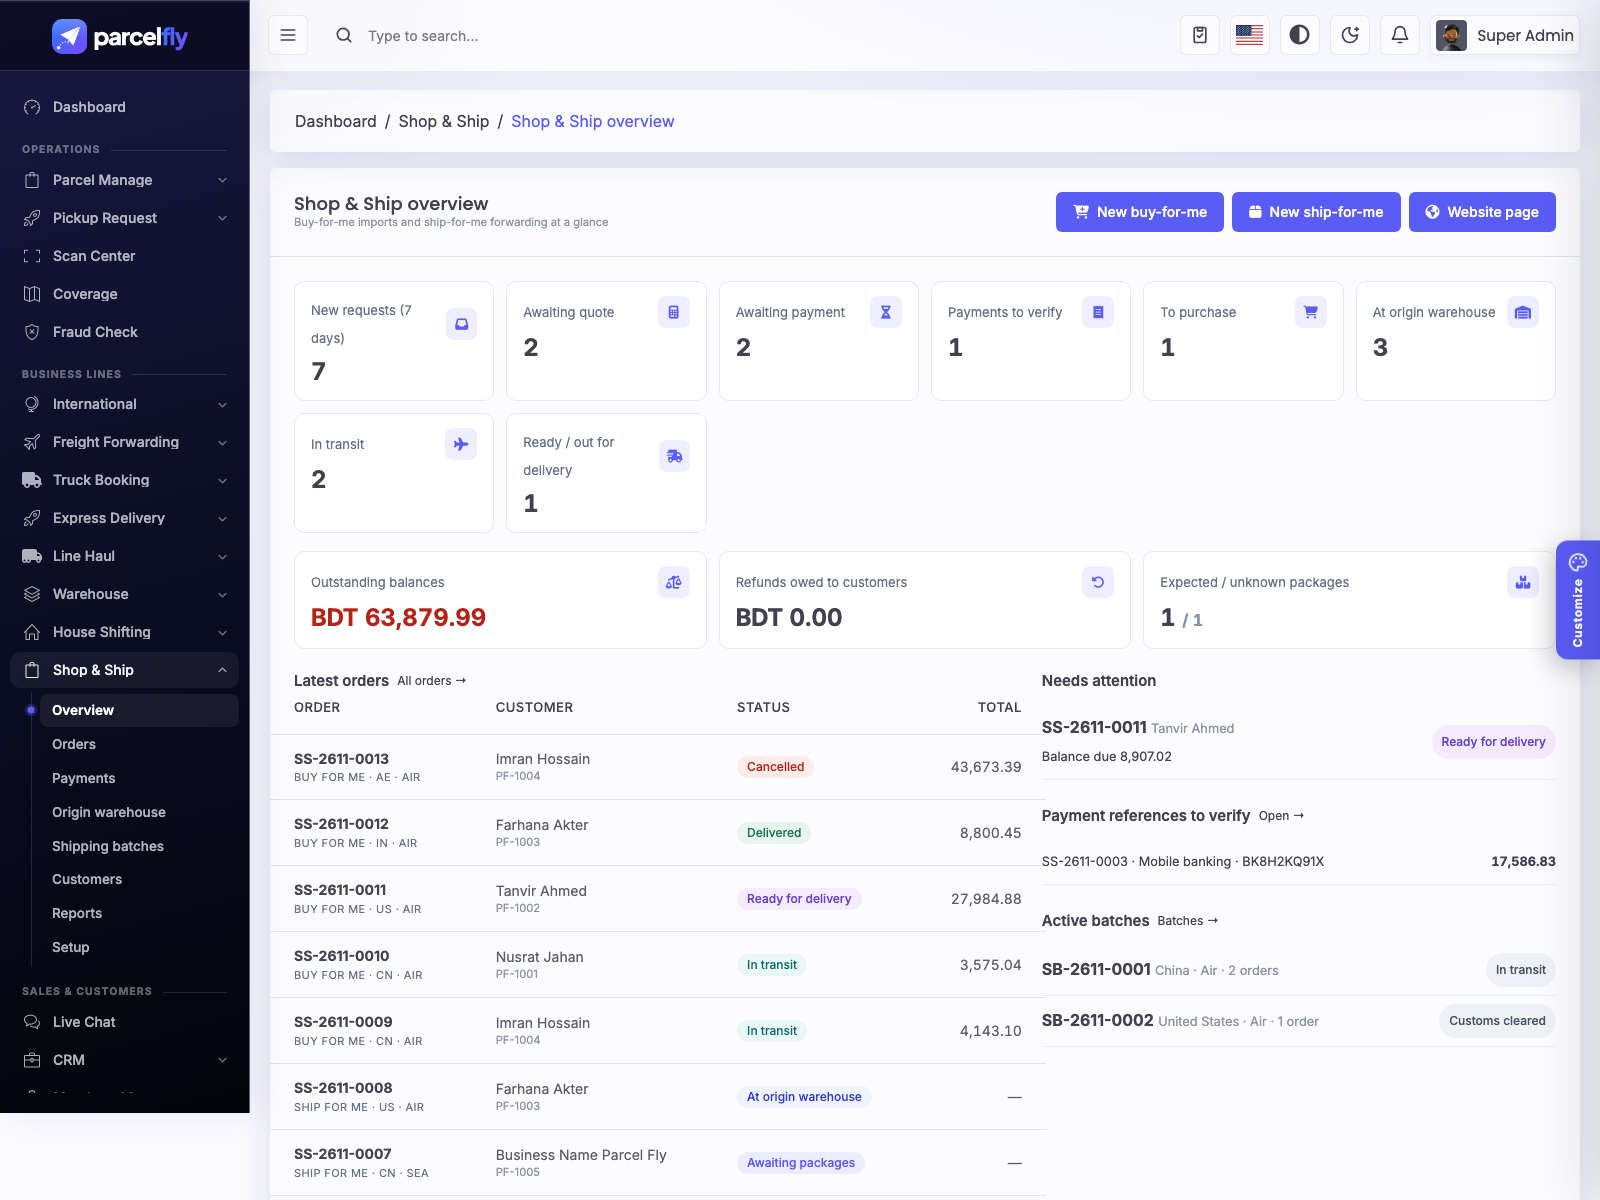
Shop & Ship
Buy-for-me imports and ship-for-me package forwarding from China, the USA, the UAE, India and more.
- Setup: Shop & Ship → Setup: source countries (currency, exchange rate, origin warehouse address), shipping rates per kg by country and category (air/sea, minimum weight), categories with customs and handling %, service fee and the deposit % required before buying.
- Customers: each customer gets a suite code (e.g. PF-1023) to use in the origin warehouse address. Customers can be merchants or website visitors.
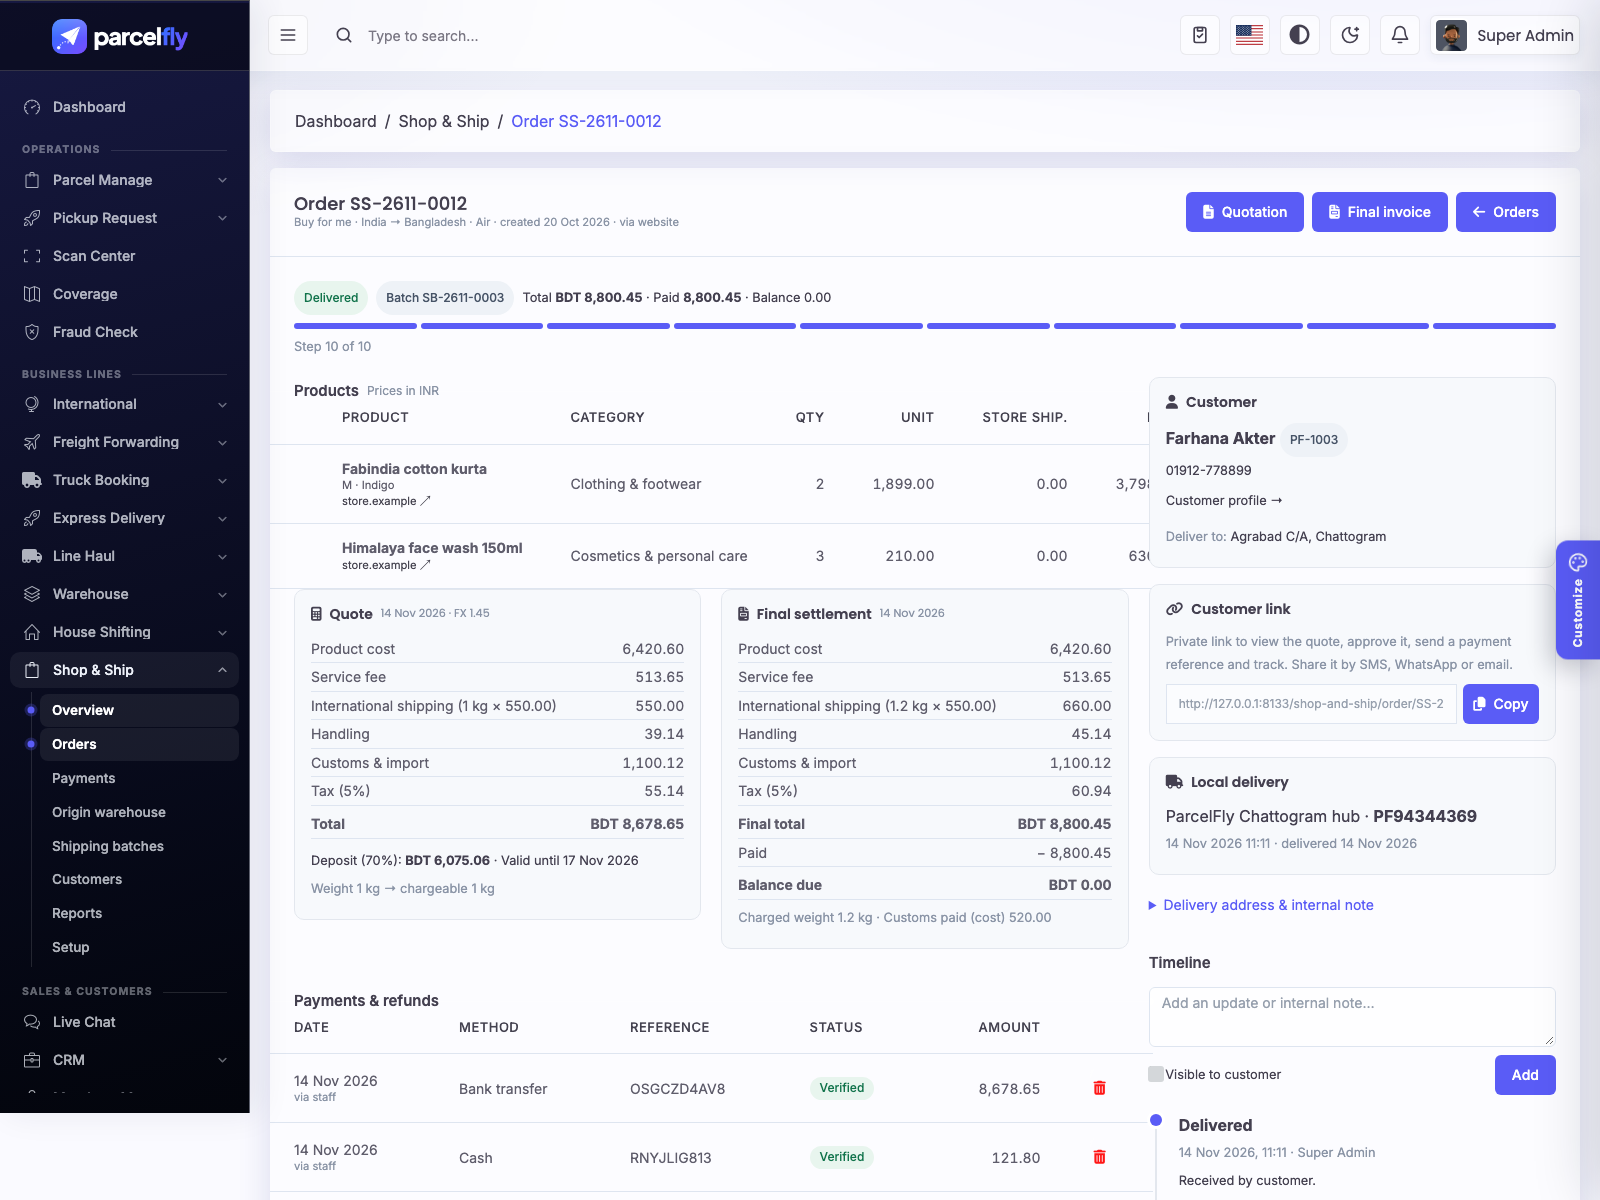
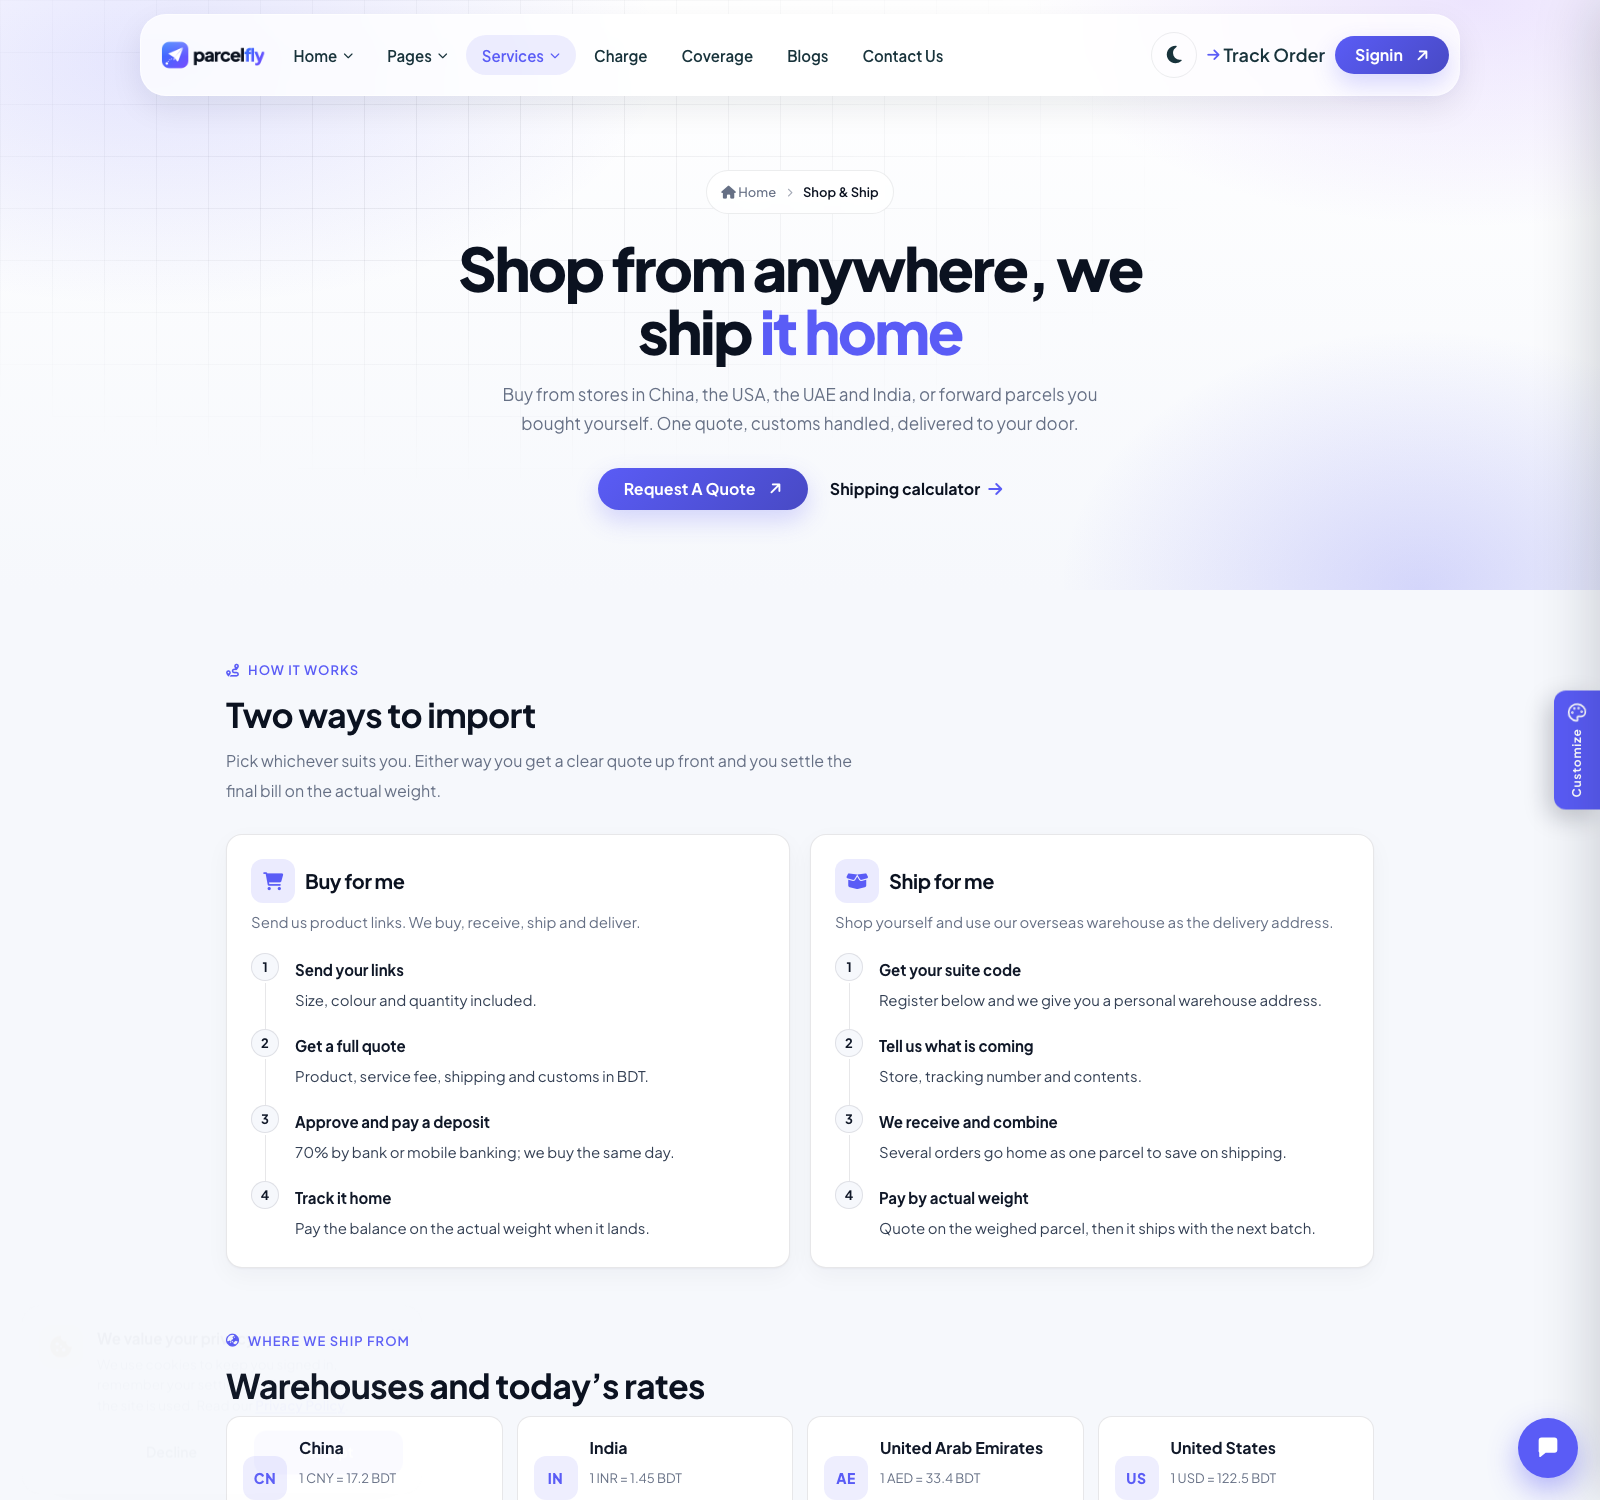
- Buy for me: the customer sends product links; staff quote (exchange rate, service fee, customs, estimated shipping, tax), the customer approves and sends a payment reference, staff verify it and buy the goods, then the order is received at the origin warehouse, shipped in a batch, cleared and delivered. The final settlement uses the actual weight and shows the balance or refund.
- Ship for me: customers register parcels they bought themselves; the warehouse receives and matches them (unknown parcels wait in a queue), several parcels can be consolidated into one shipment.
- Batches: group orders into air or sea batches; changing the batch status updates every order in it.
- Documents: quotation and invoice/final settlement prints, plus the batch manifest.
- Merchant portal & website: merchants request and follow orders in their panel; visitors use
/shop-and-ship(request form, shipping calculator) and get a private link to approve the quote and track the order.
How to use it, step by step:
- Open Shop & Ship → Setup: check the countries (exchange rates and warehouse addresses), per-kg rates, categories and the deposit %.
- Requests come from the website, the merchant panel or New buy-for-me. Open the order and click Quote to check the price; send it to the customer.
- The customer approves on their private link and sends a payment reference; verify it under Payments.
- Buy the products and click Purchased (vendor order number). When they reach the origin warehouse, receive them with the actual weight.
- Add the orders to a Shipping batch; updating the batch (in transit, arrived, customs cleared) updates every order in it.
- Click Final settlement to bill by actual weight, collect the balance, hand over for delivery and mark delivered.
Sales CRM
Follow every sales opportunity, from the first call to an active merchant.
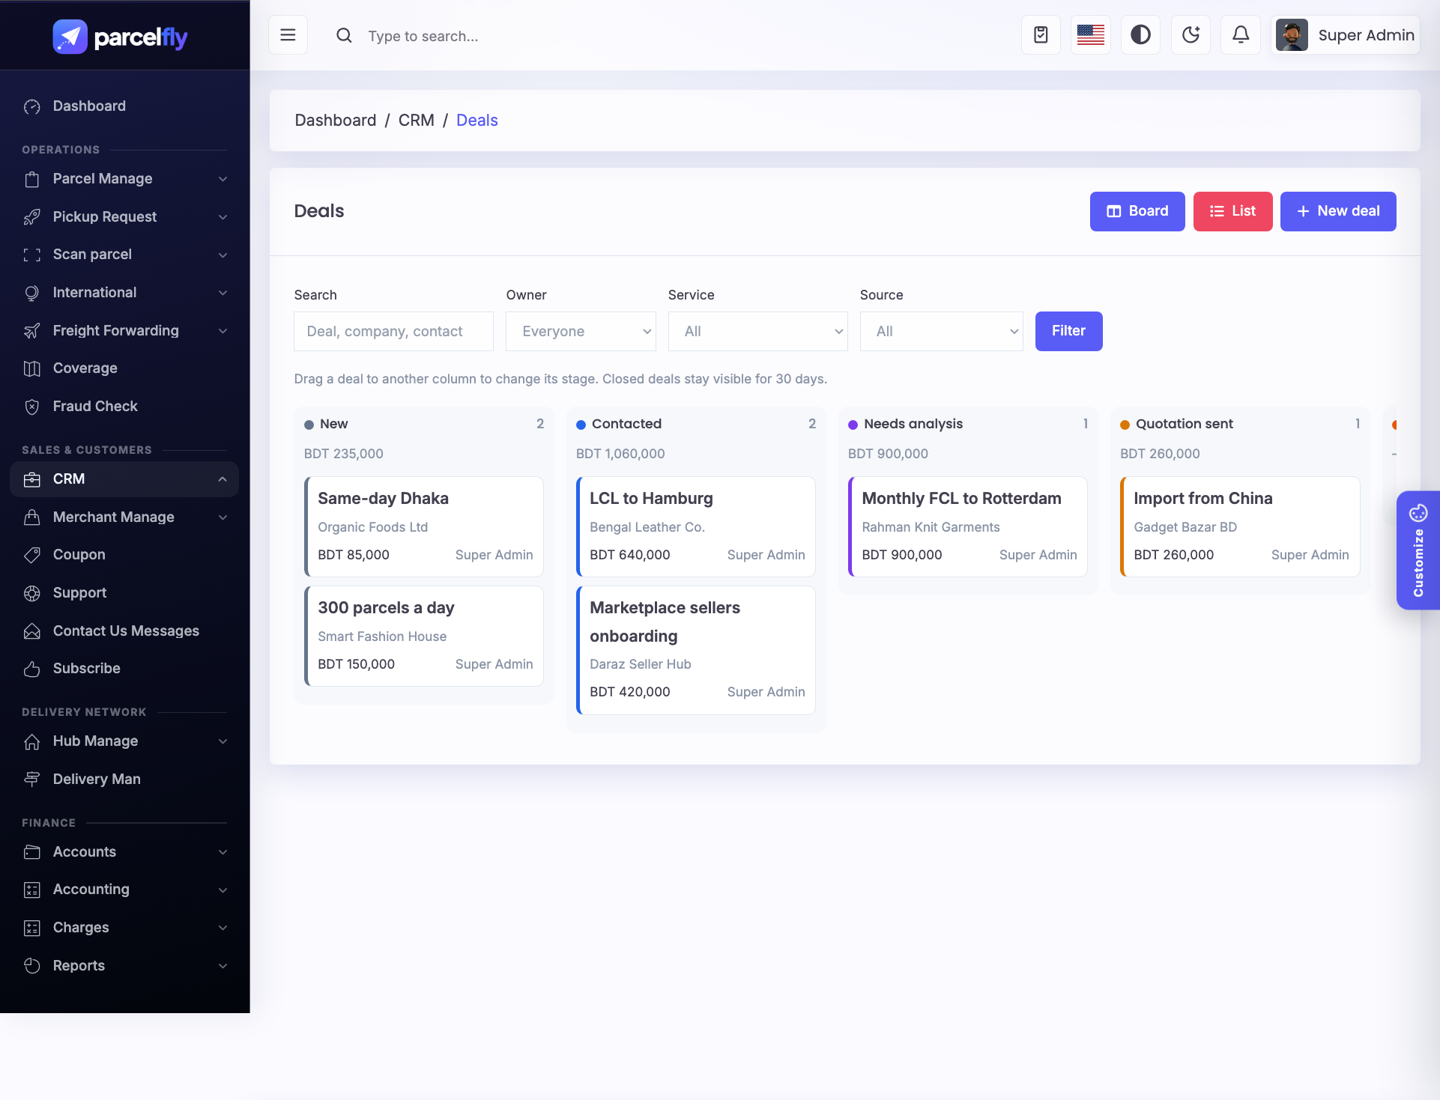
- Pipeline: CRM → Deals shows a board by stage; drag a card to move it. Stages and lead sources are set under CRM → Setup.
- Companies and contacts: keep the people you sell to, with their calls, meetings and notes.
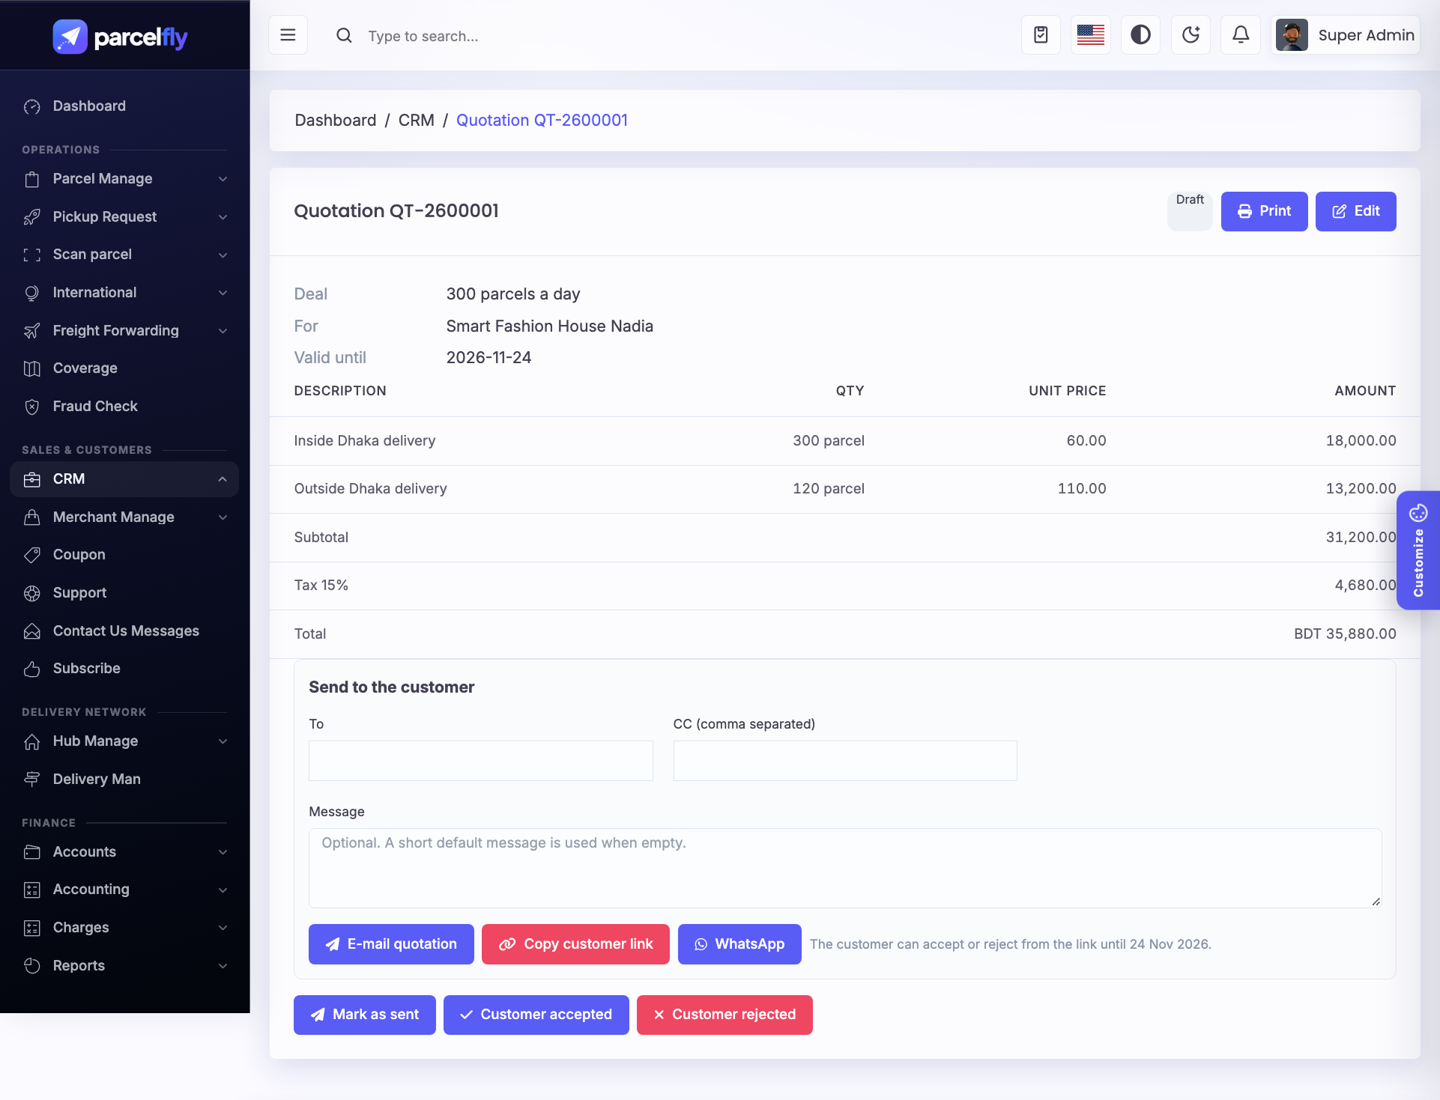
- Tasks and reminders: add tasks with a due time. Reminders go out by e-mail and/or SMS (CRM → Setup → Quotations and reminders). This needs the scheduler cron from the Modules overview.
- Quotations: build a quotation with lines, discount and tax, then e-mail it. The customer opens a secure link and accepts or declines online; the deal updates by itself. You can also share the link on WhatsApp.
- Targets: set a monthly sales target and commission rate per salesperson and see progress.
- Won deals: open a merchant account straight from a won local-delivery deal, or start a freight job or international shipment for other services.
- Website inquiries: turn contact-form inquiries into deals in one click.
Mail: sending quotations and reminders uses the mail settings under Settings → Mail Settings.
Accounting
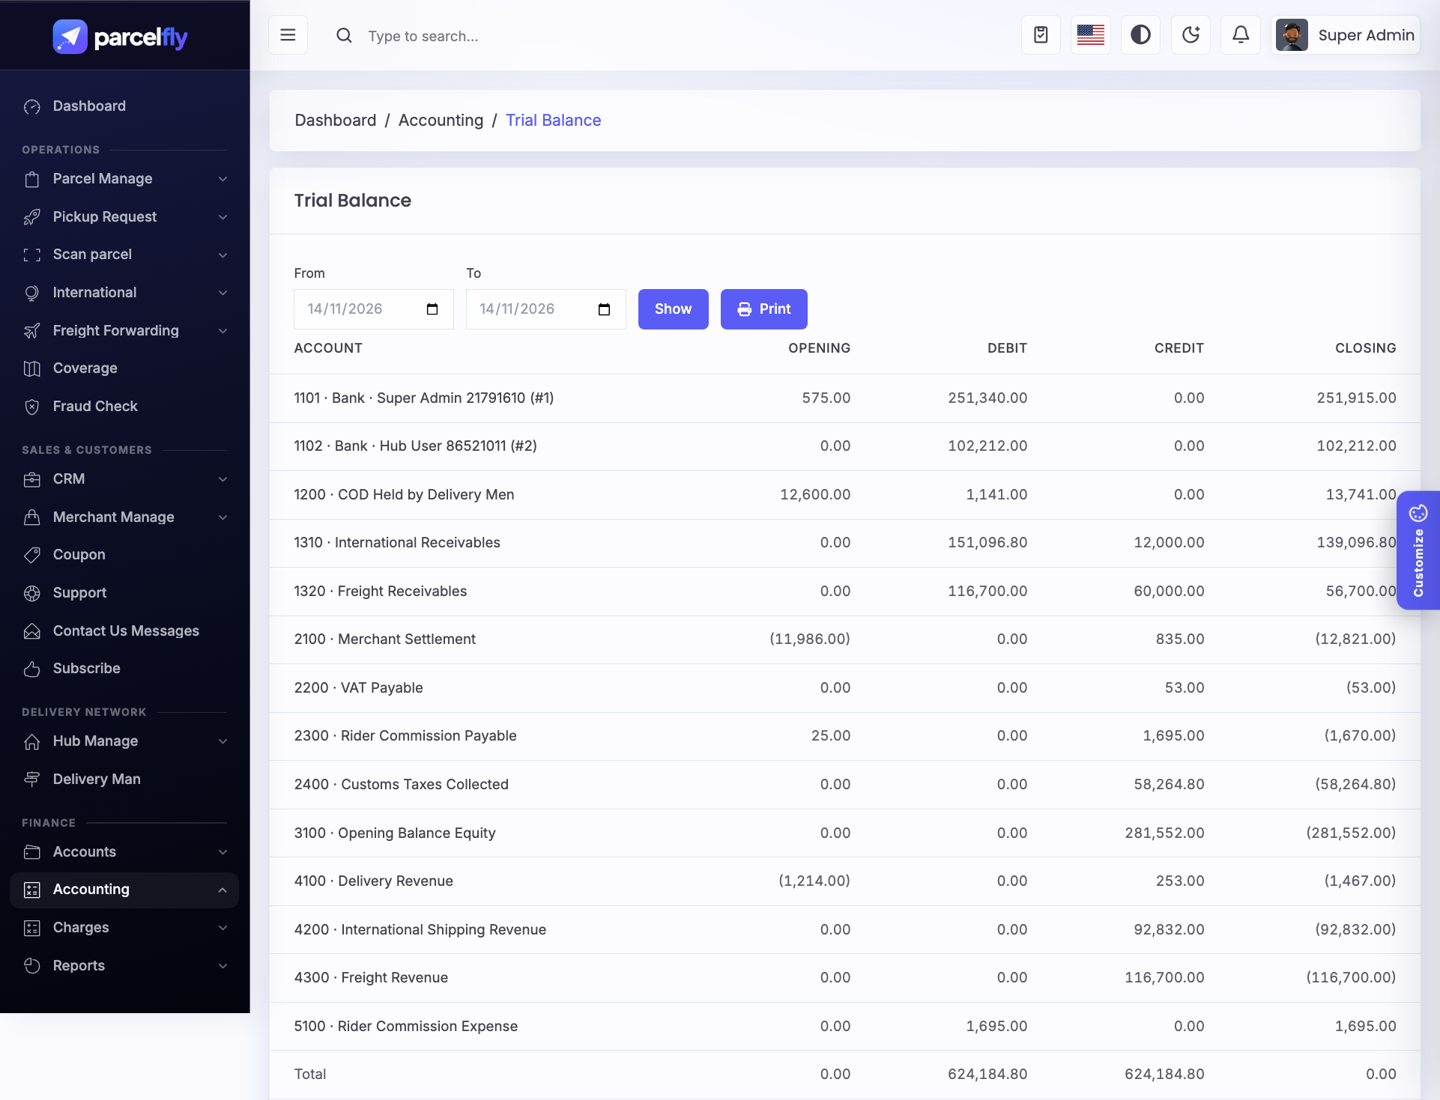
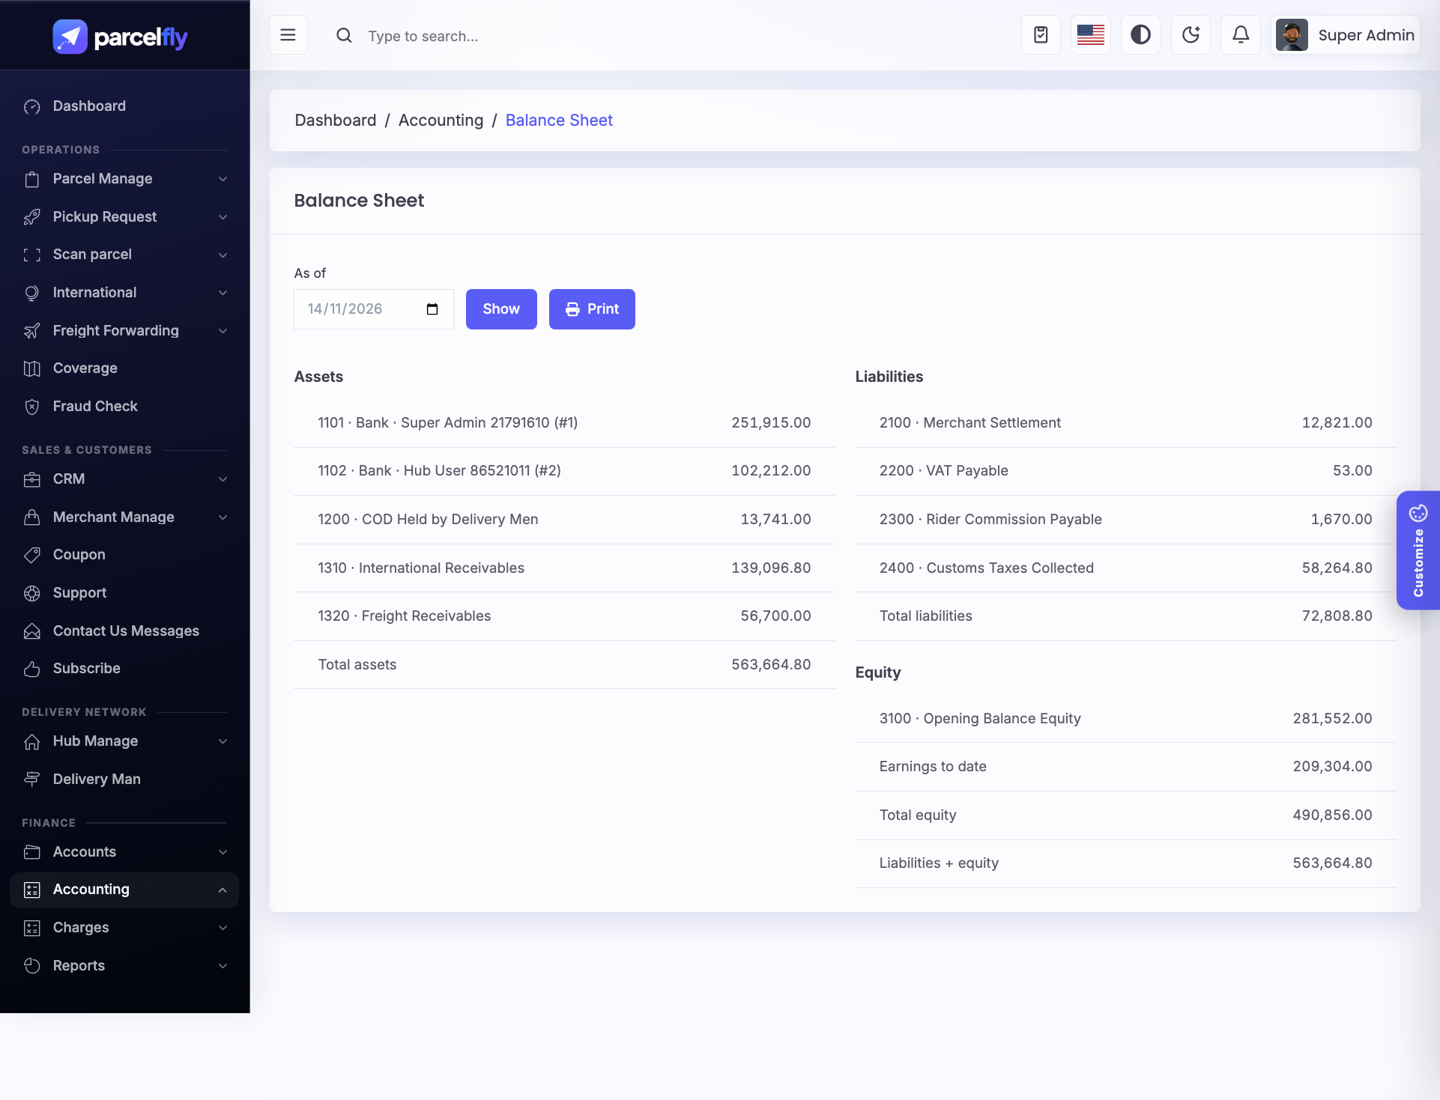
A double-entry ledger that fills itself from your daily work: parcels, merchant payouts, delivery man commission, income, expenses, fund transfers, salaries, and international and freight invoices and payments.
- Start the books: Accounting → Settings → Start books (or
php artisan accounting:start). This posts your full history and checks cash and bank balances. - Chart of accounts: add your own accounts and map income and expense heads to them.
- Journals: every automatic posting is listed with its source; add manual journal entries when needed. Corrections are made with reversal entries, so history is never lost.
- Reports: trial balance, profit & loss, balance sheet, account ledger and party balances (merchants, delivery men, freight parties).
- Period locks: lock a month after closing so nothing can be posted into it.
- Sync issues: if a record cannot be posted (for example a missing mapping), it is listed with the reason; fix it and post again.
php artisan accounting:rebuildrebuilds the automatic postings.
API & Webhooks
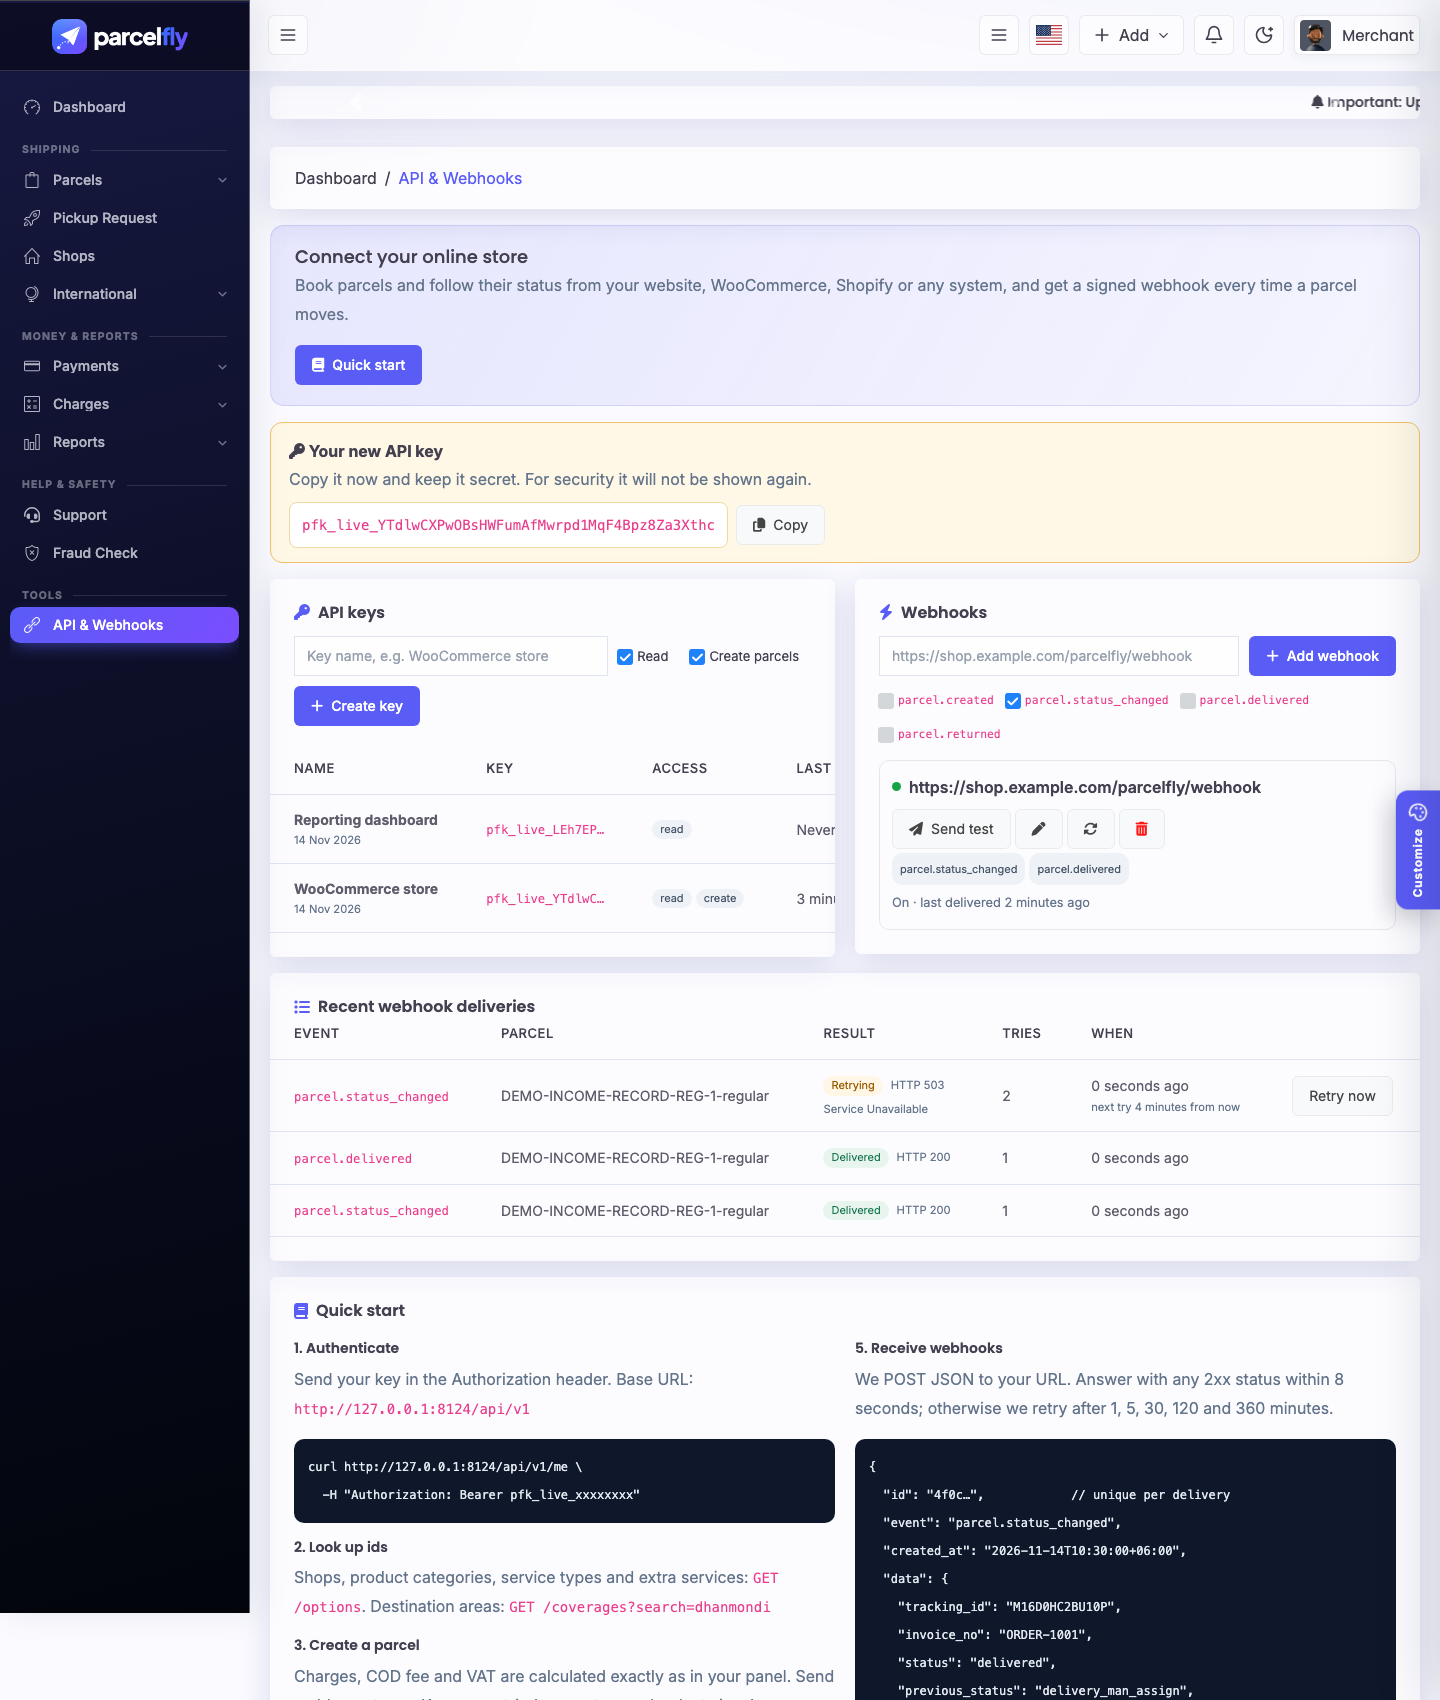
Merchants can connect their online store (WooCommerce, Shopify or a custom website) to book parcels automatically and receive status updates.
- API keys: Merchant panel → Tools → API & Webhooks. A key is shown once; only a hash is stored. Keys can be read-only or allowed to create parcels, and can be revoked at any time.
- Endpoints (base
/api/v1, headerAuthorization: Bearer pfk_live_…):GET /me,GET /options(shops, categories, service types, extra services),GET /coverages,POST /parcels,GET /parcels,GET /parcels/{tracking_id}. - Same pricing: parcels created through the API use the same charge, COD fee, VAT and coupon rules as the panel and the app. Send an
Idempotency-Keyheader so a retried request never books twice. - Webhooks: events
parcel.created,parcel.status_changed,parcel.delivered,parcel.returned. Each request is signed (X-ParcelFly-Signature: t=…,v1=HMAC-SHA256) and retried after 1, 5, 30, 120 and 360 minutes. A webhook that fails 25 times in a row is switched off. - Safety: webhook URLs must be public HTTPS addresses; private and local network addresses are refused. Each key is limited to 120 requests per minute (configurable in
Modules/Integrations/Config/config.php). - Staff view: admin sidebar → API & Webhooks shows every key and webhook, with revoke, switch off and retry. Permissions:
integrations.view,integrations.manage; merchants needintegrations.merchant.api. - Scheduler: retries are sent by
php artisan integrations:deliver, which runs every minute from the scheduler cron.
The merchant page includes a quick-start guide with copy-ready curl examples and signature checks for PHP and Node.js.
Customer Messages (SMS & WhatsApp)
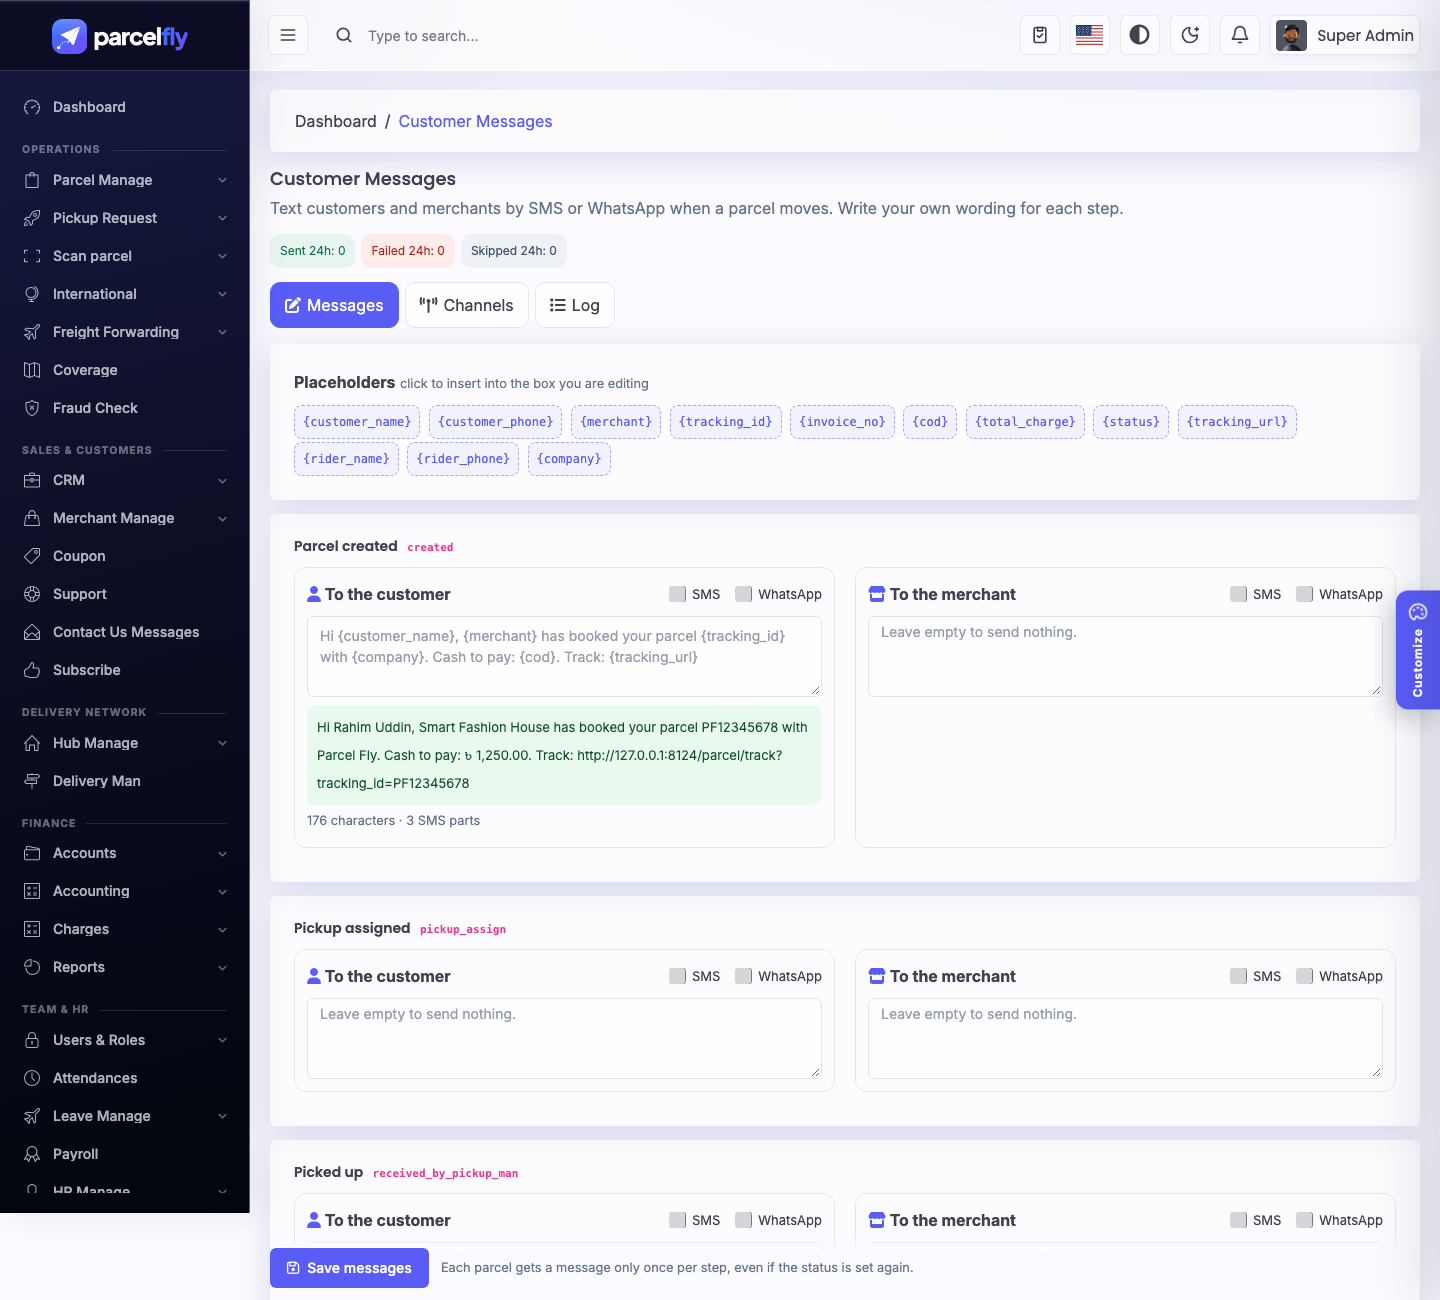
Send your own SMS or WhatsApp text to customers and merchants at every parcel step: created, picked up, at the warehouse, out for delivery, rescheduled, delivered, partly delivered and returns.
- Messages tab: admin sidebar → Customer Messages. For each step write one message for the customer and one for the merchant, then switch on SMS and/or WhatsApp. Click a placeholder such as
{customer_name},{tracking_id},{cod},{rider_name}or{tracking_url}to insert it. A live preview and SMS part counter show under each box. - Starter texts: seven common messages are included, all switched off, so nothing is sent until you choose.
- Channels tab: SMS uses the gateway under Settings → SMS settings. For WhatsApp choose UltraMsg (instance ID and token; free text) or the Meta WhatsApp Cloud API (phone number ID, access token and an approved utility template whose body is only variable 1, which receives the whole message). Set your country calling code so local numbers are converted. Saved tokens are never shown again.
- Send a test to any number from the Channels tab.
- Log tab: every message with its result (sent, failed, skipped) and the provider's answer.
- Good to know: messages go out after the page has responded, so scanning and booking stay fast, and each parcel receives a given message only once per step. Permissions:
messaging.manageandmessaging.logs.view.
Two-factor Login & Log in as
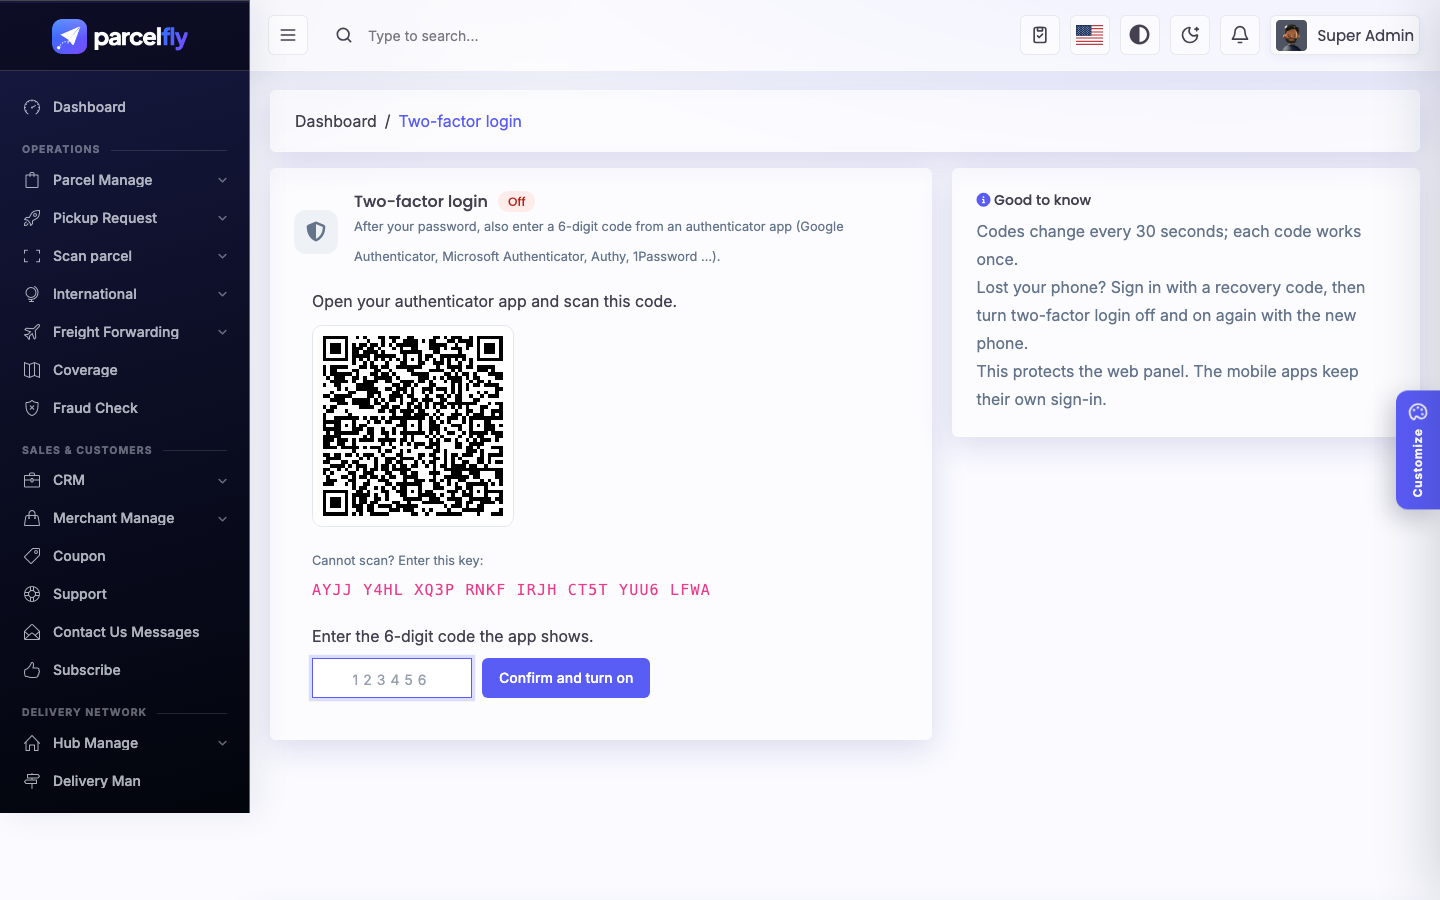
Extra protection for the web panel, and a safe way for support staff to see exactly what a merchant or delivery man sees.
- Turn on two-factor login: profile menu (top right) → Two-factor login → scan the QR code with Google Authenticator, Microsoft Authenticator, Authy or similar, and enter the 6-digit code. Save the 8 recovery codes shown once.
- Signing in: after the password, the panel asks for the current code. Each code works once; a recovery code can be used if the phone is lost (each recovery code works once). Five wrong codes pause sign-in for a minute.
- Turn off or new recovery codes: on the same page, with your password and a current code.
- Log in as: on Merchant Manage and Delivery Man lists, the action menu has Log in as. A banner shows whose account you are using and returns you to your own account with one click. Only merchant and delivery man accounts can be opened this way, never another staff account. Every start and end is written to the activity log.
- Permission:
security.impersonate(given to Super Admin by default). - Note: two-factor login protects the web panel; the mobile apps keep their own sign-in.
Merchant Panel Menu
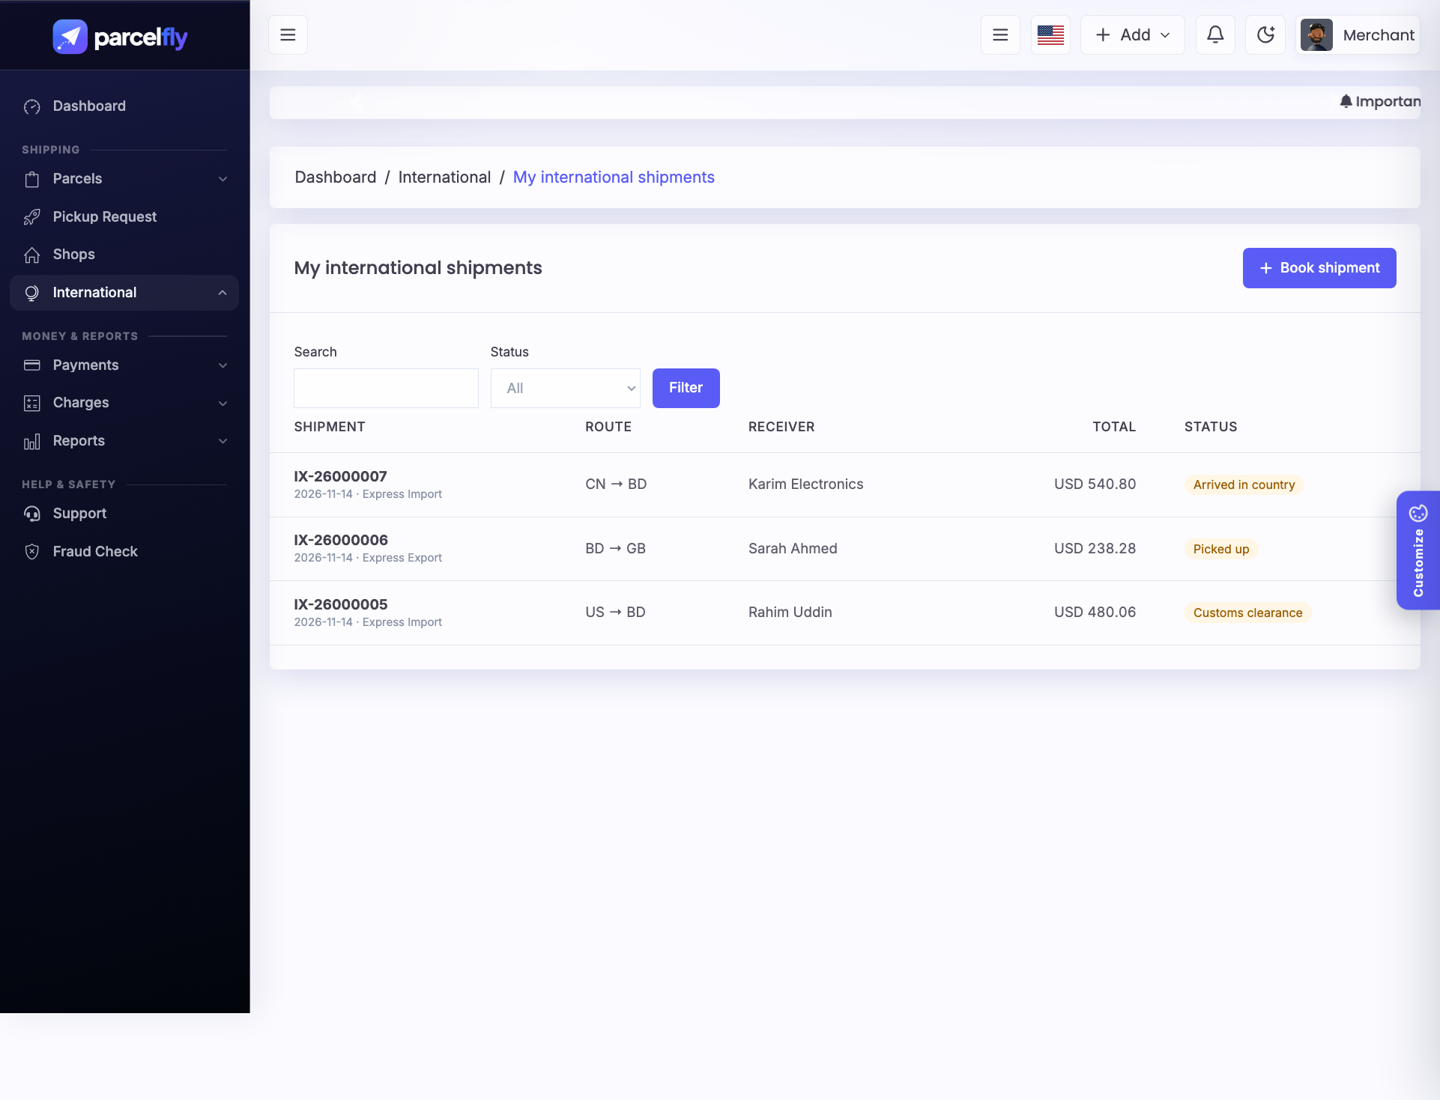
The merchant sidebar is grouped into clear sections.
- Shipping: Parcels (all parcels, create parcel, bulk import, parcel bank), Pickup requests, Shops, and — when the modules are enabled — International, Truck Booking (request a truck, quotes, trips, invoices), Express Delivery (book with a live fare and track), Warehouse (products, stock, inbound notices, orders with CSV import, returns, invoices) and Shop & Ship (buy-for-me and ship-for-me requests, quotes, payment references and tracking).
- Money & reports: Payments (payment requests, request payment, payment accounts), Charges, and Reports (parcel reports, closing report, account transactions).
- Help & safety: Support and Fraud check.
- Tools: API & Webhooks.
Brand Colour
ParcelFly uses the indigo of the logo as its default colour on the admin panel and the website.
- Change it: Settings → Theme Appearance → Primary colour (admin panel) and the website Theme Appearance (public site). Buttons, links, charts, the sidebar tint and the new module screens all follow it.
- Demo preview: on the demo, visitors can try preset colours from the Customize panel; this only affects their own session.
- Dark mode: the moon icon in the header switches the admin panel to dark mode.
Website Themes
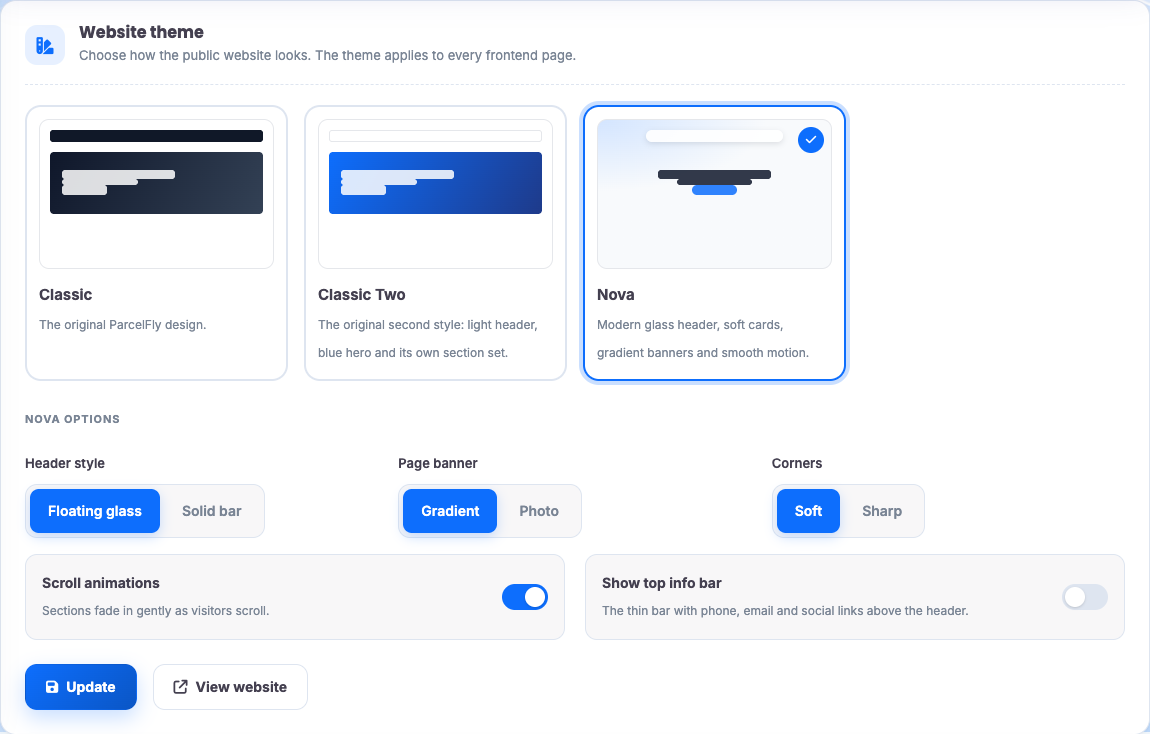
The public website includes three designs. Switching theme changes only the look; your pages, sections, services and data stay the same.
- Classic: The original ParcelFly design.
- Classic Two: The original second style with a light header, blue hero and its own section set.
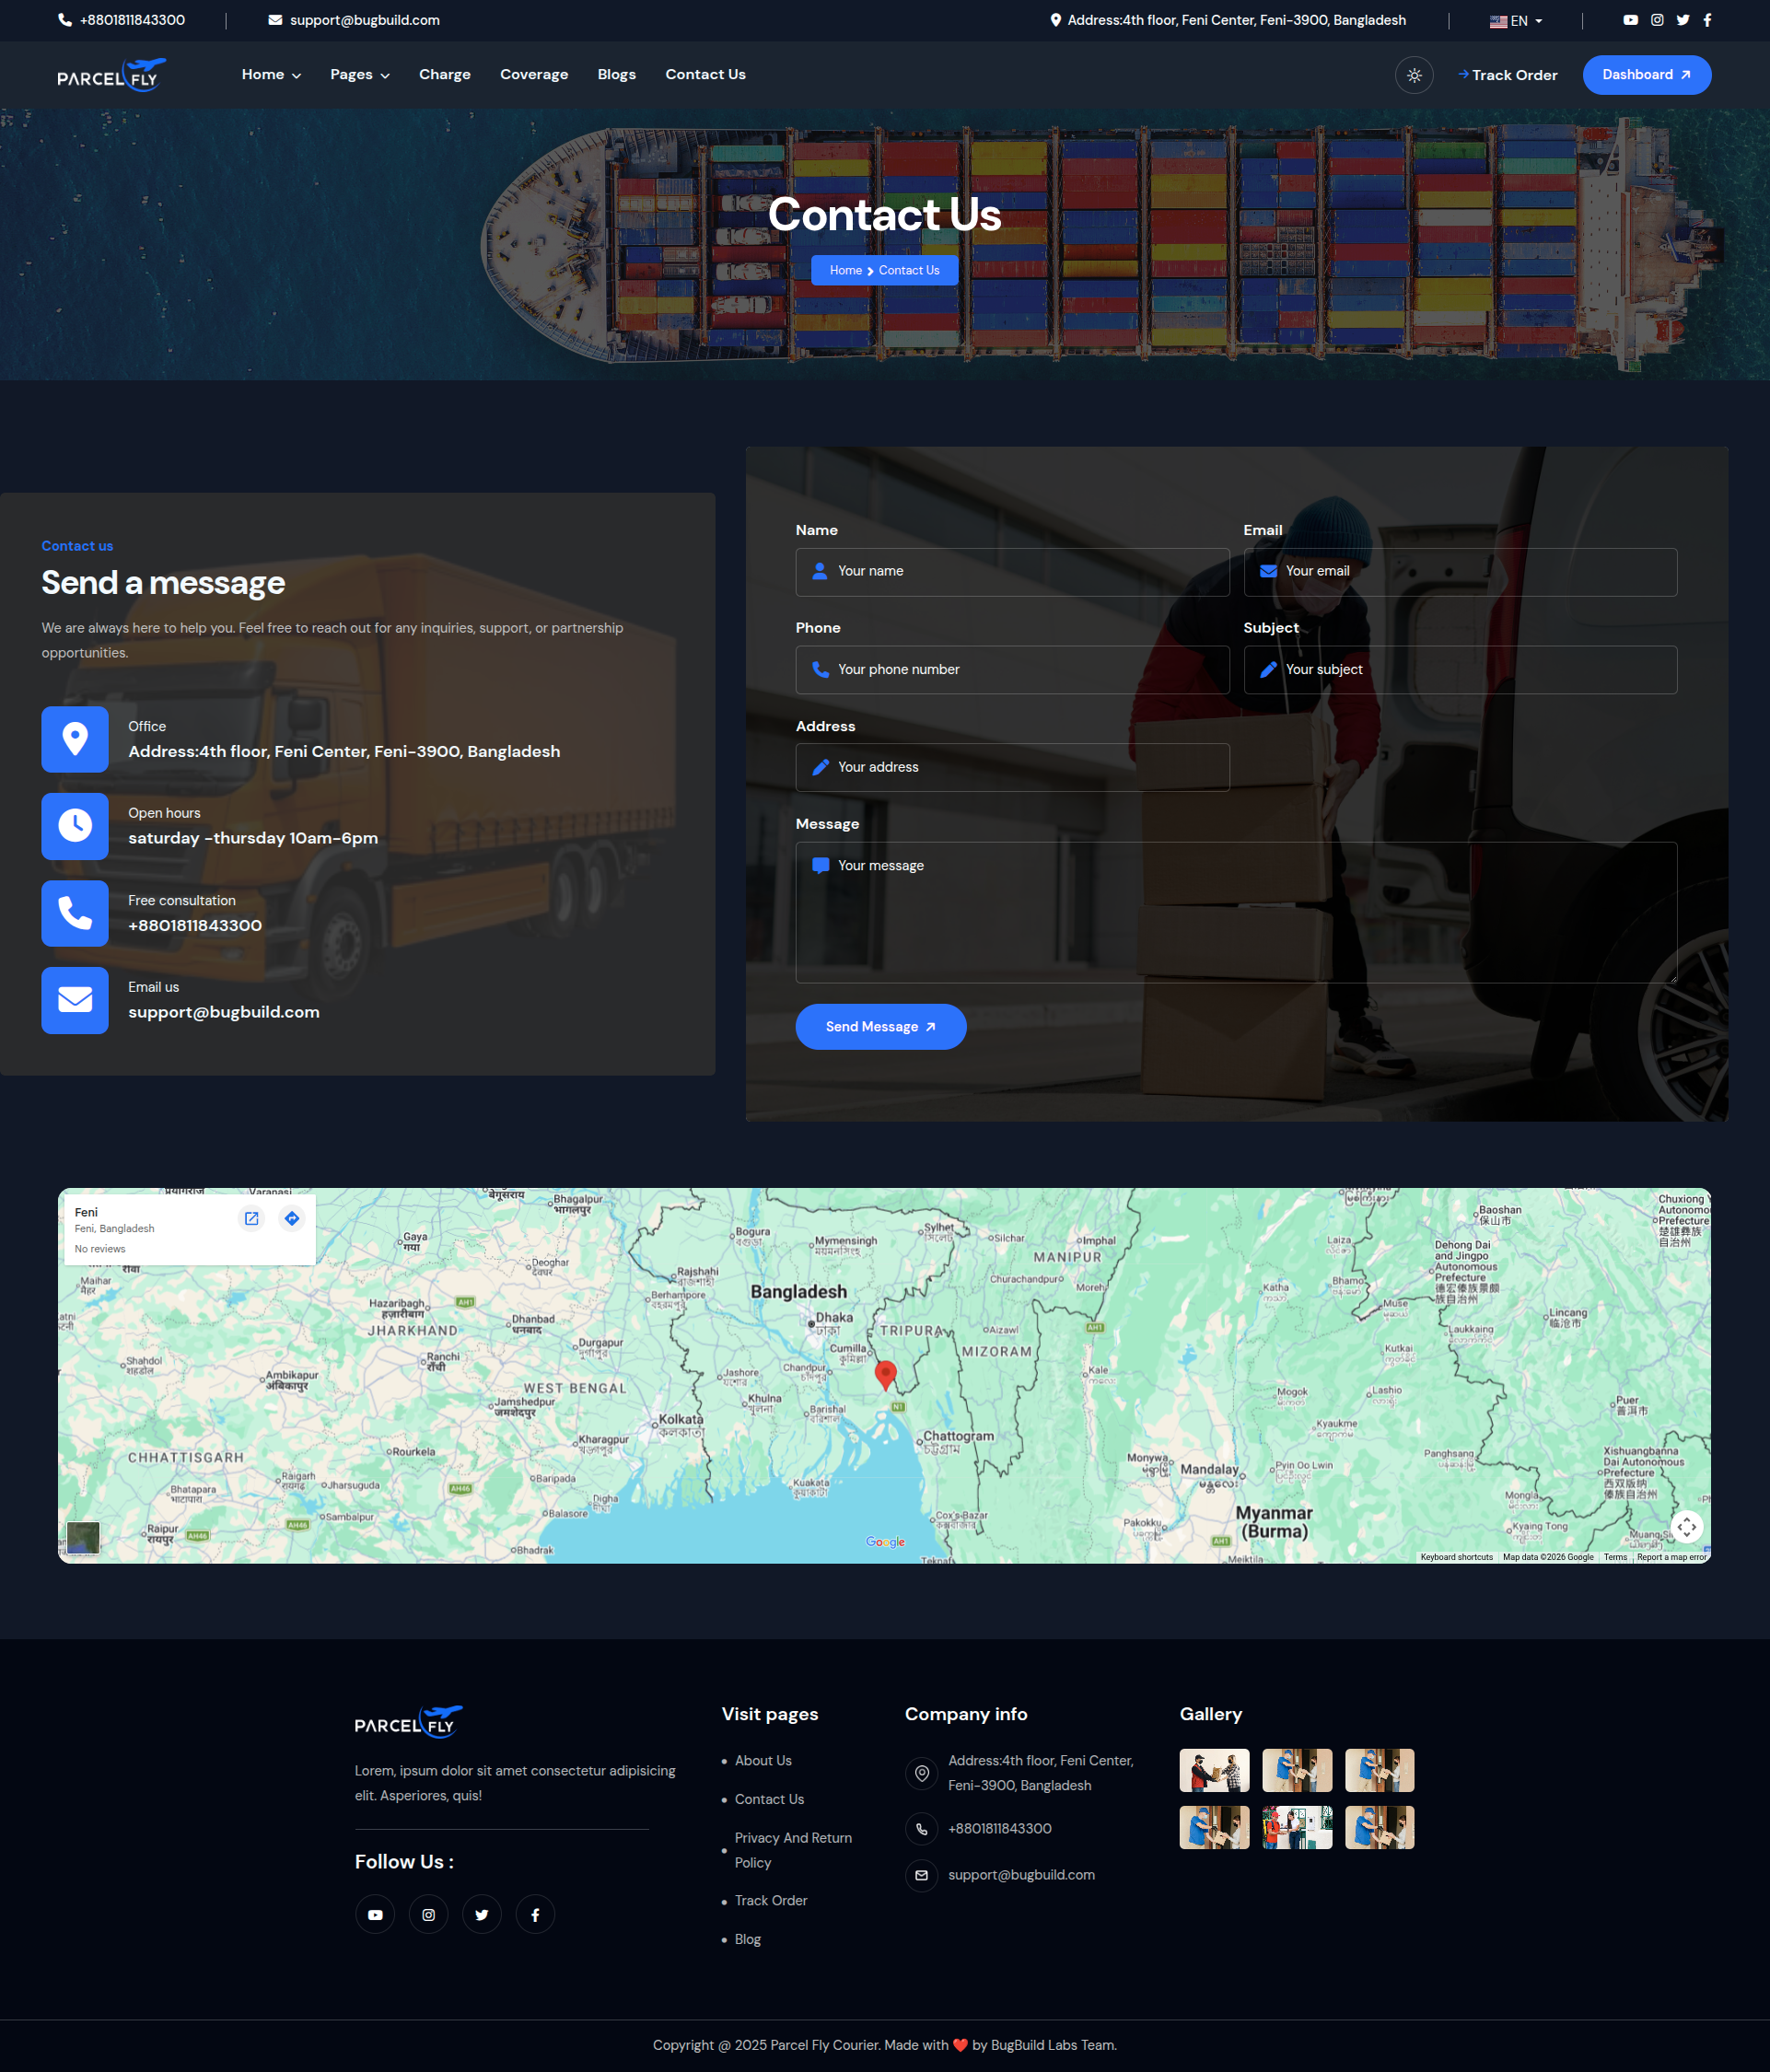
- Nova (default): Modern glass header, soft cards, gradient banners and smooth motion, with dedicated layouts for the coverage, charges, contact, blog and policy pages.
Change the theme: Go to Website Setup → Theme Appearances, select a theme card and click Update.
- Nova options: Header style (floating glass or solid bar), page banner (gradient or photo), corners (soft or sharp), scroll animations and the top info bar.
- Nova homepage content: Edit it in Website Setup → Sections → Nova Home.
- Classic and Classic Two sections: Show, hide and reorder them in Website Setup → Widgets.
Dark Theme Preview
The backend also supports a dark theme, giving users an alternate visual mode for day-to-day dashboard work.
- Theme Switch: Users can work with a darker interface for long sessions or visual preference.
- Same Data Layout: Core dashboard cards, charts, and tables remain accessible in the dark theme.
- UI Consistency: Keeps the same functionality while changing the visual presentation.
Mail Settings
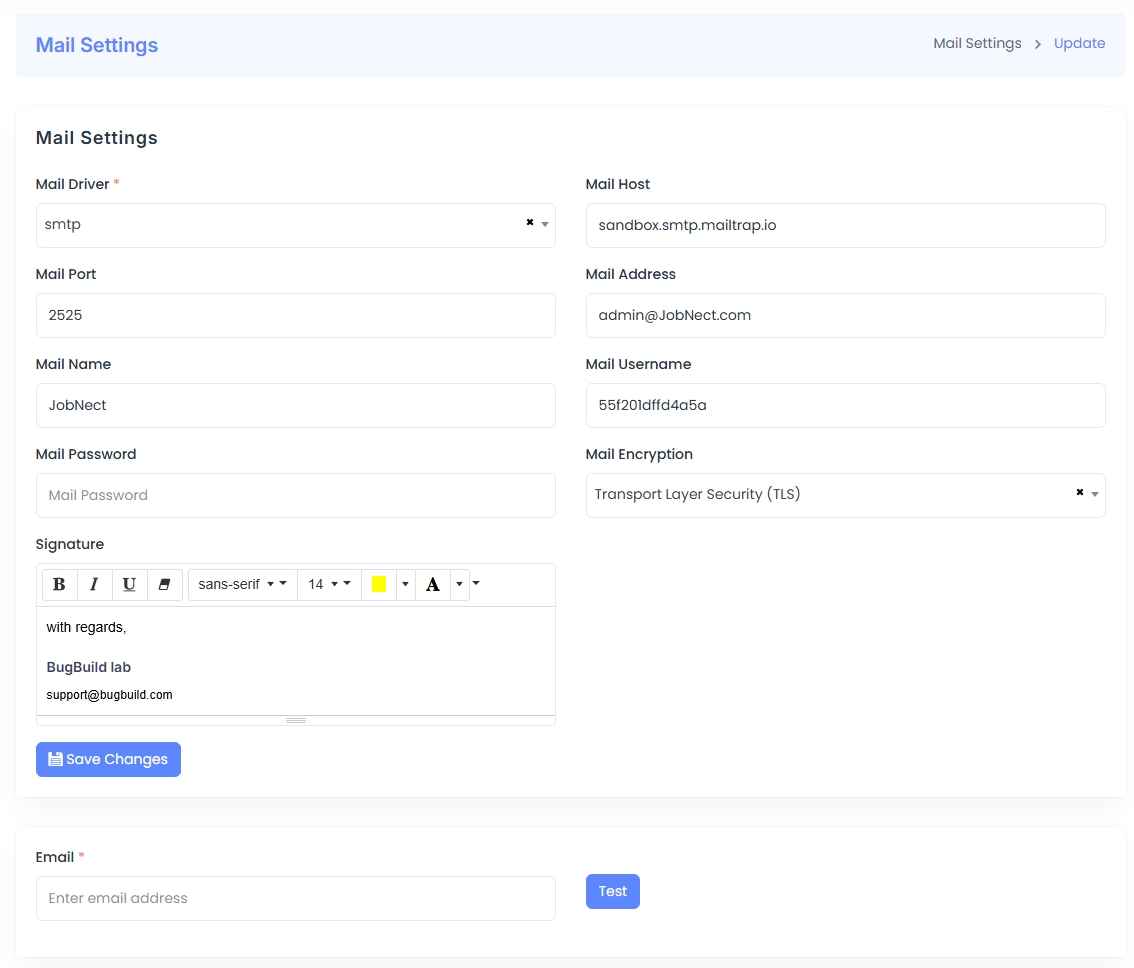
The Mail Settings panel is used to configure email delivery through SMTP or other supported drivers. It includes fields for the mail host, port, encryption method, authentication credentials, and sender identity.
- Driver & Host: Define the mail driver (SMTP) and mail server host (e.g., Mailtrap).
- Port & Encryption: Specify port number and encryption method (TLS/SSL).
- Authentication: Enter mail username, password, and sender address.
- Sender Identity: Configure the sender’s name and signature with optional formatting.
- Test Functionality: A test email can be sent to verify configuration before going live.
After saving, you can use the built-in test email feature to confirm that the configuration is working correctly.
Recaptcha
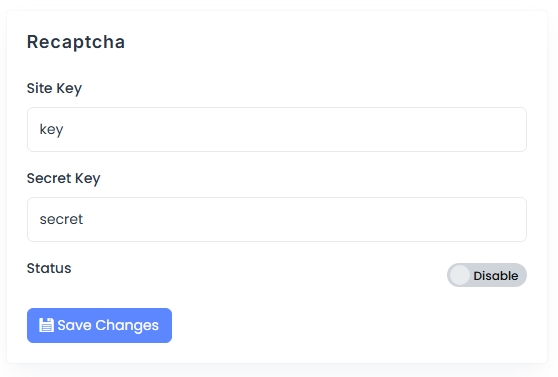
The Recaptcha configuration section protects the application from spam and abuse by using Google reCAPTCHA. Administrators must provide a valid Site Key and Secret Key from the Google reCAPTCHA console.
- Site Key: This is used in the frontend integration of reCAPTCHA.
- Secret Key: Used in the backend to verify the user’s response.
- Status Toggle: Enable or disable reCAPTCHA functionality site-wide.
Click Save Changes to apply the updated reCAPTCHA settings.
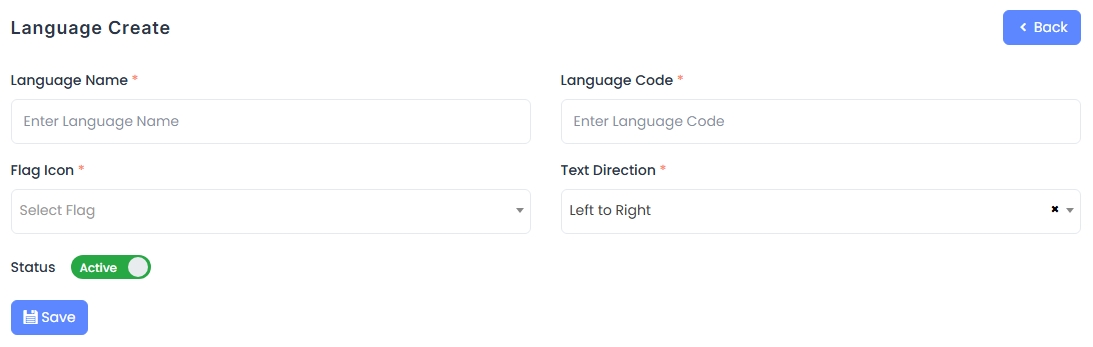
Language Management
The Language Management module allows administrators to manage localization by adding supported languages and translating system phrases.
Module Features:
- Language Create: Form to add a new language with required fields:
- Language Name
- Language Code
- Flag Icon (dropdown)
- Text Direction (e.g., Left to Right, Right to Left)
- Status toggle (Active/Inactive)
- Language List: Displays all configured languages with their flag, name, code, and current status. Each entry includes action buttons for editing or deleting.
- Edit Phrase: Enables translation of application terms per module. Each phrase has a technical key and its translated value, which can be updated inline.
This feature is essential for multilingual deployments, ensuring users see content in their preferred language.